This stitched paper Pocket Notebook was initially made to hold a 'to do' list memo book, turned into a full blown workbook and is based on a previous favourite tutorial HERE;
I've taken step by step photos to show you how this came together, starting with cutting the covers with the die from thick card. I chose to make the spine even more flexible by cutting it away from the main part of the cover and reattaching it with fabric tape (Architape). As I only planned to store a single memo book and some notes the spine was made from just two of the three strip pieces as shown below. You may spot the spacers used to measure the 1/4 inch between the spine and cover each side. I love this clever tool from Cool Katz Craft as it means no more measuring!!!
No measuring for this bit either - I cut a piece of plain cotton calico so that it was large enough to fold around the covers.
Totally inspired by the recent run of coral colour projects over on the PaperArtsy blog I selected a range of Fresco Finish paints with PaperArtsy Eclectica stamp set ESC18 and began playing on some strips of card. You'll also see some teabag paper that is stained with Rusty Car and Golden Sands Infusions.
After cutting the painted card into strips they were glued onto the fabric with some added lace, tea stained paper and Design Tape. These were then stitched in place to give them added stability and more flexibility.
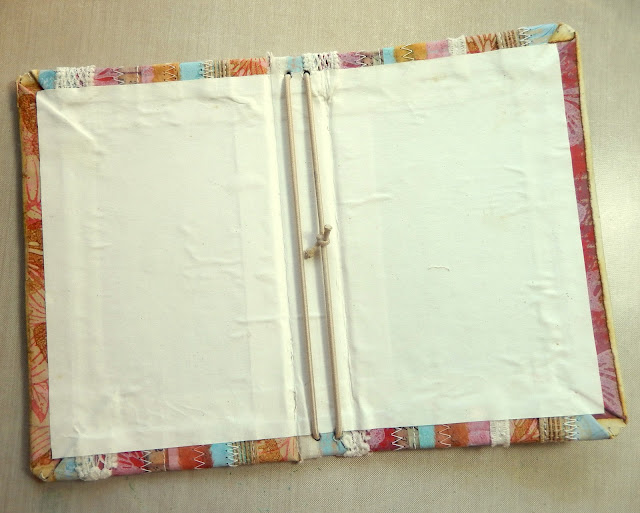
The stitched fabric was stretched over the covers and glued in place. Tea stained copier paper was cut to size and glued onto the insides of the book cover. I also took the chance to re-punch the holes at the top and bottom of the spine so elastic could be threaded through them.
With lots of off cuts remaining from the painted card and stained paper I created a matboard plaque for the front cover using the plaque piece from the Journal die covered in more of the cotton calico fabric. The pen loop for the side of the workbook was created by applying the teabag paper to some Sizzix Paper Leather (Eileen's Easy Cut Adhesive from Thermoweb) before cutting the shape suing the Pocket Notebook die.
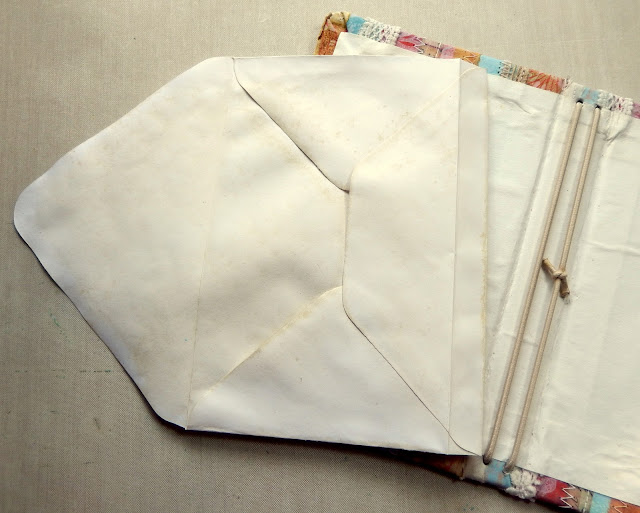
Wanting to create a simple pocket to hold important notes, numbers and references I tea stained a C6 envelope, folded it back by 1.5cm and decorated it with stamping and more strips of paper. Hint; if you are stitching onto the envelope make sure to cover the reverse side with tea stained copier paper to match.
I used more strips of paper to cover a pocket on the back of the book and added the pen loop above it. After stitching the two sides of the loop together I stapled it to the cover, disguising the staples with the top half of the loop.
Here are some close ups showing how I finished the workbook and personalised it further;
You can see here where the plaque was glued to the front cover. A coordinating colour pen was tucked into the pen loop so there's always something to hand to write down those deadlines. A cotton yarn page saver made using Eileen's Twist n Style Tool - I looped it around the elastic at the top of the spine.
Below you'll see the stamp decorated envelope in place together with some index cards, tea stained and trimmed to fit inside.
The front of the envelope flap was covered in more strips of card and paper, with the stitching on the reverse disguised with paper as mentioned previously. You'll also see that a colour coordinated memo book was slipped through the first of the elastic ties.
I often need small bits of paper to make notes about the ingredients used in projects or for adding address labels to packages so the second of the elastic ties was the perfect place to slip through some offcuts of tea stained copier paper left over after making smaller books. This is easily refillable over time.
On the back cover you'll see the extra pocket added as a space to keep other bits as needed.
That's it for this month's Eileen Hull project. For lots more from the Inspiration Team don't forget to check out Eileen's website HERE. And if you haven't yet make sure to get your hands on the new Pocket Notebook die.
Thanks for visiting,
Jenny xxx
A list of PaperArtsy stockists can be found on their blog HERE.


Gorgeous, and I love the papers you stamped.
ReplyDeletewonderful,thank you for the detailed instructions. Ax
ReplyDeleteA stunning book with so many wonderful ideas and inspiration. Thank you Jenny! x
ReplyDeleteI love this journal so much Jenny!! It's one of my favorite makes of yours. =)
ReplyDeleteGoodness Jenny! what a wonderful sewn journal cover - love the colors and patterns and all the fun stitches - so many wonderful creative details on this lovely piece! xx
ReplyDeleteThis book is amazing! Thanks for such a detailed tutorial- they are questions everyone wants to know! The colors are so pretty and the book from the Range is the perfect color to coordinate! (remembering our trip again and smiling :-)
ReplyDeleteFabulous book Jenny as always full of tips and inspiration thanks for sharing.
ReplyDeleteMaggieH
wow this is yet another wonderful book tutorial- love it. Love the idea of sewing paper in strips onto fabric- brilliant!
ReplyDelete