29 April 2020

Sew Sweet for The Funkie Junkie Boutique Blog

Hi everyone and welcome. It's time for another challenge over at the The Funkie Junkie Boutique Blog. Cec is your host for this one and she's called it 'Sew Sweet'.

"Create a shabby chic or vintage project with a sewing theme incorporating items and/or images related to sewing - think rubber stamps of sewing machines or dress forms e.g., fabric, pattern tissue and even notions such as buttons, zippers, thread, etc."

As ever, the Design Team will choose their top four picks, with the winner being invited to join us in a Guest DT spot at The Funkie Junkie Boutique Blog and the next three will receive Top 3 Badges to display on their blogs. Everyone who enters and follows the rules will be entered into the draw to have the chance to win a $25 spending spree at The Funkie Junkie Boutique.

At first glance this must look like another flower topped box but there are lots of sewing elements to it. The intention was to make something a little more shabby chic but the metallic sides took me down more of an industrial path.


Let's show you some of how this box came together so you can better see those sewing elements. It began with the box, die cut from matboard using Eileen's die, assembled and painted along all the edges with 'Sterling' Dina Wakley Media Acrylic Paint. I used a number of Dina's metallic paints to pull a print onto a piece of 12x12 smooth card which was then chopped into six 3 3/4 inch squares.


Two of the squares were glued onto the top and bottom of the box. The remaining four had opaque texture paste pulled through Tim Holtz 'Stitched' Layering Stencil' - once dry it was coloured with a little 'Brushed Pewter' Distress Spray Stain before being rubbed over unevenly with a brown Archival Ink.


More simple hand stitching detail was added across the centre of each panel (a simple running stitch is really effective for this) before I added some sheer ribbon over the top. To help secure it in place and add to the industrial look I popped self adhesive flat back pearl beads over the lace - alter these with alcohol inks to get them to coordinate if needed. Once done these panels were glued onto the sides of the box.


To decorate the top of the box I chose a mix of metal leaves, metal flowers (painted with white gesso and with pearlised stamens through the centre) burgundy crushed silk ribbon and a sprig of Prima Pretty Mosaic 'Aventurine' flowers. To add to the sewing theme I created a couple of flowers with layers of dress pattern tissue (die cut and secured in the centre with buttons) another with layers of crinoline (using the same method and the addition of a gold tinsel embossed centre) and one more with coiled lace.


Here are some close ups of the box to show in more detail the flowers and leaves blended together on the top and the stitching on the textured metallic sides;


That's my take on the theme 'Sew Sweet'. My hugely talented team mates have also come up with their own sewing related projects for this challenge so make sure you hop on over and check out their gorgeous projects HERE. And remember to link up your own shabby chic or vintage projects to be in with a chance of winning one of the fabulous prizes that's up for grabs.

Thanks for visiting,
Jenny xxx

Products used to create this art box are available from The Funkie Junkie Boutique and are listed/linked below.

Sizzix Scoreboards Die by Eileen Hull - Gift Box
Sizzix Alterations Die by Tim Holtz - Tattered Florals
Prima Marketing Pretty Mosaic Flowers - Aventurine
Tim Holtz Layering Stencil - Stitched
Tim Holtz Distress Spray Stain - Brushed Pewter
Dina Wakley Media Acrylic Paints and Gessos
Ranger Texture Paste - Opaque Matte
Ranger Embossing Powder - Gold Tinsel
Ranger Alcohol Ink - Mushroom
May Arts 1.5 Inch Sheer Wired Ribbon - White
May Arts 2 Inch Silky Crush Wired Ribbon - Burgundy
Bronze Leaf Embellishments - Set of 6
Bronze Leaf Embellishments - Set of 4
5 Piece Bronze Flower Beads
Artificial Flower Pearlized Stamen - One Bundle
Buttons
Cotton Crinoline

22 April 2020

To See The World - An Accordion Tiny Book for Eileen Hull Designs

Hi everyone and welcome. This month Eileen Hull's Inspiration Team are sharing more projects, ideas and inspiration using her latest dies - the Tiny Book and Tiny Book Case. I'm really enjoying making mini accordion books with the Tiny Book and decided to incorporate some of Eileen's other dies to create the background and foreground of the six pages inside this one.


You can see on the photo below that the cover is the start of the 'story' which unfolds inside to reveal the words of William Blake (taken from a stamp set curated by Alison Bomber for PaperArtsy). For me though these are difficult times, it is also an opportunity to take more notice of, appreciate and be thankful for all the little things in life that surround us and enrich our lives.


Below you'll see how the accordion pages unfold from within the covers of the book to reveal the whole scene. They are backed onto cotton fabric so that they can open and collapse easily.


I've put together a short tutorial to show you how the book was made.

Tutorial


Start by cutting six pieces of card 3 inches tall by 2 1/4 inches wide and a Tiny Book die cut from white Matboard. Cover all of them with scraps of paper and leaves die cut from book pages using Eileen's 'Journaling Cards Flowers & Leaves' set. Paint over the layers with a wash of dilute 'Gold Rush' Fresco Finish Paint before dry brushing lightly with 'Chalk' Fresco Finish Paint. You may also be able to see below the circular images created by using stamps from Seth Apter's PaperArtsy stamp set ESA12 and the 'Chalk' coloured paint.


To make the leaves stand out more draw around them with a graphite pencil and rub over it gently (I used a paper stub) to soften the lines and overall effect.


Emboss the pages and cover with a swirly embossing folder (or just pick one of your favourites). Use a sanding block to rub gently over the raised areas to remove some of the paint from random areas. Blend some brown dye ink to the edges of the cover and pages.


Either pull some prints using a small Gel Plate and pastel colours (I used a mix of different PaperArtsy Fresco Finish Paints) or pick some unpatterened papers if you'd prefer.


Die cut a mix of houses and 'trees' using Eileen's 'House Ornament' and 'Spring Leaves' dies. At this stage you can apply a little brown dye ink to the edges to add some contrast.


Returning to the embossed pages and book cover rub an embossing ink pad over the raised areas and cover in clear embossing powder, heat setting each one. It doesn't matter if the embossing powder gets onto some of the other areas. I chose to run a silver permanent ink pen along the line at the bottom of the pages and cover. You can add highlights wherever you want depending on the design of embossing folder chosen.


Line up the pages and cover, then arrange the 'trees' and houses along them, spacing and overlapping as you like. Glue them down firmly in place, re-cutting in between the pages where you've overlapped the trees.


Tear a strip of cheap cotton fabric about 3 1/4 inches wide and stick onto the inside of the book cover using dry adhesive (like Sizzix Adhesive sheets). Then glue two of the pages onto the inside of the cover avoiding the spine area. Finally space the remaining four pages along the rest of the cotton strip leaving a 3/8 inch gap between each one (I used a spacer from Cool Katz Craft to make this easier). Trim at the end and fray all the edges.


To complete the cover and pages doodle in some patterns and images of your choice. I went with simple grass, flowers, spots and dots using black and white gel pens. Stamp the words from Alison Bomber's PaperArtsy stamp set EAB16 'Magic & Wonder' in permanent black ink onto white card before trimming them and mounting them onto the cover and pages.

Here are some close ups of the finished pages;


I hope this project has given you ideas for creating your own mini accordion books using Eileen's dies. Make sure to check out what the rest of the team have made by visiting Eileen's website.

And if you haven't already got your 'Tiny Book' and 'Tiny Book Case' Dies here are links to a couple of independent retailers;
UK - Country View Crafts
US - The Funkie Junkie Boutique

For now, thanks for visiting,
Jenny xxx

15 April 2020

A Mother's Love for The Funkie Junkie Boutique Blog

Hi everyone and welcome. It's time for another challenge over at the The Funkie Junkie Boutique Blog. Sara Emily is your host for this one and she's called it 'A Mother's Love'.

"A mother's love can mean so many different things to different people. With this challenge I invite you to take some time to reflect on what it means for you and create a vintage or shabby chic project for your mother or a special woman in your life to let them know how much you love them. Be sure your project has the word "love" somewhere on it where it will be noticed."As ever, the Design Team will choose their top four picks, with the winner being invited to join us in a Guest DT spot at The Funkie Junkie Boutique Blog and the next three will receive Top 3 Badges to display on their blogs. Everyone who enters and follows the rules will be entered into the draw to have the chance to win a $25 spending spree at The Funkie Junkie Boutique.

This challenge has been a particularly difficult one for me as we lost my Mum unexpectedly at the beginning of the year. Two things spring to mind immediately when thinking of her; firstly she had a real passion for her garden, particularly the flowers, and was forever thinking of the next additions that could be made. Secondly she was an amazing seamstress, making many of our childhood clothes by hand and embroidering beautiful pieces for the wall and home which we treasure still. So I wanted to incorporate both of those things in my project for this challenge and came up with an embroidered Tiny Book seen below.


This Tiny Book uses some of the new designs from Wendy Vecchi in a different way than you've maybe seen them. I've put together a tutorial below to show you how it came together.

The Tutorial


To start I cut a piece of cotton calico fabric about one and a half times the size of Wendy Vecchi's 'All Scratched Up' Background Stamp and painted it with Dina Wakley Media 'Sand' Acrylic Paint diluted with some water. When dry it makes the fabric stiff which is perfect for stamping on. I then stamped the All Scratched Up background onto the fabric using Violet permanent ink.


Looking at the background you can see lots of different patterns - I chose to add stitches into the open spaces within each 'square' shape using a cream coloured cotton thread. Again a bonus of the fabric being stiffened by the paint is that you don't need to use an embroidery hoop or frame in order to stitch through it.


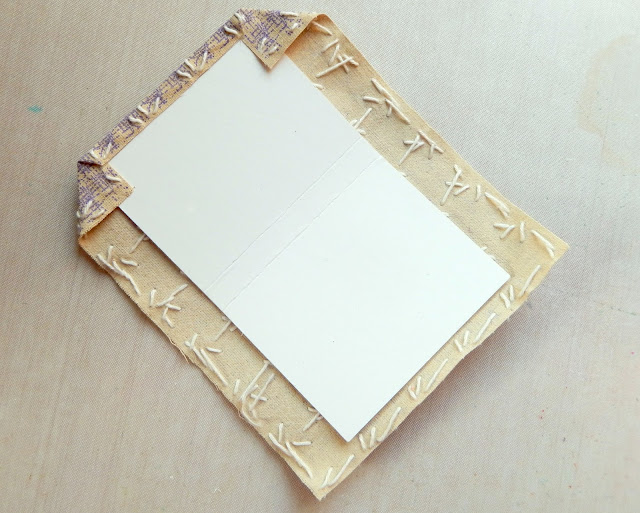
I cut a Tiny Book from matboard using Eileen Hull's newly released die and used the stitched fabric to cover it using self-adhesive sheets and tape as shown below - as you can see Wendy's background is a perfect fit! The reason for using dry adhesive rather than wet glue is to prevent it 'bleeding through' the fabric and affecting the finished look of the book.


Next up I coloured a piece of seam binding with Dina Wakley Media 'Heather' Acrylic Paint mixed with a little water. When dry it stiffens making it great for holding the crinkles when you scrunch it and hold the shape of tied bows.


Wrapping the seam binding around the spine of the book, tying it in a double bow on the outside of the cover. Once done I made a text block from tea stained copier paper and bound it into the book cover.


Turning back to the leftover painted fabric I stamped the smaller of the open flowers from Wendy Vecchi's MAKE ART 'Thank You' set using her Poppy Archival Ink.


The open design is perfect for embroidery - I used satin stitch across the petals with embroidery thread (floss) and then dropped Wendy Vecchi's 'Orange Blossom' Liquid Pearls into the centre to represent the stamens. It's worth doing this and ensuring the liquid is set firm before you stitch around the centre to prevent any 'bleed' into the embroidery thread.


With the flower done I decided to create some petals, again using a stamp from the 'Thank You' set on the painted fabric. This time I used Dina Wakley Media 'Lime' Acrylic Paint to do this.


In order to fit the 'leaves' around the flower on the book cover I decided to cut some of them apart before stitching them with a similarly coloured embroidery thread.


Stitching complete my attention turned to completing the front of the book. I added a piece of tea stained lace trim from my stash first and then added the leaves across three corners. Linda stocks some wonderful flower stamens which can be used to create your handmade flowers or in this case to bundle behind the stitched flower. You'll see for this part I used wet glue to hold them firmly in place and did the same with the flower, leaves and lace - you could use a hot glue gun or silicone glue to achieve this too.


To complete the challenge and the book I needed to include the word LOVE and add some trinkets to the spine. For this purpose I picked the appropriate Story Stick from my stash, die cut a small matboard key using Eileen's die and also chose a wonderful heart charm from Linda's store. These were altered with touches of Dina Wakley Media 'Black' and 'Sterling' Acrylic Paint along with Gunmetal Mixative Alcohol Ink in order to coordinate their look. These were attached to the bow with silver jump rings.


Here are some close ups of the finished book so you can see more of those details;


That's my take on the theme 'A Mother's Love'. My hugely talented team mates have also come up with their own projects for this challenge so make sure you hop on over and check out their gorgeous projects HERE. And remember to link up your own shabby chic or vintage projects to be in with a chance of winning one of the fabulous prizes that's up for grabs.

Thanks for visiting,
Jenny xxx

Products used to create this art box are available from The Funkie Junkie Boutique and are listed/linked below.

Sizzix Scoreboards Die by Eileen Hull - Tiny Book
Studio 490 Wendy Vecchi Background Stamp - All Scratched Up
Wendy Vecchi MAKE ART Stamp/Die/Stencil Set - Thank You
Dina Wakley Media Acrylic Paints and Gessos
Ranger Wendy Vecchi Liquid Pearls - Orange Blossom
Ranger Archival Inks
Ranger Tim Holtz Alcohol Ink Metallic Mixative - Gunmetal
Antique Silver Heart Charm
Artificial Flower Pearlized Stamen - One Bundle
Silver Tone Jump Ring Set
Seam Binding

1 April 2020

April Flowers Bring May Flowers at The Funkie Junkie Boutique Blog

Hi everyone and welcome. It's time for another challenge over at the The Funkie Junkie Boutique Blog. Maggi is your host for this one and she's called it 'April Flowers Bring May Flowers'.

"Design a vintage or shabby chic project that incorporates a wet "something" with flowers. Examples: Stenciled or doodled raindrops, water distressed or crumpled paper, Tim Holtz's Umbrella Man, you get the idea, just have something that represents wet. Then, add some flowers to your project."

As ever, the Design Team will choose their top four picks, with the winner being invited to join us in a Guest DT spot at The Funkie Junkie Boutique Blog and the next three will receive Top 3 Badges to display on their blogs. Everyone who enters and follows the rules will be entered into the draw to have the chance to win a $25 spending spree at The Funkie Junkie Boutique.

Today is a special day as it sees the release of a whole host of Sizzix Chapter 2 dies and embossing folders. For this project I've chosen to share with you brand new Sizzix Scoreboards Dies from Eileen Hull - the 'Tiny Book' with it's coordinating 'Tiny Book Case'.


This Tiny Accordion Book and matching Tiny Book Case feature papers, flowers and a mould from a gorgeous Prima Marketing collection called 'Pretty Mosaic' and are enhanced with new stamps by Wendy Vecchi. Here are a couple of close ups of the floral cluster on the closure band for the embossed Tiny Book Case - note the glistening 'raindrops' on the flowers and leaves.


And here's a closer look at the cover of the Tiny Book, holding an accordion pull out inside.


Inside the paper, stamped flowers and trims have been put together to represent the journey along a flower strewn garden path.


Again, here are some close ups to show the details - it's really hard to capture on camera the clear embossed dots representing more pf those raindrops but the stitched rainbows are a little easier to spot;


Now, I've put together a step by step tutorial for recreating this accordion book and case.

The Tutorial


Start by cutting a piece of matboard/mount board 3 1/4" x 5 1/4" and glue to the reverse of one of the double-sided sheet of the patterned paper 13/4" from the left side (as shown below).


Cut around the paper then turn to the front. You'll see the words and flowers are nicely lined up. Run through with the Tim Holtz 'Roses' Embossing Folder.


Run the embossed paper covered board piece through your die cutting machine with the Tiny Book Scoreboards Die as shown below.


Cover the inside of the book with a piece of cloth, trim to fit and fray the edges.


At this point I realised that the frayed edges at the top and bottom were a much paler colour than those at the size due to the two toned fabric I'd used, so I diluted a little Sand Acrylic Paint and coloured them to match. It occurred to me that if you don't have fabric of this colour you could always die yours with the same paint, allowing it to dry before sticking it to the reverse of the book cover.


Next cut a 3" tall strip of the mosaic paper as shown below.


Paint an uneven line along the bottom of the strip using Aloe Acrylic Paint.


On a piece of thin paper stamp and emboss the stylised roses from Wendy Vecchi's 'Rosy Art' stamp set with white embossing powder. I used tea stained paper, but you could easily use paper coloured with a little Antique Linen Distress Ink.


Dilute some Acrylic Paint - Blushing, Eggplant and a mix of Evergreen and Black - with water. Paint the roses and leaves then splatter a little of the green colour over the strip.


Cut around the flowers and stick them over the painted line on the mosaic paper.


Cut a 2" panel from the left hand side of the strip. Fold the remaining strip into more 2" sections as shown below.


Apply Transparent Gloss Texture Paste through the dots stencil in the Wendy Vecchi MAKE ART 'Thank You' Stamp/Die/Stencil Set over each of the panels.


Hand-stitching if you like (mine's a basic running stitch in semi-circular patterns) before adding Tim Holtz Clippings Stickers over the flowers and on the front cover of the Tiny Book. I ran a little edge of dilute Umber Acrylic Paint around them to make them stand out more but would probably use a little lighter shade of grey in hindsight. You'll have seen from the finished book photos at the beginning of this post that I also added lace trim, self adhesive gems and pearls and a few die cut tiny butterflies painted with the Blushing Acrylic Paint and a little White Gesso.


Now for the Tiny Book Case; cut a piece of matboard/mount board 8 1/4" x 6" and stick it onto the same piece of patterned paper used for the Tiny Book cover as shown below.


Run the paper covered board through your die cutting machine with the Tiny Book Case Die to cut out the basic case shape before embossing it with the Tim Holtz 'Roses' Embossing Folder.


Paint the inside of the case with Sand Acrylic Paint and when dry fold in along the scorelines before gluing the case together at the sides.


Press moulding clay into the butterfly shape on the Pretty Mosaic Mould and when dry paint with Blushing Acrylic Paint, highlighting with White Gesso. You'll see here I made two butterflies but ended up only using one and instead moulded some of the small roses from the garland shape.


There are a number of beautiful flower branches in the Pretty Mosaic line and I chose these fuchsia coloured ones as they matched the Eggplant Acrylic Paint but there are also the most adorable peach and mint shades in stock. Add dots of Glossy Accents onto the top three flowers and surrounding leaves, and when dry cut off that top section from the main branch.


Finally cut a strip of wire edged burlap ribbon long enough to wrap around the finished case. Decorate it with the flowers, moulded pieces and a paper covered key using the Tiny Book Die, cut from the waste left over from the case.


And as a reminder here's the finished Tiny Book and Tiny Book Case;


That's my take on the theme 'April Flowers Bring May Flowers'. My hugely talented team mates have also come up with their own floral creations incorporating some form of rain for this challenge so make sure you hop on over and check out their gorgeous projects HERE. And remember to link up your own shabby chic or vintage projects to be in with a chance of winning one of the fabulous prizes that's up for grabs.

Thanks for visiting,
Jenny xxx

Products used to create this art box are available from The Funkie Junkie Boutique and are listed/linked below.

Sizzix Scoreboards Die by Eileen Hull - Tiny Book
Sizzix Scoreboards Die by Eileen Hull - Tiny Book Case
Sizzix Texture Fades Embossing Folder by Tim Holtz - Roses
Prima Marketing 12 x 12 Paper Pad - Pretty Mosaic
Prima Marketing Silicone Mould - Pretty Mosaic
Prima Marketing Flowers - Pretty Mosaic
Dina Wakley Media Acrylic Paints and Gessos
Studio 490 Wendy Vecchi Stamp Set - Rosy Art
Wendy Vecchi MAKE ART Stamp/Die/Stencil Set - Thank You
Tim Holtz Ideaology Clipping Sticker Book
Ranger Embossing Powder - White
Ranger Texture Paste - Transparent Gloss
Ranger Glossy Accents
May Arts Burlap Wired Ribbon

Related Posts Plugin for WordPress, Blogger...