27 May 2020

Tickled Pink at The Funkie Junkie Boutique Challenge Blog

Hi everyone and welcome. It's time for another challenge over at the The Funkie Junkie Boutique Blog. Maggi is your host for this one and she has called it 'Tickled Pink!"Design a vintage or shabby chic project using the color pink. You may use other colors as accents, but, pink must be predominant. There are many shades of pink ranging from fuschia to soft baby pink so let your pink imagination go wild!"

As ever, the Design Team will choose their top four picks, with the winner being invited to join us in a Guest DT spot at The Funkie Junkie Boutique Blog and the next three will receive Top 3 Badges to display on their blogs. Everyone who enters and follows the rules will be entered into the draw to have the chance to win a $25 spending spree at The Funkie Junkie Boutique.

I returned to book making for this challenge, basing my project on Eileen Hull's 'Tiny Book' die, wanting to play with collage even in such a small space.The various shades of pink are complimented by the touches of gold, lime and olive, highlighted in places with touches of white.


This Tiny Book has a hinged spine to make it more flexible (using the same method employed for my larger books). I chose a gel plate print incorporating pinks and golds (Dina Wakley Media Acrylic Paints) to decorate the covers. Barely noticeable but important neverthless, Wendy Vecchi's 'All Scratched Up' Background has been stamped on top using her 'Pink Peony' Archival Ink.  I tied some of the dyed seam binding we all get when ordering bundles of lace and embellishment packets from Linda's store around the spine and to compliment it stained some of Linda's lace using 'Tattered Rose' Distress Stain to edge the spine both sides.


The flower and leaves on the front cover are from Wendy Vecchi's 'Funky Flower Art' stamp set, stamped on the coordinating Mat Minis and painted with a mix of Dina Wakley Media Paints and 'Tattered Rose' Distress Paint to match the lace and seam binding ribbon. The Lime and Olive leaves contrast strikingly and adding white highlights in areas really makes them pop against the pink background. To make it even more interesting they are layered over a collage of scraps from previous projects, all intended to compliment rather than overpower the flower. Ever since we had a challenge based on using leftovers I've kept them in separate bags based on colour to make this process so much easier. To finish I bound a tea stained text block inside in the same way as all my larger books.


That's my take on the theme 'Tickled Pink!' My massively talented team mates have also come up with their own pink projects for this challenge so make sure you hop on over and check them out HERE. And remember to link up your own shabby chic or vintage projects to be in with a chance of winning one of the fabulous prizes that's up for grabs.

Thanks for visiting,
Jenny xxx

Products used to create this Tiny Book are available from The Funkie Junkie Boutique and are listed/linked below.

Sizzix Scoreboards Die by Eileen Hull - Tiny Book
Studio 490 Wendy Vecchi Background Stamp - All Scratched Up
Studio 490 Wendy Vecchi Stamp Set - Funky Flower Art
Studio 490 Wendy Vecchi Mat Minis - Funky Flower Art
Dina Wakley Media Acrylic Paints and Gessos
Ranger Distress Paints - Tattered Rose
Ranger Wendy Vecchi Archival Ink - Pink Peony
Seam Binding

26 May 2020

May Flowers with Eileen Hull Designs

Hi everyone and welcome. As we are now surrounded by May flowers this month Eileen Hull's Inspiration Team are sharing projects, ideas and inspiration with a distinctly floral twist. I've got a couple of projects to share with you today, both based on Eileen's 'Notebook' die.


This little hand bound notebook uses Eileen's 'Stitchy Flowers' dies to create the decoration for the front cover and was designed based on the scrapbook papers I found in my stash for use inside. I've put together a tutorial to show you how the cover came together.


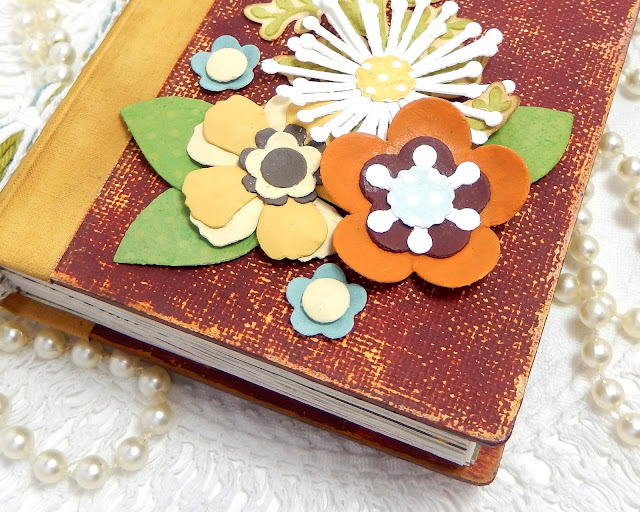
I think the scrapbook papers chosen were from a bumper pack of K&Co ones that I tea stained a while back. You'll see from the photo below how the burgundy/brown background looks like it's worn away with hints of a paler colour beneath. I replicated that look by covering the two sides of the Notebook cover in canvas before painting them with 'Mustard Pickle' Fresco Finish Paint from PaperArtsy (you'll see that the spine was removed before doing this).


I then painted over the top with 'Mahogany' Fresco Finish Paint to echo the main colour visible on the paper.


To get that worn look I used a sanding block on both covers to reveal some of the yellow colour beneath.


The removed spine was re-attached using Architape, some Hinge Spacers and a Teflon Tool, all from Cool Katz Craft in order to make it more flexible.


To match the white tape spine with the covers I painted it with 'Haystack' Fresco Finish Paint and then blended 'Walnut Stain' Distress Oxide Ink around the edges to give it an aged look.


I drew inspiration for the flowers on the front cover from more of the scrapbook papers inside the book. This first one used the larger stamens from Eileen's 'Stitchy Flowers' die set with a centre stamped using Wendy Vecchi's 'Reverse Dots' Background Stamp.


I used the same 'Reverse Dots' stamp to decorate the painted leaves to echo some of those on another of the paper designs. More of Eileen's 'Stitchy Flowers' were painted using 'Haystack', 'Vanilla' and 'Mud Splat' Fresco Finish Paints before being layered together.


The final 'Stitchy Flowers' were inspired by another of the papers, this time using more Fresco Finish Paints in 'Terracotta', 'Niagara Falls', 'Vanilla' and the 'Mahogany' colour used for the cover. All of the flowers were layered over a Wendy Vecchi designed stencilled fern that had been in my stash for ages.


The tassle and cord hanging from the spine of the notebook were created with coordinating cotton yarn using Eileen's 'Twist N Style Tool'. With the cover and spine finished I added the text block, made from those scrapbook papers and other tea stained paper, inside following the tutorial I first shared HERE.


Here are some close ups of the finished hand bound notebook;


And now for something completely different - at the beginning of this post I promised you two floral notebooks and here's the second one below. Last weekend I was lucky enough to join in the fun at Eileen's 'Beach House Art Retreat' on Facebook. From her beautiful beach home Eileen guided us step by step through three individual and very different project including this gorgeous idea for a felt pouch based on the Notebook die.


Again Eileen's flower dies were used to decorate the front along with some embroidery and the projects that everyone made are amazing. I chose to line my version with some matching faux suede to cover the stitching on the reverse and added a pockets at either side as shown below. We had so much fun together taking part in Eileen's virtual retreat and although the sand may not have been under our feet, the sun shone and the attendees all enjoyed themselves immensely - if she holds another one I can highly recommend it!


I hope the projects shared have given you some ideas and inspiration for creating your own notebooks using Eileen's dies. Make sure to check out what the rest of the team have been creating this month incorporating flowers by visiting Eileen's website.

For now, thanks for visiting,
Jenny xxx

19 May 2020

Wildflowers Notebook with PaperArtsy Infusions for MarteLAB

Hi everyone and welcome. A quick heads up that I'm sharing the tutorial for a new fabric covered notebook over on the MarteLAB blog today.


Hope you can join me over there to find out how this came together.

Thanks for visiting,
Jenny xxx


13 May 2020

Oh Man at The Funkie Junkie Boutique Challenge Blog

Hi everyone and welcome. It's time for another challenge over at the The Funkie Junkie Boutique Blog. I'm your host for this one and have called it 'Oh Man!"Fathers Day may be a way off yet but there are always other occasions and reasons for making something for the men in our lives. For this challenge create something which you feel has a more masculine look."

As ever, the Design Team will choose their top four picks, with the winner being invited to join us in a Guest DT spot at The Funkie Junkie Boutique Blog and the next three will receive Top 3 Badges to display on their blogs. Everyone who enters and follows the rules will be entered into the draw to have the chance to win a $25 spending spree at The Funkie Junkie Boutique.

This tag is a bit of a fantasy piece based around an idea I had for making aged looking bottles with a bunch of ephemera. And inspired by one of Cec Wintonyk's projects for a previous TFJB challenge I added a little male fairy to the centre.


You can see from the photo below that the base tag is an Aquamarine colour with flecks of Gilt and Ancient paint, all Dina Wakley Paints that were used to pull a print from a Gel Press Plate. I added a splattered Texture Paste pattern over the top using a Tim Holtz 'Grime' Layering Stencil. The rusty looking background card layer was a leftover piece from a previous project HERE which had the 'Grime' pattern stencilled onto it before being stamped with script from the Tim Holtz 'Ledger Script' stamp set. This was layered onto gold Tim Holtz Metallic Kraft Stock and tea stained copier paper before being mounted onto the tag base.


The bottles which have a semi-translucent look, were cut using Tim Holtz 'Bottled Up' Bigz Die from the die packaging. I scuffed up both sides, wiping a little of the Aquamarine paint into the scratches one side and Umber paint into the scratches on the other side. I glued thin velum onto the aqua side and splattered Black gesso onto the brown side to add to the timeworn look. After adding little hand cut 'corks' to the tops I stamped a range of labels from the Tim Holtz 'Field Notes' stamp set and stuck those onto the bottles.


Again, you can better see from the close up photos how a collage stack of ephemera and printed paper was added beneath the bottles - this included a large ticket from the Tim Holtz 'Ticket Book' collection and some more stamped images from the Field Notes set.To finish the tag I added the Paper Doll boy with his Transparent Wings along with various Ideaology metal embellishments covered with a little more of the Aquamarine paint. The sentiment which the boy is resting his hand on comes from the Tim Holtz 'Clippings' Sticker Book.


That's my take on the theme 'Oh Man!' My hugely talented team mates have also come up with their own male themed projects for this challenge so make sure you hop on over and check out their gorgeous projects HERE. And remember to link up your own shabby chic or vintage projects to be in with a chance of winning one of the fabulous prizes that's up for grabs.

Thanks for visiting,
Jenny xxx

Products used to create this art box are available from The Funkie Junkie Boutique and are listed/linked below.

Tim Holtz Sizzix Alterations Bigz Die - Bottled Up
Tim Holtz Stamp Set - Field Notes
Tim Holtz Stamp Set - Ledger Script
Tim Holtz Layering Stencil - Grime
Tim Holtz Ideaology 'Clippings' Sticker Book
Tim Holtz Ideaology 'Ticket Book'
Tim Holtz Ideaology 'Baseboard Dolls'
Tim Holtz Ideaology 'Hinge Clips'
Tim Holtz Ideaolgy 'Index Clips Fasteners'
Tim Holtz Ideaology 'Vignette Accents'
Tim Holtz Ideaology Metallic Kraft Stock
Dina Wakley Media Paints and Gesso

Related Posts Plugin for WordPress, Blogger...