28 July 2021

Shimmering Summer Fun at The Funkie Junkie Boutique Blog

Hi everyone and welcome. Janna is hosting the latest challenge over on The Funkie Junkie Boutique Blog and she's called it 'Shimmering Summer Fun'; "Use bright summer colors in your project and add some shimmer, shine, or sparkle to it. Does summer make you think of sparkling blue oceans, family vacations, or flowers in full bloom? We want to know, so add some shimmer to your cards, tags, scrapbook pages, and journal spreads. Happy crafting! "

The Design Team will choose their top four picks, with the winner being invited to join us in a Guest DT spot at The Funkie Junkie Boutique Blog and three additional outstanding entries will receive Top 3 Badges to display on their blogs. Everyone who enters and follows the rules will be entered into the draw to have the chance to win a $25 spending spree at The Funkie Junkie Boutique.

For this challenge I have created a few more ornaments with some of Eileen Hull's new Sizzix Chapter 3 dies - the 3-D Scoreboards L Die 'Box, Ornament' and the Thinlits Die Set 'Wreath & Snowflake'. The colours used are inspired by the soft summer fruits growing in our garden and there's plenty of pearl and golden shimmer on show.


The card used to build these ornaments was created with a mix of Dina Wakley Media Acrylic Paints in Blackberry, Fuchsia, Gilt and White (with a touch of Seth Apter 'Stratosphere' Izink Pigment layered over). A brayer and spatula were key to blending and layering the various paints.


This first ornament was based on the snowflake shape from the 'Wreath & Snowflake' die set with crystals and pearls added for a touch of glamour. The large bead and smaller pearls were coloured with Ranger Tim Holtz Alcohol Pearl ink in 'Intrigue' to match with the Fuchsia paint colour.


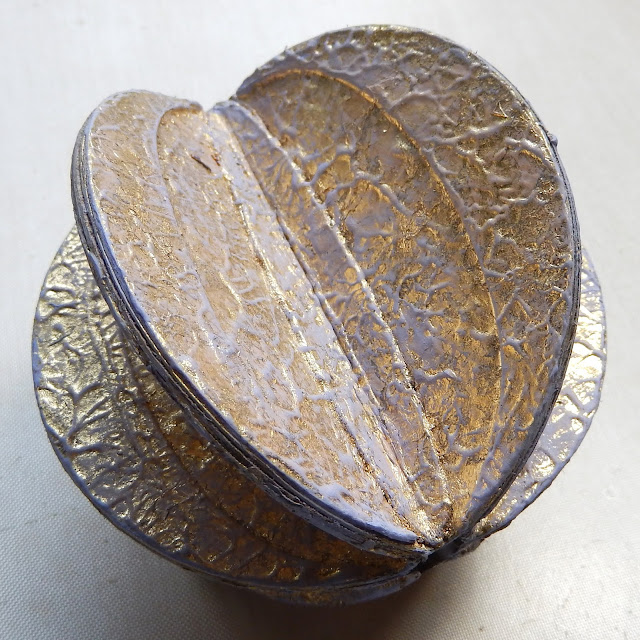
The round ornament was based on the circular base from the 'Box, Ornament' die, shaped as shown in my previous FJB post and filled with thick gel paste to help it hold its domed shape. The surfaces on both sides had leaf stems and berries, cut from the 'Wreath & Snowflake' die set, glued on in a spiral pattern with more crystals and Alcohol Pearl altered pearl beads added. Some 'White Fire' Prima Alchemy Matte Wax was blended along the edges to create more shimmer.


The final ornament was based on the wreath shape from the 'Wreath & Snowflake' die set, cut many times and glued together to make a more substantial base. The edges again had some 'White Fire' Prima Alchemy Matte Wax blended along them and more of the leaf stems and berries were die cut and layered on top of each side. A final sprinkle of crystals and Alcohol Pearl altered pearl beads were added to finish it.


So that's my take on the 'Shimmering Summer Fun' theme. For even more inspiration the rest of the Design Team have come up with their own projects for this challenge so make sure you hop on over and check them out HERE.

21 July 2021

Festive Ornaments for Eileen Hull Designs

Hi everyone and welcome. This month Eileen Hull's Teams are sharing projects using Eileen's new Sizzix Chapter 3 dies as part of the launch celebrations this month. For my second project of the month I have combined two of the new dies, the Sizzix Scoreboards L Die 'Box, Ornament' and the Thinlits Die Set 'Wreath & Snowflake' to bring you some more festive ornaments. Each one has been given a different yet complimentary look using some of the products from Sizzix Effectz range.


To show how each of these ornaments was created here's a closer look at each one individually together with a 'how to' tutorial, starting with the largest.


This one started with me cutting six of the ornament shapes and their matching elliptical stripes using Eileen's 'Box, Ornament' Die from thick card, gluing the the shapes together and then folding each one in half lengthwise (as shown below). To give them some extra dimension I added a coat of Sizzix 3D Adhesive from the Sizzix Effectz range with a spatula, patting over the surface to give it a stippled look.


For the best results you have to leave the adhesive to 'cure' and go clear before adding anything on top. At that point I took some 'Gold' Sizzix Decorative Metallic Flakes and pushed them onto the tacky surface, making sure every part was covered before rubbing away any excess. As you can see the stippled surface can be seen even more with the flakes applied.


At this point I glued the gilded ornament die cuts together to form open 'segments'. Note; the heavier the weight of card you use the chunkier each segment will be.


With a thought to wanting to match these new ornaments to the to ones I'd created last week I decided to further emphasise the surface texture by dry brushing over the Metallic Flakes with 'Wisteria' PaperArtsy Fresco Finish Paint which has a lovely chalky look, taking the opportunity to cover the edges too at this point.


To decorate and add a contrasting finish some leaf stems and berries were cut from card covered in 'Gold' Sizzix Decorative Foil Sheets. I added drops of Lavender Liquid Pearls over the berry pieces to compliment the Wisteria paint colour before gluing the leaves and berries around the centre of the ornament. To finish drops of White Pearl Liquid Pearls were added to the decorative border and some sheer white ribbon was added to the top around an embroidery thread hanging loop.


The second ornament is one based on Eileen's snowflake from the 'Wreath & Snowflake' Thinlits Die Set.


This one started with me covering strips of kraft coloured card with double-sided Sizzix Adhesive Sheets on one side. I then applied 'Gold' Sizzix Decorative Foil Sheets over the top before die cutting five of the snowflake shapes.


After folding each gilded snowflake in half  I glued each one together, matching the sides together as shown below.


To decorate the assembled snowflake more drops of White Pearl and Lavender Liquid Pearls were applied to the surface to give it a 'bejewelled' look. To finish I glued a loop of embroidery thread into the top of the snowflake and threaded some matching beads on to it, using a little glue to secure them in place.


The third and final ornament is based on the wreath die from Eileen's 'Wreath & Snowflake' Thinlits Die Set.


For this one I die cut six wreath shapes from kraft card and covered each one with some of the 'Gold' Sizzix Luster Wax. I suggest using a brush to do this if you don't want to use your fingers and applying a couple of coats gives really good coverage. You will need to cover the front of three and reverse of the remaining three.


In the same way as I'd done for the previous two ornaments I folded each of the wreath shapes in half before joining them together, matching each piece by folding three inwards and three outwards; this is why you needed to add wax to the back of three pieces since they would end up as front facing.


In the same way as before I covered more kraft card with Sizzix Adhesive Sheets before applying Sizzix Metallic Foil Sheets on top. More berry shapes were die cut from the card remembering that I would need some to be cut from the reverse side so they would match up back to back.


You can see below how I glued the berries onto each side of the wreath sections, matching them up against each other. To finish I also added drops of White Pearl Liquid Pearls and secured the embroidery thread loop at the top with a white pearl bead.


And as a reminder this is what the group of three ornaments looked like when finished;


I hope you've enjoyed seeing how Eileen's dies have been used to create these ornaments. Make sure to check out the other Chapter 3 release projects and tutorials from the other Inspiration and Educator Team members - links to their posts can be found on Eileen's blog throughout the month.

For now thanks for visiting,
Jenny xxx

14 July 2021

Funkie and Frilly Ornaments for The Funkie Junkie Boutique

Hi everyone and welcome. Teri is hosting the latest challenge over on The Funkie Junkie Boutique Blog and she's called it 'Funkie and Frilly'; "The challenge is to create something Frilly and Funkie. Add buttons, lace, flowers or anything you like to your projects."

The Design Team will choose their top four picks, with the winner being invited to join us in a Guest DT spot at The Funkie Junkie Boutique Blog and three additional outstanding entries will receive Top 3 Badges to display on their blogs. Everyone who enters and follows the rules will be entered into the draw to have the chance to win a $25 spending spree at The Funkie Junkie Boutique.

For this challenge I chose to work with some of Eileen Hull's new Sizzix Chapter 3 dies - the 3-D Scoreboards L Die 'Box, Ornament' and the Thinlits Die Set 'Wreath & Snowflake' - to create some Funkie yet Frilly style ornaments. These ones have a Christmas theme but could easily be adapted to work for other occasions.


Here's how they came together, starting with the 3 1/4 inch strips of heavy card which were covered in strips of book paper, music score, die cut paper lace, torn fabric and crackle paste, all blended together with a layer of white gesso on top when dry.


After sealing with a coat of clear gesso I rubbed 'Frayed Burlap' Distress Crayon into the surface before wiping away a lot of the excess with a damp cloth. This helped to make the various layers stand out more and give the card a more vintage look.


Using Eileen Hull's new Sizzix 3-D Scoreboards L Die 'Box, Ornament' I cut six ornament circles and two sets of the decorative strips from the card.


Each of the die cut pieces were edged with Prima's 'White Gold' Matte Wax using a brush, which was also used to dry brush over the surfaces too.


Wreath and snowflake shapes were die cut from undecorated heavy card using Eileen Hull's new Thinlits Die Set 'Wreath & Snowflake'. These were coloured with a couple of layers of Prima's 'French Lavender' Matte Wax. These were then glued onto the front of each ornament base. I also used this wax on the die cut decorative strips so that they would stand out more when glued in place..


To give the ornaments a 'padded' look and convex shape I dampened the card and rubbed each one on the reverse with the back of a spoon before gluing three increasingly larger circular shapes die cut from scrap mount board inside. A 12 inch piece of lavender coloured embroidery thread (floss) was knotted together and glued across the centre of one side of each ornament on the back to create a hanging loop. For each ornament the two matching sides were glued together, matching up the decorative elements on the front and securing the loop thread inside. I found using pegs around the edge of each ornament to hold the edges together whilst the glue was drying worked well. When dry each one was embellished individually with various frilly trims and charms.


For the first of the ornaments the decorative strips had lace overlaid across the centre and 'crystal' gems added on top. A decorative gold bead and Christmas tree charms (glued together to make them 3D) had some of the 'White Gold' Matte Wax applied and matching 'crystal' stars were added to the tree to make it sparkle. The bead was threaded onto the embroidery thread loop a the top and glued in place whilst the tree was attached to the smaller loop at the bottom with a jump ring.


For the second of the ornaments the wreath die cuts had self adhesive pearls added on top. The antique silver toned pine cone charm had some of the 'White Gold' Matte Wax applied to change its colour before white gesso was brushed over the surface to look like snow. Again this was attached with a jump ring at the bottom of the ornament and this time a matching pearl bead was threaded onto the loop at the top.


The third ornament with its die cut snowflakes had self adhesive crystals added on top. The antique silver toned snowflake charm had some of the 'White Gold' Matte Wax applied to change its colour before crystals were added to the centre on each side. Again this was attached with a jump ring at the bottom of the ornament and this time a matching gold bead was threaded onto the loop at the top.


So that's my take on the 'Funkie and Frilly' theme. For even more inspiration the rest of the Design Team have come up with their own projects for this challenge so make sure you hop on over and check them out HERE.

For now, thanks for visiting,
Jenny xxx

Products used to create these ornaments are available from The Funkie Junkie Boutique and are listed/linked below.

1 July 2021

Eileen Hull Designs Sizzix Chapter 3 Release Party and Blog Hop

Hi everyone and welcome. Thanks for joining us for the Eileen Hull Designs Sizzix Chapter 3 Release Party and Blog Hop. Today we are sharing the new 'Box, Vintage Truck' XL Die, the 'Box, Ornament' Scoreboards L Die, and 'Wreath & Snowflake' Thinlits Die Set.

Celebrate every day with these versatile Chapter 3 Sizzix dies! Although themed as a holiday collection, just think of how many ways you can decorate these dies to celebrate every season of the year, simply by changing out the paper and colors! The Truck and Camper pair are a match made in heaven. Set it on the mantel, (paired with the Camper die!), hang on the tree, fill with treats or create your holiday cards with them. The Ornament Box may be used several ways – use the circle shapes separately as ornaments or build up the sides and add treats, snacks and gifts. Decorate the box with elements from the Thinlits Wreath & Snowflake dies or use those elements in your journals, tags, pages and pockets! You will want them all!

Join us for the Chapter 3 Release Party, where team members from around the world will share their projects! The Release Party will be on Facebook Live on Thursday, July 1 at 12:00 Eastern time. You will find the video on @Eileen Hull Designs Facebook Page. Thanks for joining us!


For my first project of this month I've kept it simple - a birthday card featuring the 'Vintage Truck' full of presents which have been decorated with a star and bow from the 'Wreath & Snowflake' set. Important points to mention - you can make the truck shorter in length by cutting away a rectangular section from the rear of the truck behind the back wheel; Sizzix Luster Wax is great for adding metallic touches to the bumpers, tyres and as an alternative to ink when distressing the edges of card; spritz your painted truck with water before adding small drops of alcohol ink then dry with a heat tool to give your vintage truck rust spots.


I will be back throughout July to share more projects with you using Eileen's new dies (including some super intricate festive decorations). For now thank you for joining me here as part of this Eileen Hull Designs Sizzix Chapter 3 Blog Hop and Release Party.

Here's the full list of blog hop participants - remember to leave a comment for each designer and you'll be in with a chance to win;
Related Posts Plugin for WordPress, Blogger...