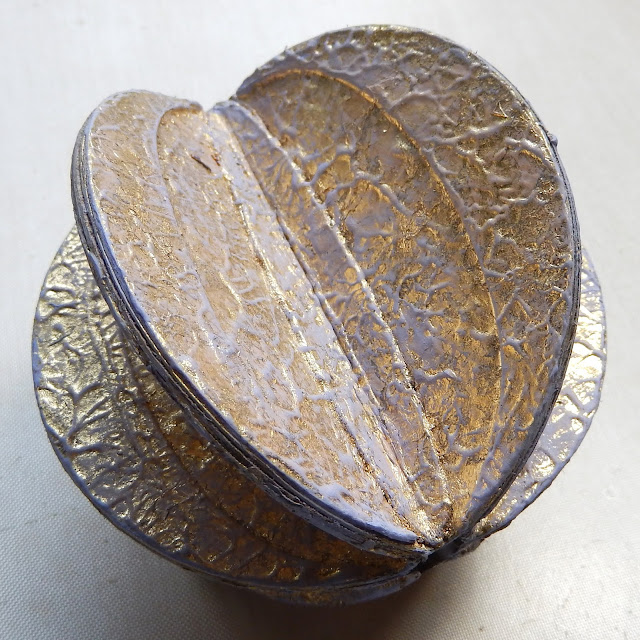
To show how each of these ornaments was created here's a closer look at each one individually together with a 'how to' tutorial, starting with the largest.
This one started with me cutting six of the ornament shapes and their matching elliptical stripes using Eileen's 'Box, Ornament' Die from thick card, gluing the the shapes together and then folding each one in half lengthwise (as shown below). To give them some extra dimension I added a coat of Sizzix 3D Adhesive from the Sizzix Effectz range with a spatula, patting over the surface to give it a stippled look.
For the best results you have to leave the adhesive to 'cure' and go clear before adding anything on top. At that point I took some 'Gold' Sizzix Decorative Metallic Flakes and pushed them onto the tacky surface, making sure every part was covered before rubbing away any excess. As you can see the stippled surface can be seen even more with the flakes applied.
At this point I glued the gilded ornament die cuts together to form open 'segments'. Note; the heavier the weight of card you use the chunkier each segment will be.
With a thought to wanting to match these new ornaments to the to ones I'd created last week I decided to further emphasise the surface texture by dry brushing over the Metallic Flakes with 'Wisteria' PaperArtsy Fresco Finish Paint which has a lovely chalky look, taking the opportunity to cover the edges too at this point.
To decorate and add a contrasting finish some leaf stems and berries were cut from card covered in 'Gold' Sizzix Decorative Foil Sheets. I added drops of Lavender Liquid Pearls over the berry pieces to compliment the Wisteria paint colour before gluing the leaves and berries around the centre of the ornament. To finish drops of White Pearl Liquid Pearls were added to the decorative border and some sheer white ribbon was added to the top around an embroidery thread hanging loop.
The second ornament is one based on Eileen's snowflake from the 'Wreath & Snowflake' Thinlits Die Set.
After folding each gilded snowflake in half I glued each one together, matching the sides together as shown below.
To decorate the assembled snowflake more drops of White Pearl and Lavender Liquid Pearls were applied to the surface to give it a 'bejewelled' look. To finish I glued a loop of embroidery thread into the top of the snowflake and threaded some matching beads on to it, using a little glue to secure them in place.
For this one I die cut six wreath shapes from kraft card and covered each one with some of the 'Gold' Sizzix Luster Wax. I suggest using a brush to do this if you don't want to use your fingers and applying a couple of coats gives really good coverage. You will need to cover the front of three and reverse of the remaining three.
In the same way as I'd done for the previous two ornaments I folded each of the wreath shapes in half before joining them together, matching each piece by folding three inwards and three outwards; this is why you needed to add wax to the back of three pieces since they would end up as front facing.
You can see below how I glued the berries onto each side of the wreath sections, matching them up against each other. To finish I also added drops of White Pearl Liquid Pearls and secured the embroidery thread loop at the top with a white pearl bead.
And as a reminder this is what the group of three ornaments looked like when finished;
For now thanks for visiting,
Jenny xxx


Wow! These are amazing Jenny! So rich looking <3 Great techniques and thorough tutorial as always. Thanks so much for all you do!
ReplyDeleteJenny, these are stunning!!
ReplyDeleteJenny, thanks for the inspiration and sharing your wonderful talents!!!
ReplyDeleteThanks for the tutorial…amazing how they look!
ReplyDeleteThanks for the tutorial…amazing how they look!
ReplyDeleteThese are just sooooo beautiful! Thank you for the fab tutorial. Take care xxx
ReplyDelete