30 January 2018

Book Club 2 Collection - Eileen Hull Designs

Creativation 2018 with Eileen Hull Designs


Hi everyone and welcome! Well what fun we had at the Sizzix booth representing Eileen Hull Designs at this year's Creativation show. Anne Redfern and myself flew out to Phoenix for the week and worked hard to add some UK flavour to the mix. Did you see Anne on social media? She was doing FB Live videos, demo'ing, helping in classes, and leading us on a charge to JoAnn's!!! I'm sure she'll share more of her own story on her blog Redanne.

Here are a few photos from the event;

My early morning view walking down to the Convention Center.

Meeting up with friends Maggi Harding (Eileen's Inspiration Team)
and Linda Coughlin (The Funkie Junkie Boutique)

Taking a class with the incredible Seth Apter.

Sharing Eileen's latest die designs at the Sizzix booth.

A selfie with Clelia Pirarba and Miranda Nullo
who'd travelled all the way from Italy!

Hi jinks (and kicks) with Jennalee Anderson, Jess Madaglia, Mitsyana Wright, Eileen Hull, Brenda Walton (YES - THE Brenda Walton!) me, Karen Bearse, Susie Bentz and Kim Evans.

Eileen Hull Designs DT shopping trip to JoAnn's.

Eileen Hull Designs, Book Club 2 Collection - The Wrapped Journal


Now to one of the latest Sizzix dies from Eileen Hull; this 'Wrapped Journal is just one of several new and clever designs that form the Book Club 2 collection which is being released in May/June.


It is a similar height to the Passport, has all the features you love about the Journal (scored spines, pre-cut holes for elastic threads) but has the added bonuses of being deeper (holds four signatures) wraps around (to protect those page edges) and CUTS IN ONE PASS!!!! That deserved to be in capitals because it means NO GLUE REQUIRED!!! Just cut and colour! How awesome is that!


I went to crazy with this one to see just how much could be crammed inside - 20 pages covered in fabrics, papers, die cuts and more as it turns out!!! I'm just sharing the cover with you today as you'll be needed resuscitation if I share it all in one go.


Cut from Mat Board (mount board) this one was sturdy enough to endure coats of gesso, dress pattern tissue, book pages, muslin, lace, stencilling with texture paste and paint (both inside and out). The felt panel on the top holds Eileen's 'Stitchy Flowers' covered with Emerald Creek Crafts 'Hammered Metal' embossing powder over the embroidered stems and button centres.


Inside you'll see the same treatment of the cover and the first of those 20 pages, many of which feature more of Eileen's die designs and Emerald Creek Crafts embossing powders. I promise to share the remainder of those pages at a later date.


Hopefully you'll be starting to see why Eileen's Inspiration Team are really excited about this new Wrapped Journal. There will be a round up of some of their ideas for using it on Eileen Hull's website so make sure you check them all out. You are bound to be inspired. And remember, there's now a place for all fans of Eileen Hull Designs to share and meet like-minded people; with an ever growing number of members the Eileen Hull Fan Club is definitely the place to be right now!

OK, I'll be back tomorrow with a new video and news of a very special blog hop happening on Friday. For now take care and get creative!
Jenny xxx

25 January 2018

Book Binding (the simple way) with Eileen Hull Designs

Hi everyone and welcome! Thank you all so much for the positive reaction to my new journal cover project yesterday - in case you missed it you'll find it HERE. Lots of you were intrigued by the binding system I'd used so it seemed now would be a good time to share my tutorial for it.


The concept is based around those plastic disks you can see on the edge of the journal - they are part of 'The Happy Planner' from Me & My Big Ideas, and are readily available now in stores on both sides of the Atlantic. It allows you to insert, move or remove pages easily without tearing them. As part of her latest Book Club Collection release with Sizzix, Eileen Hull has developed this Book Binding Movers & Shapers Magnetic Die that will easily cut the required slits into anything you want, enabling you to add your own pages to planners and journals that use the disk system.


Book Binding Tutorial

Here's a tutorial for creating mini books using this system with a few hints and tips for getting a professional finish. I started with pieces of single-sided 12x12 designer paper (DCWV - The Mariposa Stack) and cut out two pieces 6 1/4 x 4 1/4 inches (16cm x 11cm).


To cut the pages I used Eileen Hull's new Scoreboards XL Die - Book & Pages, Trinket Box and Frame, also part of the new Book Club Collection from Sizzix. As you can tell from the name this is a versatile die with lots of shapes in one place! One of those is a 4 x 3 inch (10cm x 7.5cm) page shape shown below. This was my 'go to' for cutting all the pages and the front/back covers, which were cut from Matboard (Mountboard) for strength.


To make sure the facing pages match perfectly I folded each piece of 6 1/4" x 4 1/4" paper in half and placed it over the die, cutting two matching pages in one pass.


Below you'll see how the pages look when cut. If you find the paper measurements a little snug for you just increase the width and length; as long as it's folded in half the pages will always match perfectly.


I repeated the process several times, gathering together pairs of pages all ready to be glued together. Remember when you are doing this to make sure the matching pages are facing each other; so for example the first page will be stuck to the inside front cover, the second will be glued to the third, the fourth to the fifth and so on. The final page is then glued to the inside of the back cover. As for the outside of the front and back covers, I simply cut another pair and glued them on to match too.


Now it was time to cut the slits for the disks. I placed my Book Binding Die towards one end of the Movers & Shapers Magnetic Base Tray and placed the left edge over the it, balancing the remainder of the page on the side of the tray. It's important to use the Magnetic Tray with Movers & Shapers dies as it holds them firmly in place as you run them through your cutting machine.

You'll see some tape along the edge of my die; I used the The Happy Planner Mini Disks and found they worked better if the slits were a little smaller. To do this simply spread masking tape across the die where required, run it through your Big Shot one time to cut away the slits, and press the tape down between each slit to secure. You then have a perfect guide for lining up your page. Pass the page and die through your cutting machine using the regular cutting pads and you'll be left with the a finished page with the slits cut. I cut the front and back covers in the same way since Movers & Shapers Dies are steel rule dies that can cut thicker materials too.


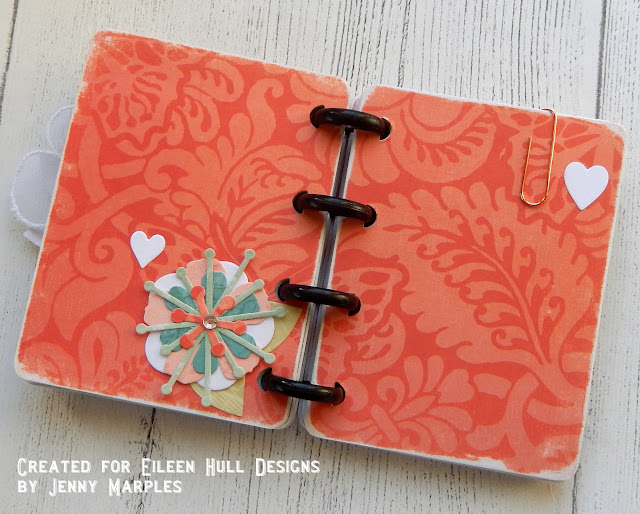
You'll see below where I cut a few of these pages in the same way. It was then just a case of slipping the disks into the slots before adding the front and back covers. The beauty of this system is that all the pages will now lie flat so you can decorate them in situ and line up your embellishments.


Here are the photos of the first mini book all completed with a selection of the inner pages; the flowers were cut from the same paper pad using Eileen Hull's Thinlits Dies by Sizzix - Stitchy Flowers & Leaf and the word was cut using another of her Thinlits Dies - Floral Arch & Words.


And here's a second version using the same DCWV Paper Stack, this time turned into a mini scrapbook diary; I created the tabs using Eileen Hull's now famous Scoreboards XL Die - Journal, and the mats inside were embossed using her Textured Impressions Embossing Folder - Basket Weave.


As you can see this is an easy project to create and makes a wonderful little gift to give throughout the year. I hope you've enjoyed this tutorial. If you have any questions or comments please let me know in the comments box below. For lots more inspiration, ideas and tutorials make sure you head over to Eileen Hull's website where the Inspiration Team are sharing many more fantastic projects.

And remember to get out there and support those craft stores who are now starting to stock Eileen Hull's Book Club Collection; if yours is not make sure to let them know you want them! These are the dies you will find yourself using over and over again (especially if you are creating for friends, family, customers and classes).

Take care of yourselves and get creative! Jenny xxx

24 January 2018

2018 - The Year of ... for Frilly and Funkie

Hi everyone and welcome! Phew, well it's been a whirlwind start to 2018 - the annual AFCI trade show 'Creativation' has just finished in Phoenix and many of your favourite brands have officially launched new products and designs to retailers and customers around the World. I was lucky enough to attend again this year to meet up with the incredible Linda Coughlin, owner of The Funkie Junkie Boutique. Boy, does she work hard to bring you the goodies you want/need to add to your stash! And as if that wasn't enough I travelled out with my crafting buddy Anne Redfern to join other members of Eileen Hull's Inspiration Team at the Sizzix Booth. It was a fantastic opportunity to meet up with old friends and make new ones in the industry.

2018 - The Year Of...


Meantime, over at the Frilly and Funkie Challenge blog we are already half way through the latest challenge, '2018 - The Year Of... '. Our host Suzz explains more; "I am not very good at New Year Resolutions but I do like to think about what I want to focus on in the New Year. To help me do this, I pick a word that is my word for the year and try to use that word to keep me focused on what is important. The challenge to you is to pick a word that will be your inspiration for 2018. Create a vintage or shabby chic project that includes your word of 2018. The word can be part of a sentiment, phrase or stand alone on your project as long as it is featured somewhere in your art."

As ever, the Design Team will choose their top four picks, with the winner being invited to join us in a Guest DT spot at Frilly and Funkie and the next three will receive badges to display on their blogs. Everyone who enters and follows the rules will be entered into the draw to have the chance to win a $25 spending spree at The Funkie Junkie Boutique.


You will have seen from the photos that my word is more of a phrase - Be The Difference. It reflects a lot of personal goals and a desire to become a better 'influencer/motivator' for all of you out there. Confession time; I created a journal to record all the high points of 2017 but discovered that having a set number of pages in advance stifled me and hence my ability to fill it - some months were busier than others so then came the challenge of working out how fit those in. Put up a challenge like that and it can easily deter me from getting it finished!

So this time I've created a new journal with a binding system that's going to allow me to add pages as I go along, including inserts of differing sizes and shapes - how's that for flexibility! I'm leaving more of the detail on this system for another post very soon. The cover itself is made from strong board that has been covered in Tim Holtz Memoranda Paper, stamped with Archival Inks, stencilled to add texture and then brayered with Distress Paints to add colour. All of that provided a base to layer Ephemera, die cuts and Remnant Rubs to build the design. Inside black gesso covered the board in preparation for brayering and stamping with the same Distress Paints and stamps.


Here are some close ups so you can get to see more of the detail. I love the fact that brayering paint gives you uneven layers of colour. Giving the finished cover a thin coat of Matte Distress Collage Medium protects the Ephemera, die cuts and Remnant Rubs as well as giving them a consistent appearance. You'll notice the layers have been kept flat to allow for the covers to sit open and be more portable. The full list of products used can be found at the end of this post, all of which can be found at The Funkie Junkie Boutique.


That's it for my DT project for the current Frilly and Funkie challenge. My talented team mates have also created lots of amazing projects for this challenge so make sure you hop on over and check them out HERE. And remember to link up your own die cut shabby chic or vintage projects, to be in with a chance of winning one of the fabulous prizes.

I'll be back with more details of the binding system I've used for this along with lots more tutorials which are currently 'under construction'. In the meantime if you have any questions please make sure you leave a comment below.

Take care of yourselves and get creative! Jenny xxx


10 January 2018

Three Is Not A Crowd at Frilly and Funkie

Hi everyone and welcome! Here we are at the beginning of a new year and over at the Frilly and Funkie Challenge blog we are already half way through the first challenge, 'Three Is Not A Crowd'. For this one we want you to create a vintage or shabby chic project that includes three of something, be it three different patterned papers, three colours, three layers, three flowers, three bows - the list goes on. This would also be a perfect time to use some of the new supplies you received for Christmas or to make space in your stash by using up old supplies. Just remember to think in multiples of three. As ever, the Design Team will choose their top four picks, with the winner being invited to join us in a Guest DT spot at Frilly and Funkie and the next three will receive badges to display on their blogs. Everyone who enters and follows the rules will be entered into the draw to have the chance to win a $25 spending spree at The Funkie Junkie Boutique, so there are plenty of reasons for joining in the fun.

With time being eaten up rapidly in preparation for the upcoming US AFCI trade show (Creativation) I've kept my project relatively simple but nevertheless effective - can you spot the 'three' in this birthday card?;


Here's a quick tutorial for recreating it; begin with a 5 1/2 inch square piece of white card. Stamp the numbers from the Purveyor stamp set across the bottom third of the card using Brushed Corduroy Distress Paint. Make sure you clean off your stamp with cold water as soon as you've finished. Dry the stamping thoroughly with a heat tool before moving on to the next step.


Blend Tumbled Glass Distress Ink all over the card (including the stamping) using a Mini Blending Tool. Use a slightly moist piece of cloth or tissue to wipe away any ink from the surface of the stamping. Then add droplets of water across the card, allowing it to 'bleach' the ink before drying.


Stamp the smaller of the script images from the Ledger Script stamp set using Carnation Red Archival Ink and dry it with a heat tool before moving on.


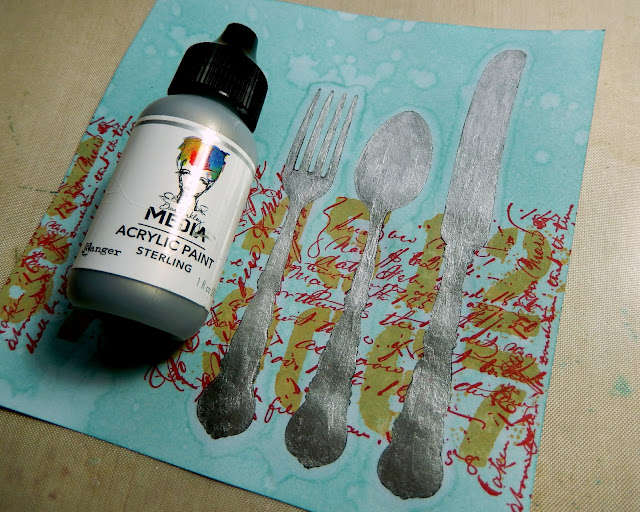
Using the Tim Holtz Stamp Platform stamp the cutlery image from the Daydream (or Nature Walk) stamp set using Black Archival Ink. When finished leave the stamp in place as you'll be re-stamping in exactly the same place later. Again, heat set the ink before moving on.


Use a water brush or paint brush dipped in water to apply water around the edges of the three images. When dry this will create a halo effect around them and becomes important later.


Paint over the images using a silver coloured acrylic paint. I used Dina Wakley's 'Sterling' paint because it has a heavy body that gives good coverage with just one coat and doesn't bleed beyond the image.


Place the painted card back into the Stamp Platform in the same place as before and re-stamp the image with more Black Archival Ink. This is why you needed to leave the stamp in situ after the first application.


When the archival ink is dry blend Brushed Corduroy Distress Ink over the three images and around the edges of the card. The colour around the edges of the images will be much 'cleaner' because it's not been mixed with the Tumbled Glass - the result of creating that halo effect with the water. You can remove ink from the painted images as before, rubbing over them carefully with some slightly moist tissue.


Layer this completed background onto Metallic and Classic Kraft Card, sanding the edges to reveal some of the kraft core. I added stitching to create another border but you could also draw a line or two with a permanent marker if you prefer. Cut the lettering from more sanded Classic Kraft Card using the Alphanumeric Thinlits Dies; the Sizzix Sidekick works perfectly with these small dies. I finished the design with a Remnant Rub, an Index Clip and a sentiment from the Small Talk Occasions sticker set.


That's it for my DT project for the current Frilly and Funkie challenge. My talented team mates have been hard at work creating lots of beautiful pieces for this challenge too so make sure you hop on over and check them out HERE. And remember to link up your own die cut shabby chic or vintage projects, to be in with a chance of winning one of the fabulous prizes.

In the meantime take care of yourselves and get creative! Jenny xxx


Related Posts Plugin for WordPress, Blogger...