20 October 2021

Grunge, Ghouls, or Giggles at The Funkie Junkie Boutique

Hi everyone and welcome. Janna is hosting the latest challenge over on The Funkie Junkie Boutique Blog and she's called it 'Grunge, Ghouls, or Giggles'; "Halloween is just around the corner and this week we are getting our hands dirty. Will your makes be frightful and ghoulish or will they be cute and get giggles? Add a touch of grunge to your makes. Cards, décor, scrapbook pages, journal spreads, we want to see it all. We will be most Distressed if you miss out on the spooky cute Halloween fun! Happy crafting!"

The Design Team will choose their top four picks, with the winner being invited to join us in a Guest DT spot at The Funkie Junkie Boutique Blog and three additional outstanding entries will receive Top 3 Badges to display on their blogs. Everyone who enters and follows the rules will be entered into the draw to have the chance to win a $25 spending spree at The Funkie Junkie Boutique.

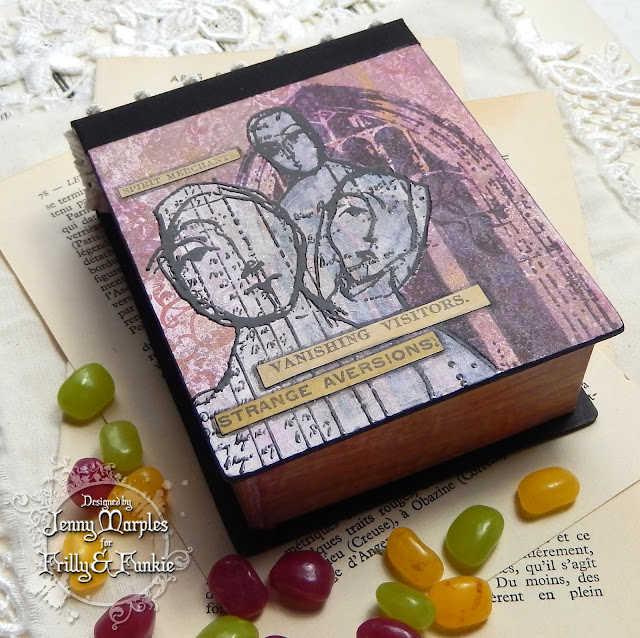
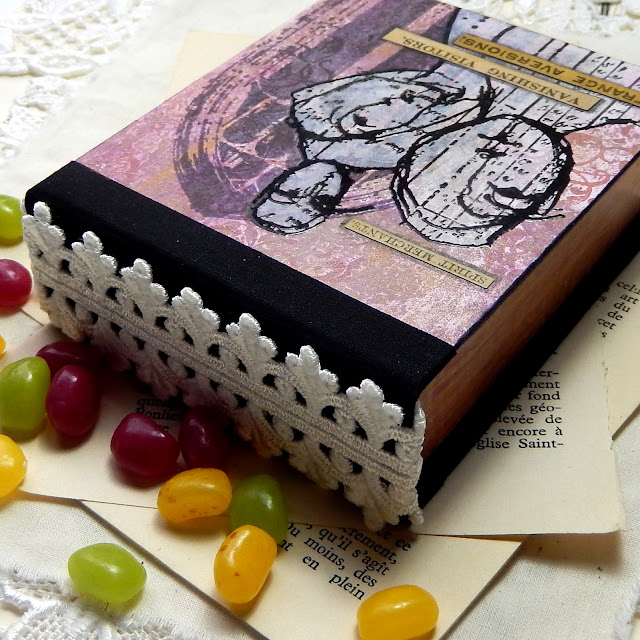
For this challenge I've created a Halloween treat box with a 'grown up' ghoulish feel featuring images from two Dina Wakley Media stamp sets.


To create the book box structure I cut the spine and covers using the new Eileen Hull Designs Sizzix Scoreboards 'Notepad' Die and connected each element with adhesive cloth tape to make the spine more flexible. Inside I cut the box shape using the side panel elements from Eileen's 'Trinket Box' Die.


The covers were then decorated with paper that had a Gel Plate print on it made with various shades of purple acrylic paint from the Dina Wakley Media range. I stamped one of the arch windows from the Dina Wakley Media 'Everyone is Welcome' stamp set with 'Petunia' Wendy Vecchi Archival Ink for a gothic look.


On top I stamped the group of three figures from the Dina Wakley Media 'Ledger Girls' stamp set, gave them a coat of white using a wet Scribble Stick and a paint brush, and then re-stamped and embossed them to enhance the features. To finish I added words from a Halloween themed Tim Holtz Sticker Book and Venise Lace trim around the spine.


That's my take on the 'Grunge, Ghouls, or Giggles' theme. For even more inspiration the rest of the Design Team have come up with their own projects for this challenge so make sure you hop on over and check them out HERE.

19 October 2021

Eileen Hull Designs Sizzix Chapter 4 Full Size Journal and Heart Mandala

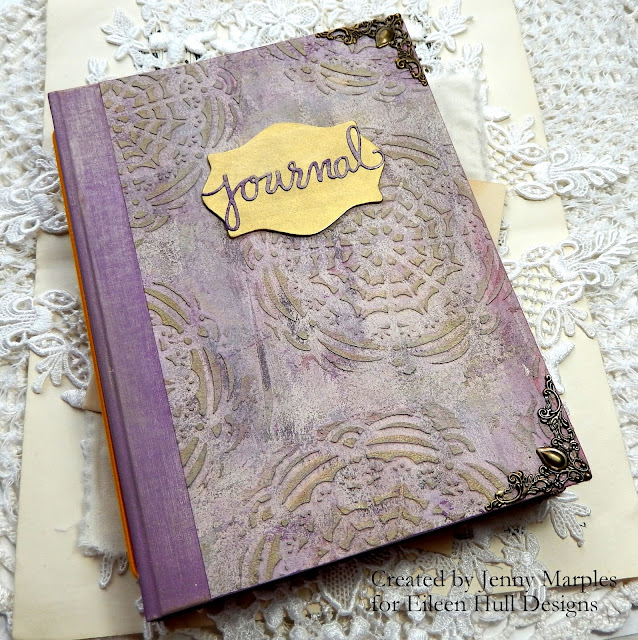
Hi everyone and welcome. This month Eileen Hull's Teams are sharing projects using Eileen's new Sizzix Chapter 4 dies as part of the launch celebrations this month. For my second project of the month I have combined two of the new dies, the Sizzix Scoreboards Plus Die 'Full Size Journal' and the Thinlits Die 'Heart Mandala' to bring you a really useful Journal that holds A5 notebooks inside.


The journal cover was cut from mountboard and I removed the spine pieces before re-attaching one of them with Architape® leaving a 1/4 inch gap between the cover and spine pieces to afford the cover more flexibility and durability when completed. The holes in the spine were re-punched in the same places as those cut by the die (now hidden by the tape) using a Crop-a-dile.


I then created some decorative paper using various shades of mauve/lilac Fresco Finish Paint by PaperArtsy. Having cut a Heart Mandala from thin kraft card I was able to use it repeatedly as a stencil through which was applied texture paste and then Gold Paint. Once dry I glued pieces of the paper to the front and back covers. The tape on the spine was also painted with a mix of the same paints to match and I took this opportunity to fix eyelets through the holes when the inside was decorated.


The plaque piece of the front cover can also be cut from the Full Size Journal Die and after painting it with the Gold Paint I added the word, cut using one of Eileen's older Thinlits Dies. To protect the corners some decorative filigree brass pieces to the front and back covers.


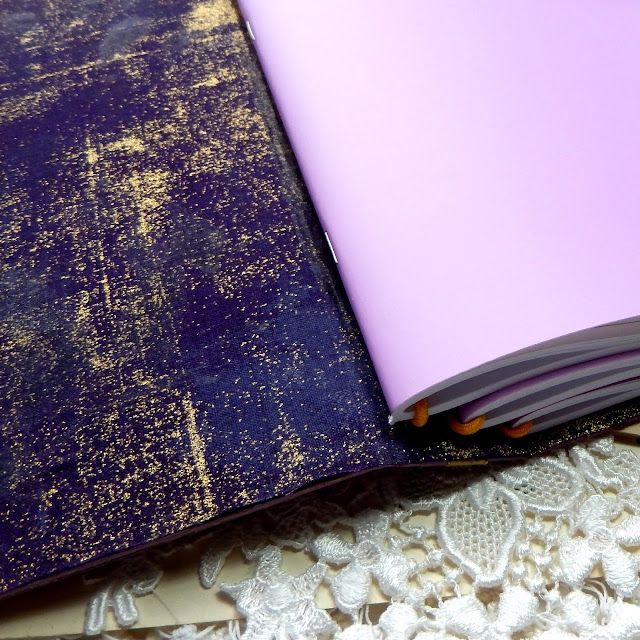
To hold three A5 notebooks securely in place inside the covers I strung three separate pieces of old gold coloured elastic cord through the top and bottom holes in the spine in the same way as has been shown many times for other Eileen journals and notebooks. Make sure to use a strong elastic as the covers are tall and don't pull them really taught so the notebooks can be slipped in and out of the covers more easily.


Just before threading the elastic cord through the spine I took the opportunity to decorate the inside of the covers by applying some contrasting fabric (Basic Grey 'Metallic Grunge') using a soft gel medium to hold it in place. Once dry it can be trimmed to fit exactly with the layer of glue preventing the edges from fraying.


I hope you've enjoyed seeing how Eileen's dies have been used to create this large journal. Make sure to check out the other Chapter 4 release projects and tutorials from the other Inspiration and Educator Team members - links to their posts can be found on Eileen's blog throughout the month.

For now thanks for visiting,
Jenny xxx

14 October 2021

Eileen Hull Designs and The Crafters Workshop

Hi everyone and welcome. October has been a busy month for Eileen Hull Designs with new Sizzix Chapter 4 releases and new stamps from Maker Forte. And for an extra layer of fun members of Eileen's teams are also teaming up with The Crafters Workshop to show how well their beautiful range of stencils work with Eileen's designs.

With the release this month of Eileen's new Full Size Journal there's lots of work going on here to make pages that will go inside. Today I'm sharing two of those pages which combine Eileen's stamps and Rebekah Meier stencils from The Crafters Workshop. This first one also makes use of a couple of Eileen's dies too.


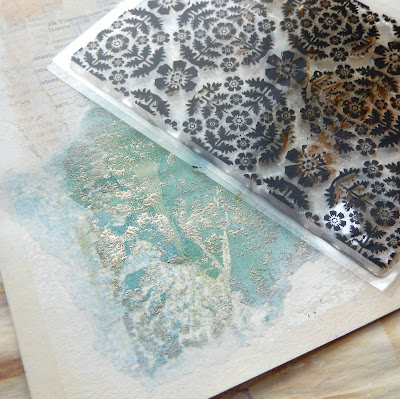
I took photos showing how the basis of the page was created, starting with the background colour which came from a piece of gel plate printed tissue using PaperArtsy Fresco Finish Acrylic Paints. This was layered over a torn piece of paper from the index of a botanical book (a charity shop find).


Wanting to add some subtle patterning over the top so opted to use Eileen's Vintage Damask background stamp in combination with embossing ink and a metallic embossing powder. In order to add a window.


I traced around the leftover piece from a window shape in Eileen's 3-D Camper die and drew a border and ledge to match. More acrylic paints and some watercolour pencils were used to colour, highlight and shade this simple shape to give it more dimension.


For the next part of the design I painted an ombre effect of Autumnal colours onto card and cut out three leaves using Eileen's Spring Leaves die. These were lined up underneath the window in a row.

To add more detail to the leaves I remembered from one of Eileen's FB Live shows that the shape at the top matches one of the stamps in the Wonderful World of Flowers stamp set.


Using permanent black ink I stamped the top half  of each die cut leaf with the leaf sections from the smallest of the flower/leaf stamps.


It was then easy to use a black gel pens to extend the patterns to cover the rest of the leaf shapes. I then filled in the little dots with a white gel pen to contrast with the darker colours.


From this point on the creative process took over, starting with the addition of the flower head between the second and third leaves. I swiped texture paste through one of the flower shapes and a little of the text at the bottom on Rebekah Meier's stencil TCW849 from The Crafters Workshop.


This stencilling was then covered in paint to make it stand out against the background. It is perfect for drawing the eye down from the window and up from the stamped word at the bottom. I broke up the line a little by adding a strip of fabric and stitched buttons on top.


To finish the page I stamped the word nature from Eileen's stamp set Snail Mail Inspirations and added a little lace trim in the top corner.


Moving on to the second journal page I didn't take 'in progress photos' for this one because it was basically a case of layering together the various stamped and stencilled elements on top of a background that was created with a mix of book page, sewing pattern tissue and paint.


The largest element is the piece that has a pale blue, raised textural pattern and words from Rebekah Meier's stencil TCW771 from The Crafters Workshop. One of my favourite things about Rebekah's stencil designs is that she provides a 'ready made' collage that can also be used for its separate parts in the way I've done here.


Also layered underneath the painted window are a stamped library card and ticket, taken from Eileen's Buttons Cards and More stamp set.


The main picture of a French window is one I took on a family holiday and used a copy of to create a gel transfer print that could have paint and tea stain added on top. Pieces of lace and some hand stitching completed the overall design by adding texture, pattern and a splash of extra colour, and another of the words from Eileen's Snail Mail Inspiration stamp set finished it.


Other members of Eileen's teams will be sharing their own makes combining her ranges with stencils from The Crafters Workshop and there will be a round up on Eileen's blog at the end of the month so make sure to see that.

For now thanks for visiting,
Jenny xxx

6 October 2021

Fall Gratitude with The Funkie Junkie Boutique Blog

Hi everyone and welcome. Teri is hosting the latest challenge over on The Funkie Junkie Boutique Blog and she's called it 'Fall Gratitude'; "Use fall colors and embellishments to create a tag or project expressing gratitude."

The Design Team will choose their top four picks, with the winner being invited to join us in a Guest DT spot at The Funkie Junkie Boutique Blog and three additional outstanding entries will receive Top 3 Badges to display on their blogs. Everyone who enters and follows the rules will be entered into the draw to have the chance to win a $25 spending spree at The Funkie Junkie Boutique.

I've created a new double page spread in my Dina Wakley Media Kraft Journal following the current challenge theme by using the colours of leaves on the Autumn leaves seen outside on walks with our dog this month.


The page started with a coat of white gesso to create a contrast to the kraft background. Dina Wakley's 'Evergreen' Acrylic Paint was then applied through her 'Marks' Stencil to produce the horizontal line. To add the leaf shapes in various autumnal colours I used wet Scribble Sticks on the leaf shapes from the 'Be Willing' and 'Not Subtle' Stamp Sets; by holding the flat end of the stick in water for around 10 seconds it activates the paint in the stick ready to be rubbed onto the stamp. The resultant look is a more watercolour effect look rather than the more solid line that would be made by using the regular Acrylic Paint.


Before stamping the face over the leaves I added one of the tags from the 'Elements' Collage Paper Pack using a soft gel medium. A permanent black ink was used for the face and I used a white paint marker to add highlights around the eyes, cheeks, lips, chin and neck. A tiny touch of the 'Evergreen' paint was also applied around the eyes.


To embellish and finish the page I did some asemic writing at the top and bottom of the face before stamping, cutting out and gluing in place letters from the 'Block Alphas' Stamp Set to spell the word blessed.


That's my take on the 'Fall Gratitude' theme. For even more inspiration the rest of the Design Team have come up with their own projects for this challenge so make sure you hop on over and check them out HERE.

1 October 2021

Eileen Hull Designs Sizzix Chapter 4 Release and Blog Hop

Hi everyone and welcome. Thanks for joining us for the Eileen Hull Designs Sizzix Chapter 4 Release Party and Blog Hop. The Chapter 4 Sizzix Release is exciting for so many reasons – there are two never-done-before designs!

One is the Sizzix Scoreboards Plus 'Full Size Journal' Die which is a Bigz Pro size – you will need a machine with at least a 9″ throat to cut this die – like a Big Shot Plus or Pro. Not to worry, if you don’t have that machine, Eileen will have the pre-cut pieces available in her Etsy store for you to work with. The other new technology is a 3-D Embossing Folder! It’s called 'Sweater' and is oh so cozy. Also new this release is a Sizzix Scoreboards 'Notepad' Die with lots of options for materials and uses, and a 'Heart Mandala' Thinlits Die to decorate with!

Join us for the Chapter 4 Release Party, where team members from around the world will share their projects! The Release Party will be on Facebook Live on Friday, October 1st at 12:00 Eastern Time. There is a GIVEAWAY too – leave a comment on each of the designers’ blog posts and you will be entered to win one of the new dies! Another prize will be given to someone who attends and comments in the Release Party Facebook Live; you will it here on Eileen Hull Designs Facebook Page.


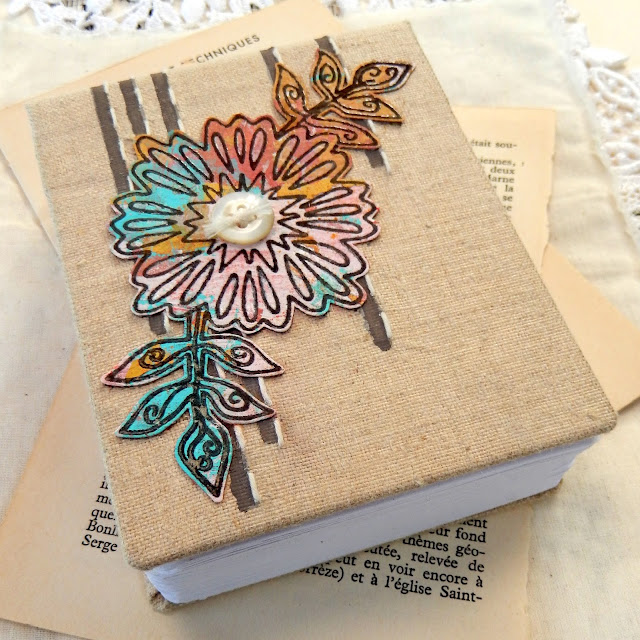
For my first project of the month I've made something which I am going to find really useful for future projects/pieces - a paint swatch notepad. The front cover features one of the flowers from one of Eileen's latest stamp set releases - 'Wonderful World of Flowers' -  too!


The flower has been stamped onto some gel plate printed paper and embossed with clear embossing powder before being cut and mounted onto the front.


For me the key to creating something to be proud of is choosing the correct colour palette so rather than spend time working that out at the time it seemed sensible to record a bunch for future reference. I made the spine flexible by splitting the covers away from it and re-assembling them with some Architape® adhesive bookbinding tape, leaving a 1/4 inch gusset between the covers and spine. A handstitched text block containing no less than 68 pages! was added inside.


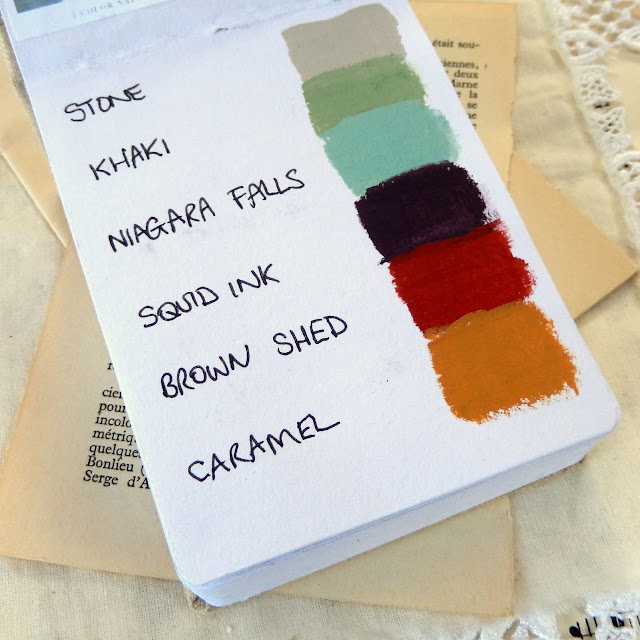
Here are some of the first of those pages filled with PaperArtsy Fresco Finish Paint swatches following colour schemes designed by Design Seeds (though there will be many more inspired by previous projects, blog posts from other designers on the PaperArtsy blog etc).


Returning to the cover of the notepad it has been covered in linen that has stitched and painted lines running from front to back behind the flower. This makes it really tactile and hardwearing at the same time.


I will be back later in the month to share another larger project using Eileen's new dies. For now thank you for joining me here as part of this Eileen Hull Designs Sizzix Chapter 4 Blog Hop and Release Party.

For those of you in the UK you'll be pleased to hear that Country View Crafts are stocking Eileen's dies and stamps - find them HERE.

Here's the full list of blog hop participants - remember to leave a comment for each designer and you'll be in with a chance to win;
Related Posts Plugin for WordPress, Blogger...