31 March 2014

Artist Trading Block Wedding Favours - Part 2

Hi everyone. Apologies for my general absence from blogland recently; family issues have taken much needed priority. This week will see a resumption of normal service with a number of DT posts and some exciting news to come. I will also be trying to catch up with as many of you as possible to see what you've been up to in my absence.


Tonight I'm sharing a sneak peek for Part 2 of the 'wedding favour adventure' I shared a couple of weeks ago with the wonderful Anne. Please do pop over to her blog to see more of what we got up to with some ATB's, die cut using Eileen Hull's Sizzix dies.
Take care of yourselves, Jenny xxx

24 March 2014

Artist Trading Block Wedding Favours


Hi everyone. A couple of weeks ago Anne (Redanne) and I organised a crafty get together to work on some Sizzix Artist Trading Block die cuts (designed by Eileen Hull) which had been sent to us by the lovely Amy (Plucking Daisies). We came up with the idea of creating sets of wedding favour boxes in different designs. If you pop over to Anne's blog you'll see some of what we got up to, with a promise of even more to come next week. I do hope you'll take a look and let us know what you think.
Jenny xxx

19 March 2014

Neglected Dies at Frilly and Funkie

Hi everyone. Over at Frilly and Funkie it's the Funkie team's turn to show you their DT samples for the current 'Neglected Dies' challenge. As host, Rebecca wants us to choose a neglected die from our stash and see what we can create with it. "Think outside of the box... or in it!"
With the winner getting the chance to be a guest designer for a future challenge and a randomly chosen $25 shopping spree at The Funkie Junkie Boutique up for grabs it's well worth entering.


I've been hooked on the flora and fauna dies recently so it feels like much of the rest of my collection has been ignored. In the end I decided to think inside and outside the box with this Movers and Shapers arrow die.


I'm on something of a mission to urge you all to use your much loved/stroked Tim Holtz Idea-ology papers. Having been designed to take inks, paints and stains they provide the perfect base for all sorts of projects, cards included.


I started this card by 'mapping out' the basic design with gesso and Distress Paints smudged directly onto the paper. Then a little base stamping in Archival Ink using the numbers line from Wendy Vecchi's License Plate Art set. Further strips of coordinating altered paper were added over the stamping and stencilling.


One of those 'outside the box' uses for my die was to cut a line of arrows into a strip of acetate (cut from the packaging around a set of embossing folders). It was great for applying embossing paste through, inking with Archival Ink and stamping through with another background stamp. The 'spare' acetate arrows were covered in a blend of Gold and Stonewashed Alcohol inks and inserted behind the lettering.


The most obvious use for the die was for cutting into the rectangular panels. As well as some Distress Crackle Paint and inking you will see small watch parts inset into these panels, fixed in place with Glossy Accents (which I subsequently 'cracked'). I loved this idea when first seeing it on one of DT team mate Trace's projects.


I do love this License Plate lettering, stamping mine with black embossing powder onto Specialty paper before 'painting' it with a mix of Archival Reinkers and surgical spirits (rubbing alcohol).  Final details included adding 'hardware' and some cog die cuts covered in Metallic Distress Paints. See how filigree metal corners become arrows when you cut them in half?! You may also notice from the close ups that the surface of the paste arrows and painted cogs is bubbly. I deliberately overheated both with my heat gun to add this extra textural element.


I hope you've got some of your own ideas from this 'walk through' and are inspired to start using your dies in a multitude of ways. Don't forget, you can also see how my DT team mates have tackled this challenge over at Frilly and Funkie for more inspiration, and then we all hope to see what you can do. With two great prizes up for grabs there's every reason to join in.

For now, take care of yourselves, Jenny xxx


14 March 2014

An Olympic take on Tim's March Tags

Hi everyone. Over at A Vintage Journey the Design Team are sharing some 'bonus' Tim Holtz inspired projects, filling the spot which in future will be given over to winners and Guest Creative Travellers.
Many of us have chosen to take this opportunity to share our March 2014 Tim Tag takes, including me!


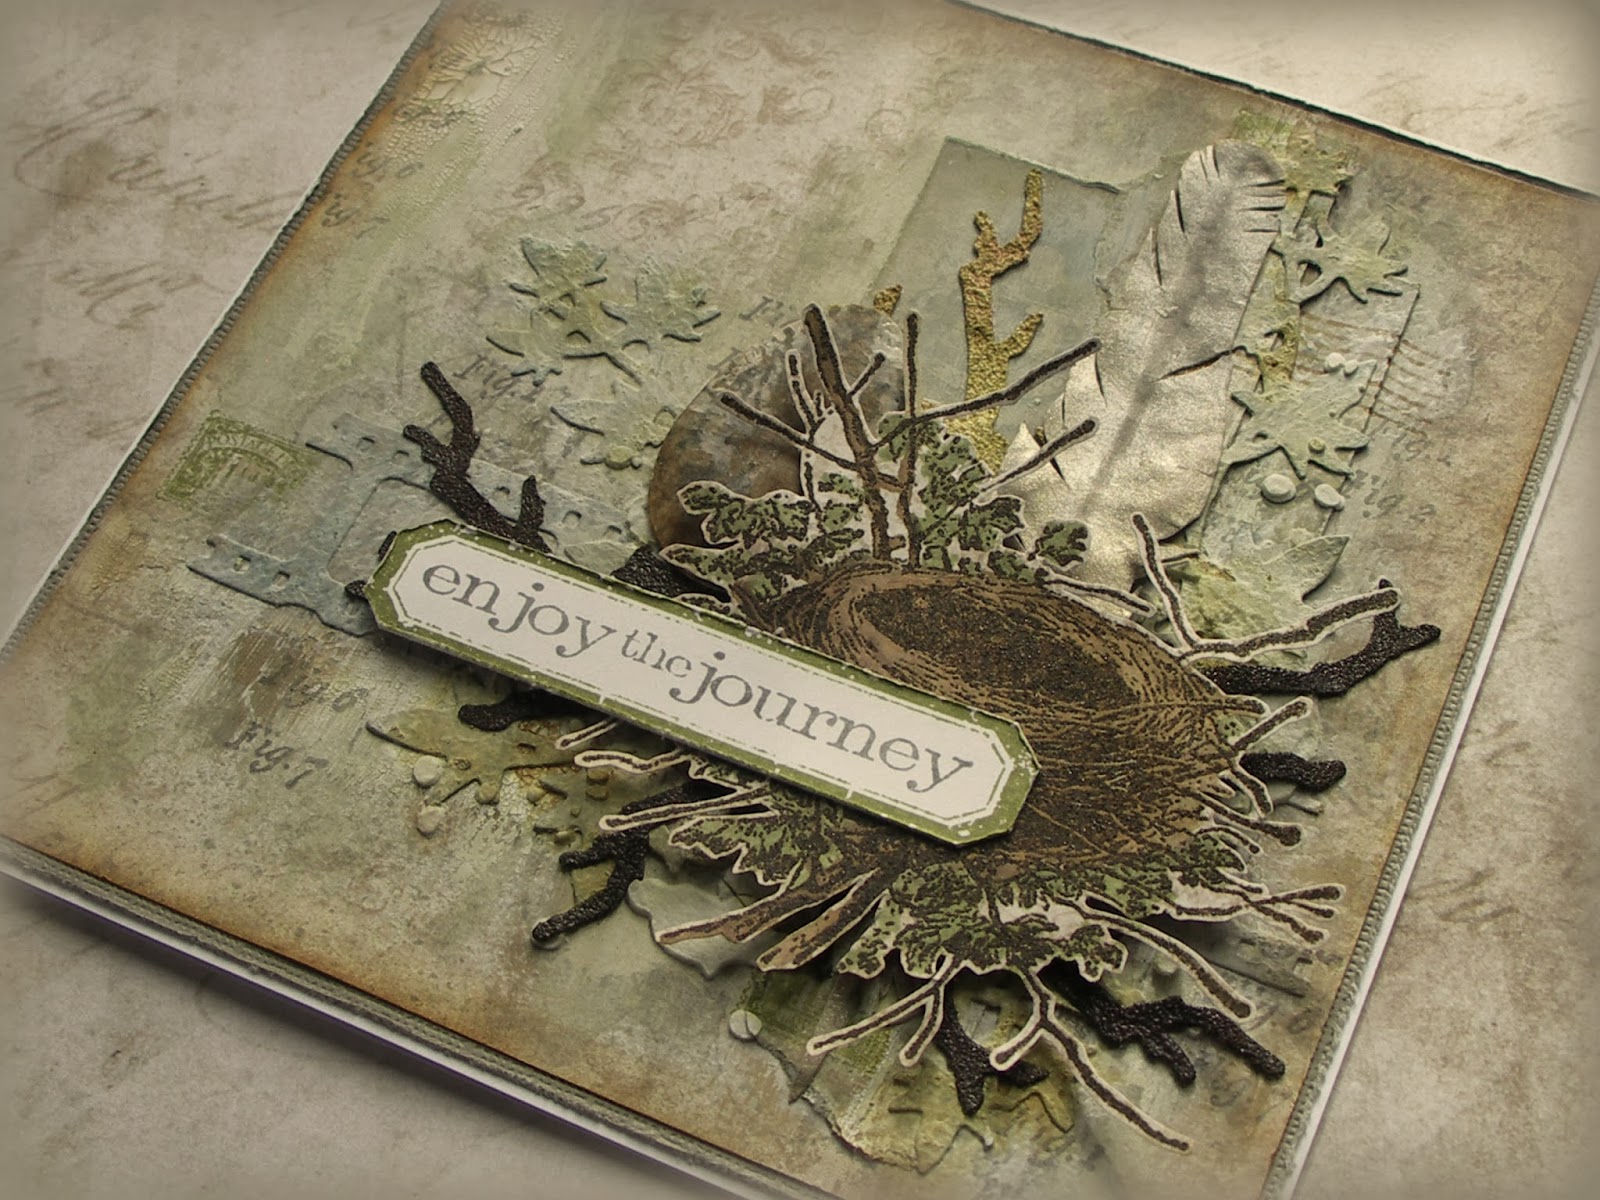
This month it's all about a technique called smudge stamping (find the details HERE) which gives projects a very soft, vintage feel. As soon as I saw the way Tim's tags looked they put me in mind of the fabulous quilted jackets worn by the Team US snowboarders, designed by Burton Snowboards.


You won't find me hopping on a snowboard any time soon I'm afraid, but watching all those on the Sochi slopes at the 2014 Olympics (and now at the Paralymics) was so exciting. One of the best things for me? The way competitors applauded the achievements of all those around them regardless of any political or geographical borders... there's a lesson for us all.


And so my homage; I used the patchwork idea but made it distinctly British with linen textured  manilla card as a base.


As many of these stamps required more detailed ink application I made use of Distress Markers alongside my Distress Ink Pads - colours included Fired Brick, Frayed Burlap, Stormy Sky and Faded Jeans.


As each element was stamped/smudged I used an embossing board to create a distinct border around it.


It made a change not to worry about getting a crisp and clear image when stamping!


Some areas were stencilled with the new Doily stencil (LOVE this one). Then I hand stitched along the borders to add to that fabric feel.


Detailed background = simple embellishments, just like Tim. So my umbrella men had tissue tape, inked die cuts and linen ribbon layered behind them.


You can just see that the embossed metal men were covered in Sandal Alcohol Ink to give them a gilt appearance. And stapling is always an easy and effective method for adding interest. Finally the sentiment, and of course Sticky Back Canvas was an obvious choice with Archival Ink stamping.


These will now be entered into Tim's March 2014 challenge alongside those of my amazing team mates. And as there is a Distress theme over at Simon Says Stamp Monday challenge I'm going to enter it there too.

Make sure you pop over to A Vintage Journey and see what they've been up to. It's one of the best places to get your regular 'Distress fix'!

Thanks for stopping by and for all your wonderful comments. They are very much appreciated.
Take care of yourselves and enjoy the weekend, Jenny xxx

8 March 2014

Scrappy step by step for Frilly and Funkie


Hi everyone. It's my turn to host another Saturday Step by Step over at Frilly and Funkie today so I do hope you can pop over and join me. I'm busy using up scraps again to create something which was inspired by a project by the very talented Karen Haylesden (see it HERE before you go).

Have a creative weekend everyone and take care of yourselves, Jenny xxx

7 March 2014

The start of... A Vintage Journey

Hi everyone and welcome. Today marks the start of an exciting new adventure - A Vintage Journey - with its current line up of 11 Creative Guides to offer help and support along the way. With our mentor, the amazing Tim Holtz in mind, we are asked to imagine, devise, design, invent and construct to inspire and encourage you to take this path with us.

And what better way to start this adventure  than with an 'Anything Tim' challenge. Do whatever you like as long as Tim is the strongest theme here. Re-visit one of his techniques or tags, use his stamps and/or products, use one of his videos for inspiration, take the colours, images, and embellishments that he has used on a project and use them to make something completely different. When you write your post please tell us what your link to Tim is and show us your vintage/shabby style. Oh yes, and make sure that you have fun!

We are proud to say that Country View Crafts will be our regular sponsor and there will be a £10 voucher for winning Traveller at the end of each challenge, chosen by the Creative Guides. You will need to read the 'Travelling Instructions' on the challenge blog to ensure your entry will be included in the prize draw.


And so to my take on this theme. You'd be forgiven for thinking this card was inspired by Tim's latest tag challenge, but in reality it was completed before the end of February (I must have been channelling my 'inner Tim'!!!) Truth is I couldn't wait to get my mucky paws on Tim's new stamps and had such fun creating a 'collage on a card', combining as many textures and media as I could possibly manage.


For me one of the most exciting things about Tim's new releases is finding out how they combine with those old favourites. And it was good to be inspired by the first glimmers of springtime in the garden, including a blackbird busily constructing a nest on the fence. The soft colours started with a base of Idea-ology 'French Industrial' paper altered with Distress Paints and Crackle Paint. Never be afraid to add your Distress products to these papers - you won't spoil them as they are specifically designed to take inks, stains and paints.


By layering up fussy cut and die cut shapes covered with the same paints and inks as the background you can add dimension to your projects without detracting from the main elements on top. Random stamping also helps to emphasise the structure of the design, and I can see the 'Fig. list' becoming a real 'go to' stamp for this purpose alongside those postal ephemera stamps.


Adding dimension through different textures is not just fun; it adds to the wow factor for anyone who is lucky enough to see your work in person. Distress embossing powders give branches a realistic 'rough' feel and even emulate the look of lichen if you use Antique Linen Distress flavour. And if you use the Walnut Stain version on your nest it will also act as a resist when you paint the image with your Distress Inks/Stains.

Try putting a couple of layers of clear embossing powder over your stamped egg, and if you run an embossing tool over the back you can even give it a domed shape to add to the realism. Underneath the nest you may spot the stencilled splatters (using white Wendy Vecchi embossing paste) and the feather is covered in a mix of Perfect Pearls Powders to give it a gorgeous sheen and colour.


So that's my offering and now it's time to see what the rest of the Creative Guides have in store for you before you take the plunge and join us on A Vintage Journey. We are looking forward to seeing how you channel your own 'inner Tim'.

Take care of yourselves, Jenny xxx


Links to Country View Crafts;

5 March 2014

The Painter - stencils and texture at Frilly and Funkie

Hi everyone. I must admit to have got rather excited when Sue chose this theme for challenge over at Frilly and Funkie.
They have to be two of my favourite things in mixed media art so frankly most of my cards could be entered, but having just got a pot of Wendy Vecchi's crackled embossing paste I just had to play.


The base to this takes a little time to do but the results are definitely worth it. Rather than waffle on I'll show you how I did it...


Cover the background with silver embossing paste and allow to dry (don't worry about getting a smooth coverage).


Colour some crackled embossing paste with Potting Soil Archival Reinker and apply it over the silver base through a brick stencil (this is an 'old' Wendy Vecchi one that I adore). Once again, allow to dry and crack.


Blend brown and grey Archival Inks over the pasted surface, then cover with a thin layer of matte glue
(I used the Claudine Hellmuth one but Ranger's Multi Medium Matte will also work).


Finally those paint splats, translucent embossing paste mixed with Fired Brick Distress Paint and Red Geranium Archival Reinker
(the paint being the opaque element in all this) all stencilled through the Tim Holtz stencil.


And so to The Chemist, no sorry, The Painter! It doesn't take much to draw a brush onto the end of the stamped test tube prior to colouring it with Distress Stains. And do you like the addition of Glossy Accents dribbles to emulate the glossy paint splats on the wall?


Having stamped the words using the Licence Plate Art stamp set on Specialty Paper using black embossing powder (you can make up your own words from the individual letters) I painted them with a mix of Surgical Spirit and Red Geranium/Orange Blossom Archival Reinkers.


It is still possible to use Distress Paint and Archival Ink stencilling over the textured background.
By doing this it 'framed' The Painter to stop him blending in too much against the wall.


I even went to the trouble of spattering red ink over The Painter's apron -
well he was never going to remain clean after flinging paint everywhere was he?!


Now you've seen my piece for this challenge I thoroughly recommend you take a look at those created by my team mates over at Frilly and Funkie.
With all that inspiration hopefully you'll want to give it a go yourself and join in with the challenge too, especially as there's a Guest Designer spot and a $25 shopping spree up for grabs.

Thanks so much for taking the time to drop by and visit. It is always appreciated.
Take care of yourselves as we hurtle towards another weekend. Jenny xxx


Related Posts Plugin for WordPress, Blogger...