23 October 2019

It Looks Real at The Funkie Junkie Boutique Blog

Hi everyone and welcome. It's the start of a new challenge theme over at the The Funkie Junkie Boutique Blog. It's Cec's turn to host and this time the challenge is called 'It Looks Real'. "There are so many ways to make something look real when it isn't. For this challenge, make a vintage or shabby chic project with one or more faux elements. Those elements could be faux rust, leather, stitching - to name a few. Make sure you tell us what the faux element is and how you made it because it will look real."

As ever, the Design Team will choose their top four picks, with the winner being invited to join us in a Guest DT spot at The Funkie Junkie Boutique Blog and the next three will receive Top 3 Badges to display on their blogs. Everyone who enters and follows the rules will be entered into the draw to have the chance to win a $25 spending spree at The Funkie Junkie Boutique.

For my DT project I've created a Pocket Notebook with a faux leather finish to the covers and faux rusted flowers on top.


Here's how this one came together (click on the photos to see them in more detail);


Take some brown/kraft coloured paper (I used the packaging from my order from Linda) scrunch it up, flatten out again and then gently rub over with a permanent brown ink (I used Acorn Archival Ink) taking care to catch the raised ridges.


Cut two covers from thick board and remove the spine pieces, putting them to one side for use later. Stick the crumpled paper to both sides of each Pocket Notebook cover using Vintage Distress Collage Medium. Apply another coat to the surface of the paper once it's stuck in place.


For this version of the Pocket Notebook I cut away two strips of the spine and stuck them to the cover with black Architape, but you can make the spine as wide as you like.


To make the faux leather darker rub dark brown permanent ink onto the surface (I used Potting Soil Archival Ink). The ink blends over easily because you've made the surface non-porous with the coat of Collage Medium. I found using the Reinker ink on the Mini Blending Tool made this step faster.


At this stage the surface appears shiny. I wanted mine to look more like time-aged, well worn look leather so I sanded back the surface a little and applied a coat of Clear Gesso, allowing it to air dry to a matte finish.


Cutting the pages to go inside the Pocket Notebook is easy with Eileen's new die design. When you get your die you'll see that on one end there are only three cutting edges with the fourth side left free. This means you can cut pages to any width you want and they'll be the perfect length to fit inside your Pocket Notebook. The photo below shows how I've drawn lines onto my die with a pen to mark off different width sizes as a guide so I can cut multiples all the same.


To cut signatures fold several sheets of paper (in this case tea stained copier paper) in half lengthwise (be it standard size in the US or A4 size in the UK). Place the folded paper sheets onto the die Place the folded edge onto the side with no cutting blade overlapping the top of the page cutting edge just a little - the remainder of the paper will hang off the end of the die so that it remains uncut.


You'll see below what happens when you run the paper and die through your cutting machine. Trim away the little bits of excess paper at the top and side, retaining the paper at the bottom for a smaller notebook. I cut several of these and stitched them together before binding them into the inside of the Pocket Notebook covers.


For a second faux finish I decided to replicate the look of an old rusted chain. Paint a piece of card with Umber Acrylic Paint and when dry add a thin coat of diluted Sedona Acrylic Paint.


Dilute some Cheddar Acrylic Paint on your craft mat and dab the card into it, heat setting and re-dabbing until you get the desired look.


Spritz with a little Distress Resist Spray to apply drips and drops over the painted card.


Shake over Chunky Rust Baked Texture Embossing Powder and heat set.


Once dry you can apply further coats of watered down Umber and Cheddar Acrylic Paint until you get the look you want. This will not adversely affect the Embossing Powder. I die cut a couple of the Large Stems flowers from the Faux Rust card.


To provide a contrast between the faux leather and faux rust surfaces I stuck some leftover painted paper (from THIS project) mounted on card and cut it into squares. Lining them up perfectly on the front cover was easy with the Wendy Vecchi STAY-tion.


To finish the front cover I wound wire, wool and beads around the die cut flower stems before sticking them on top of the mounted squares. I also added a small coordinating butterfly from my stash - Linda sells lots of different ones in her store HERE. A beaded twisted wool page holder was attached to the inside of the book spine and a mix of tiny silver plated and bronze bells were attached using jump rings. Here's a closer look at the finished book;


And here's the back of the book showing the finished faux leather look more clearly;


So that's my take on the theme 'It Looks Real' for the current The Funkie Junkie Boutique Blog challenge. My fantastic team mates have created the most amazing projects for this challenge so make sure you hop on over and check them out HERE. And remember to link up your own shabby chic or vintage projects with your choice of faux finish to be in with a chance of winning one of the fabulous prizes.

Thanks for visiting,
Jenny xxx

Products used to create this Faux Finish Pocket Notebook are available from The Funkie Junkie Boutique and are listed/linked below.

21 October 2019

PaperArtsy Paper Stitching Workbook for Eileen Hull Designs

Hi everyone and welcome. This month Eileen Hull's Inspiration Team continue to share ideas for using the new Sizzix Scoreboards XL Die - 'Pocket Notebook'. Make sure to check out all the team's fabulous posts on Eileen's website HERE.

This stitched paper Pocket Notebook was initially made to hold a 'to do' list memo book, turned into a full blown workbook and is based on a previous favourite tutorial HERE;


I've taken step by step photos to show you how this came together, starting with cutting the covers with the die from thick card. I chose to make the spine even more flexible by cutting it away from the main part of the cover and reattaching it with fabric tape (Architape). As I only planned to store a single memo book and some notes the spine was made from just two of the three strip pieces as shown below. You may spot the spacers used to measure the 1/4 inch between the spine and cover each side. I love this clever tool from Cool Katz Craft as it means no more measuring!!!


No measuring for this bit either - I cut a piece of plain cotton calico so that it was large enough to fold around the covers.


Totally inspired by the recent run of coral colour projects over on the PaperArtsy blog I selected a range of Fresco Finish paints with PaperArtsy Eclectica stamp set ESC18 and began playing on some strips of card. You'll also see some teabag paper that is stained with Rusty Car and Golden Sands Infusions.


After cutting the painted card into strips they were glued onto the fabric with some added lace, tea stained paper and Design Tape. These were then stitched in place to give them added stability and more flexibility.


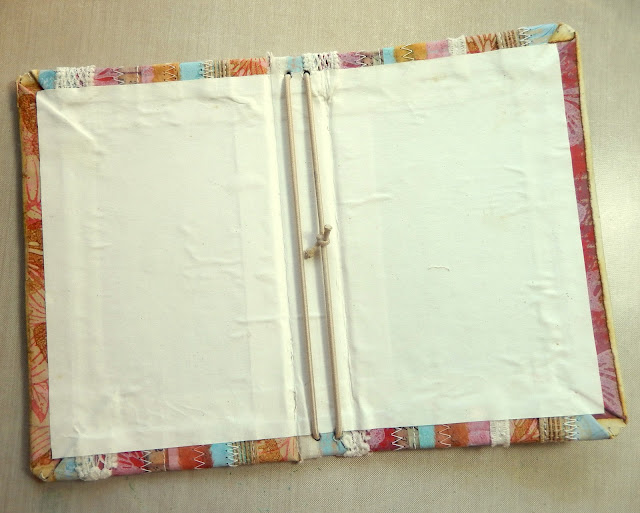
The stitched fabric was stretched over the covers and glued in place. Tea stained copier paper was cut to size and glued onto the insides of the book cover. I also took the chance to re-punch the holes at the top and bottom of the spine so elastic could be threaded through them.


With lots of off cuts remaining from the painted card and stained paper I created a matboard plaque for the front cover using the plaque piece from the Journal die covered in more of the cotton calico fabric. The pen loop for the side of the workbook was created by applying the teabag paper to some Sizzix Paper Leather (Eileen's Easy Cut Adhesive from Thermoweb) before cutting the shape suing the Pocket Notebook die.


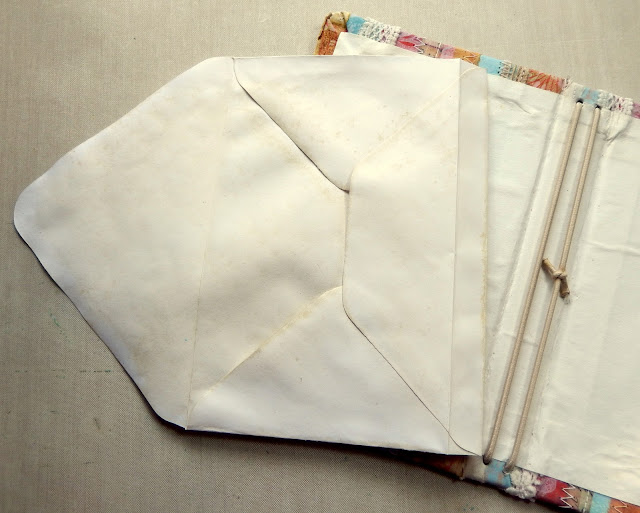
Wanting to create a simple pocket to hold important notes, numbers and references I tea stained a C6 envelope, folded it back by 1.5cm and decorated it with stamping and more strips of paper. Hint; if you are stitching onto the envelope make sure to cover the reverse side with tea stained copier paper to match.


I used more strips of paper to cover a pocket on the back of the book and added the pen loop above it. After stitching the two sides of the loop together I stapled it to the cover, disguising the staples with the top half of the loop.


Here are some close ups showing how I finished the workbook and personalised it further;


You can see here where the plaque was glued to the front cover. A coordinating colour pen was tucked into the pen loop so there's always something to hand to write down those deadlines. A cotton yarn page saver made using Eileen's Twist n Style Tool - I looped it around the elastic at the top of the spine.


Below you'll see the stamp decorated envelope in place together with some index cards, tea stained and trimmed to fit inside.


The front of the envelope flap was covered in more strips of card and paper, with the stitching on the reverse disguised with paper as mentioned previously. You'll also see that a colour coordinated memo book was slipped through the first of the elastic ties.


I often need small bits of paper to make notes about the ingredients used in projects or for adding address labels to packages so the second of the elastic ties was the perfect place to slip through some offcuts of tea stained copier paper left over after making smaller books. This is easily refillable over time.


On the back cover you'll see the extra pocket added as a space to keep other bits as needed.


That's it for this month's Eileen Hull project. For lots more from the Inspiration Team don't forget to check out Eileen's website HERE. And if you haven't yet make sure to get your hands on the new Pocket Notebook die.

Thanks for visiting,
Jenny xxx

A list of PaperArtsy stockists can be found on their blog HERE.

9 October 2019

It's Halloween at The Funkie Junkie Boutique Blog!

Hi everyone and welcome. It's the start of a new challenge theme over at the The Funkie Junkie Boutique Blog. It's Sara Emily's turn to host and this time the challenge is called 'It's Halloween!' Here's what she says about it; "I love Halloween! With Halloween just a few weeks away, I challenge you to create a vintage or shabby chic project with a Halloween theme. Your project can be as silly or creepy as you like, but just have fun!"

As ever, the Design Team will choose their top four picks, with the winner being invited to join us in a Guest DT spot at The Funkie Junkie Boutique Blog and the next three will receive Top 3 badges to display on their blogs. Everyone who enters and follows the rules will be entered into the draw to have the chance to win a $25 spending spree at The Funkie Junkie Boutique.

With the recent release in the US of Eileen Hull's 'Pocket Notebook' die this challenge seemed like the perfect time to create one with a Halloween theme. So I've put together a handbook ready for recording lotions and potions, with a spooky fireside scene on the front and stamped tea stain aged pages bound inside.


I began this book with the cover, adding a pattern to the surface with Texture Paste through the Flames Stencil and altering it with a combination of White Gesso and dilute 'Umber' Acrylic Paint. By sticking muslin fabric to the inside I was able to create a 'fringe' around the edges on the front. Next up came the fireplace, die cut and built up in layers to add depth and dimension. After painting it in 'Elephant' Acrylic Paint I went over with a wash of dilute Black Gesso to add the shading that comes from smoky fires burning in the grate for many years. Talking of fires I chose to light this one with 'Sedona', 'Cheddar' and 'Lemon' Acrylic Paints topped off with Glossy Accents on the flames.


Creating the bits and pieces for the mantlepiece was so much fun. The bottles were coloured with 'Magenta', 'Cheddar' and 'Olive' Acrylic Paints, topped with clear plastic, tea stained labels and kraft stock corks. To give the crystal ball an authentic finish I painted the sphere with White Gesso and Pearl Mixative Alcohol Ink before adding a thick coat of Glossy Accents. The candles were die cut from glossy card, defined with dilute Black Gesso. The page holder hanging along the spine includes an altered spider charm.


Inside I bound the book with tea stained pages and stamped some with various Tim Holtz Halloween themed images from sets including Ravens, Tangled Webs and Ledger Script. The end pages were created from Italian marbled paper which had the look of flames from the fireplace on the cover.


So that's my take on the theme 'It's Halloween' for the current The Funkie Junkie Boutique Blog challenge. My fantastic team mates have created the most amazing Halloween themed projects for this challenge so make sure you hop on over and check them out HERE. And remember to link up your own shabby chic or vintage Halloween themed projects to be in with a chance of winning one of the fabulous prizes.

Thanks for visiting,
Jenny xxx

Products used to create this Halloween Pocket Notebook are available from The Funkie Junkie Boutique and are listed/linked below.

3 October 2019

Eileen Hull Designs Pocket Notebook Blog Hop!

Hi everyone and welcome. Today is the official launch day for Eileen Hull's latest die - the Pocket Notebook - and to celebrate a whole heap of extremely talented creatives have put their own spin on it for a very special Release Party!!! Eileen’s Inspiration and Education teams have combined to show us their amazing Pocket Notebook ideas. Please follow the Blog Hop to see all of the fabulous projects, techniques and videos (more details at the end of this post).


That's just a taste of what can be created with this new die, now here's what the Pocket Notebook looks like - you get all of the pieces you need to make an entire book- the cover, pages, latch and pen loop! The Pocket Notebook measures 6 3/4” x 4 1/2” with a spine that can adjust from of 3/8” to almost 2”! String it with elastic, hemp, ribbon or twine, or even bind it. So many option for this fun die!


For this special Release Party I create a new bound junk journal with a collage style cover;


Whilst visiting That's Crafty for Eileen's recent UK Paper Trail workshop (featuring this fabulous die) there was enough time to check out Laura's huge stock of stencils and I was excited to find many of Rebekah Meier's gorgeous designs (find them online HERE). One of these (called Mini Raven Mosaic) teamed beautifully with the PaperArtsy stamp set ECF05 by Courtney Franich. Below you'll see how four colours of PaperArtsy Fresco Finish Paint (Hey Pesto, Stone, Spanish Mulberry and Haystack) were used to create a rainbow effect background which could then be added to matboard ready for die cutting the covers. I included one of those flexible spines (now familiar from previous smaller Notebooks) covered in lace and string so that the inside text block could be bound properly.


You can see from the photos below how the stamps and stencil were used over the brayered background with a combination of ink, paste and paint to create a layered collage. I also used teabag paper coloured with PaperArtsy Infusions (Golden Sands) lace, string, wire and yarn, and one of Eileen's Journaling Words, die cut from her Thermoweb Foam Adhesive and covered with Thermoweb's Deco Foil Transfer Sheet (Aqua). To make the page holder I used Eileen's Twist n Style Tool to create a twisted braid of contrasting yarns and added charms before attaching it to the inside of the journal spine.


The special part to this die is the new feature of an open ended page cutter - this allows you to cut pages to the perfect size lengthwise, leaving the folded edge free so you can determine how wide you want them to be.


During Eileen's UK Paper Trail we learned how, by folding A4 size sheets of paper in half (as shown above) complete signatures could be die cut easily from one end - since this is a Bigz XL die you can cut multiple pages at one time. For this journal I folded several sheets of tea dyed copier paper, graph paper and scrapbook paper together. Once cut you are left with pieces which, with a minimal amount of trimming, are then perfect to fit inside a smaller Notebook, Wrapped Journal or Passport Book (as shown below). No waste! Perfect!!


Here are a couple of photos showing how the text block was added inside the covers;


That's it for my project - now back to the Release Party and that Blog Hop I mentioned at the top of this post.

Please follow the Blog Hop to see all of the fabulous projects, techniques and videos!

There are also two GIVEAWAYS - the Pocket Notebook die and a gift certificate for Eileen’s Etsy store. To enter to win, leave a comment on each of the posts. Winners will be announced on Tuesday, October 8 on Eileen’s Facebook Live show. Eileen will be on Facebook Live today at 4:00 Eastern at Eileen Hull Designs with a couple of special guests so be sure to tune in.

Thanks for hopping along with us today!

Jenny Marples (you are here)

Related Posts Plugin for WordPress, Blogger...