17 November 2021

Tag It with The Funkie Junkie Boutique Blog

Hi everyone and welcome. Teri is hosting the latest challenge over on The Funkie Junkie Boutique Blog and she's called it 'Tag It'; "Now is the time to be sure you have enough holiday gift tags. Show us your best festive holiday tag!"

The Design Team will choose their top four picks, with the winner being invited to join us in a Guest DT spot at The Funkie Junkie Boutique Blog and three additional outstanding entries will receive Top 3 Badges to display on their blogs. Everyone who enters and follows the rules will be entered into the draw to have the chance to win a $25 spending spree at The Funkie Junkie Boutique.

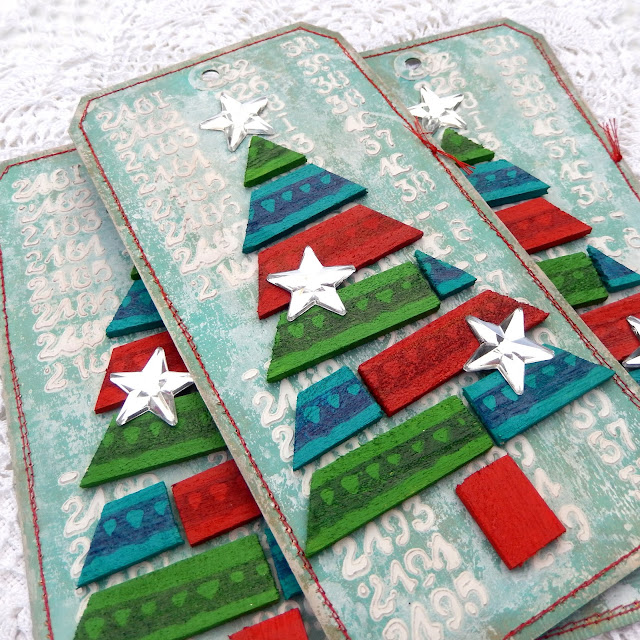
For this challenge I chose to make three large tags (they measure 8"x 4") which are needed for three large candy jar gifts this Christmas.


After dry brushing layers of Gilt, Turquoise, Sky and White Dina Wakley Media Acrylic Paints onto the tags (both front and back) and machine stitching around the edges I applied paste through the Prima Finnabair 'Book of Numbers' stencil.


To make the trees I used the small pieces of balsa wood that are often included as stretchers when you buy canvases, cutting them to make the tree shapes before painting them with Evergreen, Peacock and Sedona Dina Wakley Media Acrylic Paints.


The garland stripes across the middle come from a stamp in the Dina Wakley Media 'Not Subtle' stamp set and was applied with coordinating Archival Inks; these included Wendy Vecchi's Night Sky and Mulberry as well as Library Green.


Once the decorated wood pieces were glued in place on the tags I added some large Mirrored Stars for a touch of sparkle.


That's my take on the 'Tag It' theme. For even more inspiration the rest of the Design Team have come up with their own projects for this challenge so make sure you hop on over and check them out HERE.

For now, thanks for visiting,

15 November 2021

Crafting for the Seasons with Eileen Hull Designs

Hi everyone and welcome. This month Eileen Hull's Teams are crafting for the seasons which covers fall, winter and all the holidays therein. As luck would have it I was also kindly asked by Susan Seabert of Country View Crafts to send a project using the Vintage Truck so it could be used as part of Eileen's Tailgate Party (if you missed Eileen's Live featuring Sizzix and special guests you can catch it on replay HERE).


So by combining these two - the Tailgate Party and Crafting for the Seasons - I came up with this Vintage Truck and hand-bound Sweater Notepad Set, a bit of a twist on the festive favourite red truck with Christmas tree in the back;


I've put together a tutorial to explain how this all came together, starting with the truck. Links have been added throughout to the relevant products stocked by Country View Crafts.

All the pieces should be cut from mount board (or a similar weight card) using Eileen Hull's 'Box, Vintage Truck Sizzix Scoreboards XL Die', including two sides, four wheel arches, one of the truck bases, two base endcaps and four hub caps. Paint all of these with a coat of 'Medieval' Dina Wakley Media Acrylic Paint.


When the paint is dry partially assemble the truck - the box inside and the two sides - as shown below;


Paint over the box and sides with 'Ruby' Dina Wakley Media Acrylic Paint and when dry rub over with sand paper to reveal some of the Medieval paint below. You can further enhance that ageing by rubbing over some Tim Holtz 'Vintage Photo' Archival Ink.


To create the 'wooden' truck insert use the second of the box pieces cut when using Eileen's 'Box, Vintage Truck' XL Die and after spritzing with water use a woodgrain embossing folder on it to create the look of timber (I used an older one). Paint all over on both sides, first with a coat of 'Umber' Dina Wakley Media Acrylic Paint and then with looser brush strokes of 'Sand' Dina Wakley Media Acrylic Paint.


When you've done this on both sides rub over with the Tim Holtz 'Vintage Photo' Archival Ink to bring out the wood grain.


After cutting this piece of 'wood' in half horizontally use one of the already completed truck sides as a template to cut away the window and bonnet areas before gluing each piece in place inside the box section as shown below. When in place you can glue the two sides onto the outside of the truck box.


To complete the truck paint the wheels first with 'Black' Dina Wakley Media Acrylic Paint, then with 'White' Dina Wakley Media Acrylic Paint, sanding back the edges to give them that authentic look of wear and tear. Cover the smaller wheels hubs with Eileen Hull Molten Dimensions 'Polished Silver' Embossing Powder - the more coats you give it the more the finish will become domed and smooth.


To finish the truck glue the hub caps onto the centre of the wheels and then glue the wheels onto the sides of the truck.


Turning to the notebook begin by cutting two sides (which will have the spine attached) from mount board (or a similar weight card) using Eileen Hull's Sizzix Scoreboards 'Notepad' Die. If you want to give the finished notepad a more flexible spine cut away the existing spine pieces and glue together to form a double layer. If not leave the spine pieces attached to the covers.

Spritz the cover sections with water and emboss using Eileen Hull's 'Sweater' 3D Sizzix Embossing Folder. Paint over the embossing on both sides with 'Sand' Dina Wakley Media Acrylic Paint before dry brushing over the raised areas with Dina Wakley Media 'White Gesso' (or you can use the white paint mentioned previously). To emphasise the embossed pattern even further I rubbed a 'Fallen Leaves' VersaFine CLAIR ink pad over the surface of each side of the embossing folder, carefully re-placed the embossed card into it and ran it through my embossing machine to transfer the ink into the debossed areas. You will need to clean the embossing folder when finished.


Re-attach the spine between the two covers using some bookbinding tape as shown below, leaving a gap between the spine and each cover - I've used Architape® and 1/4" Hinge Spacers from CoolKatzCraft Ltd to do this. Alternatively if you've left the spines attached to each cover glue them together and add tape over the top to strengthen the scored areas. I also chose to wrap silver ribbon around the spine to add a decorative touch.


At this stage I inserted a blank hand-bound text block inside; there are lots of tutorials online showing how to make and attach text blocks and practice really does make perfect with these.


Layer and glue together the die cut tree pieces (included on Eileen Hull's 'Box, Vintage Truck Sizzix Scoreboards XL Die') using one of the smaller trees to support the larger tree at the front. Paint with 'Evergreen' Dina Wakley Media Acrylic Paint before covering with clear glitter.


Finish the Notepad by gluing the trees onto the front cover.


Below you can see how the Vintage Truck and Sweater Notepad look apart and how the silver ribbon trim looks on the spine of the Notepad.


I hope you've enjoyed seeing how Eileen's dies (and more) have been used to create this festive set using products available from Country View Crafts. Make sure to check out the other seasonal projects and tutorials from the other team members - links to their posts can be found on Eileen's blog throughout the month. And don't forget, if you missed Eileen's Live Tailgate Party featuring Sizzix and special guests you can catch it on replay HERE.

For now thanks for visiting,
Jenny xxx

3 November 2021

Living Things at The Funkie Junkie Boutique Blog

Hi everyone and welcome. Suzz is hosting the latest challenge over on The Funkie Junkie Boutique Blog and she's called it 'Living Things'; "For this challenge the inspiration is animals or any type of living creature that you want to feature on your art! This will showcase our love for our pets, animals and/or our insect friends! Include a photo, stamped image, embellishment or pattern paper of a living creature in your art. "

The Design Team will choose their top four picks, with the winner being invited to join us in a Guest DT spot at The Funkie Junkie Boutique Blog and three additional outstanding entries will receive Top 3 Badges to display on their blogs. Everyone who enters and follows the rules will be entered into the draw to have the chance to win a $25 spending spree at The Funkie Junkie Boutique.


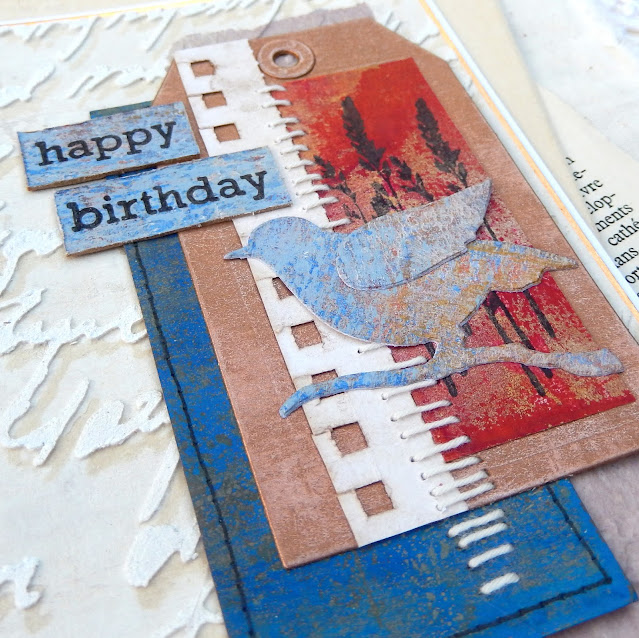
Now it may be hurtling towards that festive time of the year and minds may be turning to holiday projects but there is always a need for birthday cards. With my stocks running low I decided to use this challenge (and an upcoming showcase tutorial) to team some Prima Finnabair stencils and Prima Finnabair Art Alchemy wax to create backgrounds for a new set.


For this background I used the 'Ghostwriter' stencil and 'Old White' Wax Paste on top of some Dina Wakley Media Paint. To frame it some of the Tim Holtz Metallic Kraft Stock worked perfectly.


Last year my team mate Suzz suggested organising all those leftover bits and bobs collected over the  years into colour families, something I am really grateful for because it makes looking for scraps, stamped pieces and die cuts that will work together so much easier. The bluebird and sentiment were made from the same gel print, contrasted with another gel print in shades of red and gold onto which I stamped the grasses from a Wendy Vecchi set called 'Bravo'. Adding further layers, textures and some stitching helps to add detail to the card.


That's my take on the '
Living Things' theme. For even more inspiration the rest of the Design Team have come up with their own projects for this challenge so make sure you hop on over and check them out HERE.

For now, thanks for visiting,
Related Posts Plugin for WordPress, Blogger...