20 November 2019

Lovely Leaves at The Funkie Junkie Boutique Blog

Hi everyone and welcome. It's the start of a new challenge theme over at the The Funkie Junkie Boutique Blog. It's my turn to host and this time the challenge is called 'Lovely Leaves'. "At this time of year leaves take over from flowers as the stars of Nature's display - the deciduous ones take on beautiful Autumnal hues before falling to the ground, whilst the evergreen ones keep our gardens from looking bare as we wait for new flowers to appear in the Spring. For this challenge make sure to add leaves (or even Pine Needles if you like) to your vintage or shabby chic projects."

As ever, the Design Team will choose their top four picks, with the winner being invited to join us in a Guest DT spot at The Funkie Junkie Boutique Blog and the next three will receive Top 3 Badges to display on their blogs. Everyone who enters and follows the rules will be entered into the draw to have the chance to win a $25 spending spree at The Funkie Junkie Boutique.

This DT project features layers of Dina Wakley Media Acrylic Paint in the background and leaves from Tim Holtz 'Nature's Wonder' stamp set in the foreground, and has an Autumnal colour palette (which seems to have come and gone very quickly this year here!)


I've put together a tutorial for recreating the cover of this Pocket Notebook below.

Tutorial


Having cut the two covers using Eileen Hull's Pocket Notebook die the spine has been cut away and rejoined with a quarter inch space either side using Architape. I've shown this step several times on my blog including here. After covering the covers and spine with a coat of White Gesso follow up with a layer of Dina Wakley Media 'Gilt' Acrylic Paint. Then scrape over random patches of White Gesso on the top.


From here it looks a little scary with some brighter colours in play but fear not, you've seen that it turns out alright in the end. Use a brayer to apply a coat of Dina Wakley Media 'Blushing' Acrylic Paint; you can see below that I left some of the previous layers visible underneath.


Repeat the process, this time with Dina Wakley Media 'Cheddar' Acrylic Paint. As each layer is applied so I use less and less paint.


Again, repeat the process with Dina Wakley Media 'Carnation' Acrylic Paint.


To tone down the bright colours dry brush over it all with White Gesso, taking care to go lightly at this stage - you don't want to lose all the colour that's been lovingly applied so far!


While the covers and spine are still flat trim the spine with ribbon or lace; Linda stocks beautiful ribbon in her store including this Gold Crocheted Metallic Ribbon from May Arts.


To compliment the gold ribbon and protect the edges of the notebook add Gold Tone Corners, altered with first Black Gesso then a little Mushroom and Latte Alcohol Inks. You'll see from the photo below that I used the same paint/inks to alter some of the gold beads on a yarn tassel, attached to the inside of the spine before the text block is added.


As this challenge theme is all about leaves it's time to include some of those; stamp out oak leaves from the 'Nature's Wonder' stamp set on coloured paper/card. Mine was left over from a Gel Press printing session and has many of Dina Wakley's colours on it including Ruby, Cheddar, Sedona and Buff. Cut them out ready for adding to the front cover.


Apply some of the 'Aviary' Collage Paper to a piece of card using Matte Distress Collage Medium and cut/tear to trim the section you want.


To finish I added some torn strips of painted paper (more of the stuff used for the leaves plus some coloured with Dina Wakley Media 'Olive' Acrylic Paint) stitched together with lace trim. With the bird in place I attached a key from my stash (Linda also has keys in her store) wound with burlap string and wire and arranged the stamped leaves around it. For a final detail I added a Drusy Cabochon and small gilt bead before attaching the tea stained paper text block inside.

Here are some close ups to show you the finished notebook in more detail;


Inside are the bound tea stained copy paper pages that can be held open by the beaded tassel;


For now that's my take on the theme 'Lovely Leaves' for the current The Funkie Junkie Boutique Blog challenge. My fantastic team mates have created the most amazing projects for this challenge so make sure you hop on over and check them out HERE. And remember to link up your own shabby chic or vintage projects featuring leaves to be in with a chance of winning one of the fabulous prizes.

Thanks for visiting,
Jenny xxx

Products used to create this Pocket Notebook are available from The Funkie Junkie Boutique and are listed/linked below.

19 November 2019

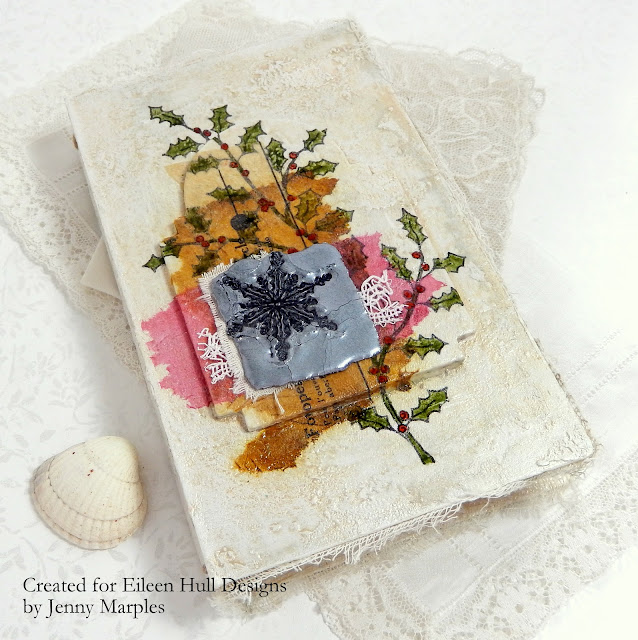
Christmas Collage Junk Journal Style Pocket Notebook for Eileen Hull Designs

Hi everyone and welcome. Over the next couple of months people will be celebrating a number of holidays so Eileen Hull's Inspiration Team have been creating projects with those in mind using her fantastic dies. You can find details all their informative and inspirational posts on Eileen's website.

It's been a while since I've made a junk journal so this new holiday notebook gave me the perfect opportunity - scraps of paper and card are ideal for recording all those holiday memories and lists on. I also wanted to play with some collage ideas on the cover using Kay Carley's beautiful Christmas stamps from PaperArtsy. The style of collage is heavily influenced by the work of the incredible Roxanne Evans Stout - find out more about Roxanne and her art on her website here.


I've put together a step by step tutorial to show you how it came together sharing a few tips and techniques along the way.

Tutorial


Cut two covers from mount board using Eileen Hull's 'Pocket Notebook' XL Scoreboards Die from Sizzix. You can choose how wide to make the spine depending on where you glue together the scored portion on the end. I went for a slim style notebook, overlapping just two of the strips as shown below.


I went on to add a die cut piece of mount board to the centre of the front cover (using an old Tim Holtz Movers & Shapers Die). You could add any shape you like for this part or even leave it flat. Scrape patches of PaperArtsy Grunge Paste over the front of the cover using a spatula and allow to air dry. Add a coat of gesso to the inside and outside of the cover before applying a layer of PaperArtsy's 'Cloud 9' Fresco Finish Chalk Acrylic Paint. Stamp the large holly branch image (from Kay Carley's Eclectica stamp Set EKC32 by PaperArtsy) onto tissue using permanent black ink. Tear it away from the sheet around the edges and adhere it to the front cover using Matte Distress Collage Medium.


Apply 'White Fire' Fresco Finish Metallic Acrylic Paint from PaperArtsy mixed with water (about half and half) to the front cover and allow it to settle into the uneven surface, heat setting when you are happy with the look. You can repeat this process if you want a stronger look - for this project I just wanted to highlight the surface rather than make it a focal point.


Mount board (or Matboard) can start to split along scorelines if subjected to a lot of wet media so I like to reinforce the spine in a couple of ways. Firstly you can run a thin bead of Matte Distress Collage Medium along the scorelines when bent into their eventual shape; it dries clear, matte and shrinks back so creates a seal against wet media. Secondly glue a layer of fabric or muslin to the inside of the cover, ensuring it is eased into the folds along the spine. Once dry you can trim the edges or leave them ragged as I did in this case. If the fabric is thicker you can also re-punch the holes in the spine. To finish I painted the same diluted mix of 'White Fire' Metallic Acrylic Paint over the fabric when the glue was dry.


I didn't want to cover the stamped holly branch up but needed some colour applying and so opted to add transparent/translucent layers over it. The tiniest amount of PaperArtsy Infusions 'Golden Sands' was diluted with water and painted onto single layers of torn tissue. It was heat set to allow it to wrinkle in places. It could then be added to the cover using a generous amount of Matte Distress Collage Medium.


After adding a piece of torn dress pattern over the top it was obvious that the Collage Medium had removed the sheen left by the paint over the rest of the cover - of course, that's it's job! To make the area blend in with the painted cover I added a thin layer of PaperArtsy's Pearl Glaze.


The art of collage is about seeing what each layer looks like and deciding whether you need to add more. In this case I felt it needed more colour, so diluted a tiny amount of 'Blood Orange' Fresco Finish Chalk Acrylic Paint to another piece of torn tissue. This was then applied with the Matte Collage Medium and a little more of the Pearl Glaze was brushed over the top.


As a final focal point I melted several layers of Eileen Hull's 'Polished Silver' Molten Dimensions Embossing Powder from Emerald Creek Craft Supplies onto a piece of torn card. Whilst still hot I covered the smaller snowflake from Kay Carley's stamp set with black permanent ink and pressed the image into it. Once cool the stamp could be peeled away from the embossed card to reveal the crisp image, one of the many benefits of using good quality red rubber stamps.


To finish the notebook and add even more colour I filled in the holly branch leaves and berries with Sakura Glaze Pens and added a small piece of torn lace under the embossed snowflake. A length of thin white elastic was painted with more of the 'White Fire' Acrylic Paint before being looped through the holes in the spine to create space for two signatures.

Here are some close up photos of the finished cover;


In keeping with the Junk Journal style I created two signatures with lots of different scraps of paper and card; below you can see just two of the pages made from tea stained graph paper and an offcut of wallpaper. I also added pages cut from tea stained copy paper, old Christmas scrapbook paper, vellum. tea stained ruled paper and brown packaging paper. Most of these papers have no pattern on them, ideal if you want to write or draw on them. Since Eileen's die cuts pages easily from pretty much anything folded in half this is an easy job, and you can do several at a time depending on their thickness. They can be of varying widths too as in this case where I added a total of 18 sheets to each signature (creating 72 pages in all).


That's it for this month's Eileen Hull project. For lots more from the Inspiration Team don't forget to check out Eileen's website.

Thanks for visiting,
Jenny xxx

A list of PaperArtsy stockists can be found on their blog here.

6 November 2019

Fabulous Fall at The Funkie Junkie Boutique Blog

Hi everyone and welcome. It's the start of a new challenge theme over at the The Funkie Junkie Boutique Blog. It's Ginny's turn to host and this time the challenge is called 'Fabulous Fall'. "It's the wonderful season where the leaves are changing and the air is crisp and our thoughts turn to pumpkin spice everything. For this challenge create a Fall inspired project."

As ever, the Design Team will choose their top four picks, with the winner being invited to join us in a Guest DT spot at The Funkie Junkie Boutique Blog and the next three will receive Top 3 Badges to display on their blogs. Everyone who enters and follows the rules will be entered into the draw to have the chance to win a $25 spending spree at The Funkie Junkie Boutique.

For my DT project I wanted to create a new Pocket Notebook and incorporate some of the colours associated with Fall on the front. After messing around with a few ideas I came up with a collage featuring a floral bundle that uses some of the charms and findings which can be found in Linda's store.


This Notebook is a little different from my previous bound ones in that I've created three large signatures and tied them into the spine. You'll also see a moulded clay piece on the front cover alongside the scrap of muslin and the Fall floral bundle. The vibrant vintage colours have been achieved using a number of Alcohol Inks, and the cover began life covered in plain cotton calico before being altered with Dina Wakley Media Acrylic Paints. Here are some close ups;


Inside I've used a mix of tea stained copier paper and old scrapbook papers that match the colour scheme on the cover to create the signatures;


If you want to know more about how all of this came together - how I painted the fabric, how the Fall bundle was coloured, and how I constructed the Notebook itself please join me over on The Funkie Junkie Boutique Blog this coming Saturday, 9th November 2019, to see my step by step Saturday Showcase tutorial.

For now that's my take on the theme 'Fabulous Fall' for the current The Funkie Junkie Boutique Blog challenge. My fantastic team mates have created the most amazing projects for this challenge so make sure you hop on over and check them out HERE. And remember to link up your own Fall inspired shabby chic or vintage projects to be in with a chance of winning one of the fabulous prizes.

Thanks for visiting,
Jenny xxx

Products used to create this Faux Finish Pocket Notebook are available from The Funkie Junkie Boutique and are listed/linked below.

Related Posts Plugin for WordPress, Blogger...