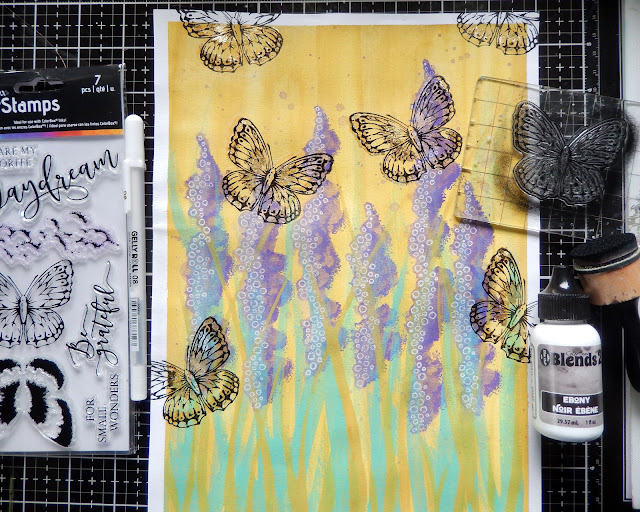
Here's how this came together. I began with an A4 sheet of watercolor paper, misted with water on both sides and stuck down to the glass mat to prevent it from warping uncontrollably. I then applied Eileen's 'Golden' and 'Sunshine' Colorbox Blends 2 reinkers using first a foam mini blending tool and then a paint brush. The ink takes a little while to dry so there is plenty of time to add or remove colour until you get the balance you want. In this case I used the brush with a little water to remove some of the colour and create uneven vertical 'stripes'.
As these Blends 2 inks are highly pigmented and super concentrated I was then able to stamp over the background using the 'Coconut' ink using a stamp from Clearsnap's 'Butterfly' stamp set. You can see below that there was no 'bleed through' with the white remaining bright and clear. I found it easiest to apply the ink to the stamp by using the foam mini blending tool.
I then used the Deco Foil Adhesive Pen to apply adhesive to the stamped white areas. On reflection this pen probably works better on plain card than on layers of ink, particularly one which isn't fully dry! Now for the one photo I forgot to take... I cut small pieces of the gold coloured Deco Foil, laid it on top of the sticky areas, rubbed them with my fingers to warm them a little, used a bone folder to ensure the foil had stuck firmly and then removed the sheets.
Here you can see where the foil has been applied over the adhesive. I then decided to go for a 'subtle background butterfly' look by stamping over the foiled areas with the coordinating butterfly detail stamp from the set using the ''Sunshine' Colorbox Blends 2 reinker. You can see how well the ink shows up the intricate detail even over the foiled areas.
Using the slower dry time as an asset I created 'watercolour flower stems' using what I think is a cloud stamp from the Butterfly set on its side in conjunction with the new 'Pansy' Colorbox Blends 2 reinker. By using a brush the colour was pulled out from the initial stamping to look like stylised fluffy flower heads. Then to reintroduce more detail I over-stamped them with the same stamp and ink.
Apologies for the ares of glare on the next two photos - the sun chose to make an appearance for once!!! Using a diluted mix of 'Bay' Colorbox Blends 2 reinker I threw caution to the wind and added bold brush stroked from the bottom of the page to replicate leaves and stems.
This process was then repeated, this time using the 'Golden' Colorbox Blends 2 reinker. I love how you can layer up these inks on top of each other with no dilution or alteration of their true colours. To add in some detail to the flowers (which by now were getting a little lost) I used a Sakura White Gelly Roll Pen 08 to add some small circles and dots to one side of each flower stem (a trick learned from my hugely talented friend Elizabeth Robinson).
In a change of heart I decided to make the butterflies more prominent by over-stamping them with 'Ebony' Colorbox Blends 2 reinker. I think this is going to become one of my 'go to' black stamping inks in future because it coped with whatever lay beneath it and gave a very detailed, crisp finish.
With the tape removed here's what the finished 'painting' looked like;
To create the journal cover I cut two sides using Eileen's Sizzix Scoreboards 'Journal' die, cut the spine from the covers and reattached them with sticky backed canvas (in the same way you may have seen me do for the Notebooks). Colour was applied using slightly diluted Colorbox Blends 2 reinkers - 'Ebony' for the spine and Golden for the edges of the covers. I then cut the 'painting' in half and stuck each side to the front covers.
To finish I applied some gorgeous purple Deco Foil to one side of Eileen's new Foam Adhesive and ran it through my Big Shot with some Thinlits dies to create the lettering for the front cover. Give them a few passes to ensure they cut cleanly through the layers of foil, foam and adhesive.
Here are a couple of close ups so you can see the finished journal cover in more detail;
That's it for this month's Eileen Hull project. For lots more from the Inspiration Team make sure to check out Eileen's website HERE.
Thanks for visiting,
Jenny xxx


Love it!! Especially the cool lettering- shiny. MISS YOU!!!
ReplyDeleteThis comment has been removed by the author.
ReplyDelete
DeleteJenny I LOVE this cover! Butterflies are my favorite! Beautiful ❤️
Absolutely STUNNING!
ReplyDelete