30 January 2016

Lady Elsie...

Hi everyone and welcome. Recently I told you the sad story of Dearest Daphne and mentioned her heart's desire Charles, son of an Earl and a bit of a cad. It's now time to introduce to you Charles' mother, the Right Honourable Lady Elsie...

(click on  each image for a closer look)

Lady Elsie spends a lot of time thinking about the past these days. As the future in Europe seems to her to grow more uncertain and day to day life becomes so drearily predictable, it's a comfort to return to her childhood memories...


Her childhood was a time of freedom long since lost. Under the instruction of their governess, Elsie and her sisters received an education appropriate to their position, learned much of the social etiquette that would be essential in adulthood and were also indulged in their literary and artistic pursuits. The chance to escape into the grounds of their family estate and sketch, paint or read as the warmth of the sun beat down was a treasured time, a dim and distant memory that grows more golden with age.


Elsie always knew that her life would be planned by those around her; it was her duty to marry a man chosen by her parents, ensuring bloodlines, hierarchy, and an order that spanned back centuries. Her mother's only involvement in Elsie's education was to teach her what was expected of her and what she must endure without complaint. And so it was that she began running a household, welcoming guests and dignitaries without question or hope of friendship, and being of use to her husband in any way he saw fit.


The Earl, though not unattractive, had an air of arrogance that gave him an ugly personality. Elsie never entertained the fantasy that the Earl felt any sort of love for her even though she was by any standards a true beauty. Just as she had learned well her duties, Elsie's husband had instilled within him from an early age the belief that a man of privilege could take whatever he wanted whenever and wherever he wanted without reproach. As such Elsie knew that the visits 'to his club' in London would include many dalliances which should never be questioned.


Whilst initially she longed for him to return home to her now she almost dreads the time they spend in each other's company. Elsie's abiding interest in art and culture are lost on him, and as the wine and port flow and his belligerence increases, she listens on in unexpressed sadness as he berates 'those damned Suffragettes and their poisonous ideas'.


The one glimmer of light in her life was on the birth of her son. Briefly 'applauded' for having fulfilled the duty of producing an heir she looked upon him as an angel with a shock of blonde hair and piercing blue eyes. Of course, as with any joy, it was short lived. A governess took over the upbringing of her boy until the time when he was packed off to a succession of boarding schools and ultimately University. Along the way she saw those unpleasant traits inherited from his father develop in Charles and she fears that another generation will be forced to endure all that she has.


And so it seems that in potentially scorning young Daphne's desires, Charles may in fact have given her a lucky escape from a life of servitude and acceptance. Yet all their futures are soon to be changed in a way that will impact on the entire social fabric as the dynasties of Europe collide...


Hopefully this canvas captures some of Elsie's story in its twists, turns and textures.

I'm entering this canvas into the January 2016 Lindy's Stamp Gang Color Challenge.
I've used all the gorgeous Sprays from the limited edition set alongside C'est la vie Cerise and Silver Moon Turquoise Embossing Powders. This has to be one of my all time favourite colour schemes and I've used the sprays to colour most of the embellishments along the way.


There's some stamping using the brand new IndigoBlu Teeny Backgrounds swirl in Gothic Purple StazOn ink and stencilling using their Roman Numerals stencil. And then there's Elsie herself (yep, she's stamped too! on tissue, layered onto burlap and texture paste!)
I wonder what story you could tell using her...


If you want to see Elsie and so many more new and exciting releases make sure you tune into the IndigoBlu YouTube channel after 1pm today (Saturday 30th January) to see a very special video with a double giveaway featuring Elsie and another beauty, Valerie!!!

For my part I hope you've enjoyed this latest tale and am pleased to say there's more to come.
Have a great weekend whatever you're up to and take care of yourselves. Jenny xxx

27 January 2016

Caelataque In Libro...

Hi everyone and welcome! Over at Frilly and Funkie it's my turn to host the next challenge 'Enjoy your Embossing'. As you might guess it's all about embossing! Find those all important prizes and entry details HERE. Officially I'm sharing my Funkie DT project next Wednesday but just couldn't resist the chance to show something else I've been working on which is all about embossing.

For those who caught Georgie Connelly's recent post HERE (if you haven't you must!) you'll have seen her incredible hand crafted book, inspired by the work of Luthien Thye from Altered Alchemy. We've both been drooling over it and talking about giving it a go.
So now, with Georgie's encouragement, it's my turn to share (be gentle with me!)...

~ Caelataque In Libro ~


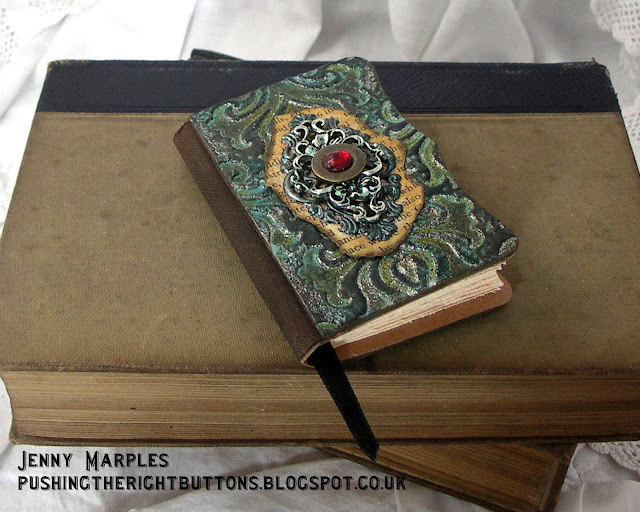
So first up (and essentially) where to start with creating a book from scratch. For me it was a new Sizzix die I got from the fabulous Eileen Hull Designs. Called 'Needle Book' it is a beautiful design that easily cut a mount-board base onto which I could add a die cut damask design. In hindsight I might have been better simply embossing the card before cutting! (note to self) but being as it was my first venture into book making it was an opportunity to learn from my 'mistakes'. I also cut a second needle book shape from plain kraft card onto which I could attach the thicker covers. This meant the spine could remain thin and flexible enough to add painted canvas to.


The main front and back covers were covered in a blend of Broken China, Peeled Paint and Salty Ocean Distress Paints (these blend so well with a fine spritz of water). Then came embossing powders; I love to mix mine to achieve different effects. In this case I used an initial layer of Ranger Silver Embossing Powder on the raised areas before re-embossing with Vintage Photo Distress Embossing Powder. When they melt together the silver takes on a grainier appearance which, when rubbed over with Archival Ink (Potting Soil) catches in random areas. Finally I pounced a mix of Mushroom, Stream and Meadow Alcohol Inks on top to add to the jewel-like quality of the embossing.


I used Ground Espresso Distress Paint to colour the edges of the cover and canvas spine before turning my attention to the centre of the front cover. Book paper, coloured with Frayed Burlap Distress Stain and burned at the edges with a candle flame, was layered under a couple of filigree metal embellishments (embossed with more Silver Embossing Powder and coloured with the same mix of alcohol inks mentioned earlier) a small brass button and a little gem coloured with Cranberry Alcohol Ink.


The signatures were cut from a plain manilla folder, distressed at the edges and dry embossed for interest. Next time I'll have a bash at making dirtier bespoke papers but for now the process of hand stitching the signatures into the spine and attaching a ribbon 'marker' was enough to tackle.


It's amazing what a spot of embossing can do to a project and I hope it lives up to expectations in some way. This is definitely an addictive process and with more Eileen Hull Designs covers in different sizes/shapes to work with the possibilities are pretty much endless!

I hope you pop over to see what my amazing Frilly team mates have to show you and look forward to seeing your own embossed projects entered into the challenge. Next week the Funkie side of the team (me included) will share more inspiration, and tomorrow we have a special Guest Designer posting her own project so if you're stuck for ideas there's plenty to get you started right there!

For now have a great day and take care of yourselves, Jenny xxx

24 January 2016

Tim Holtz (not a) Tag - January 2016

Hi everyone and welcome. With the start of a new year Tim Holtz signalled a change in direction for his annual Tim Holtz 12 Tags challenge. Revisiting and remixing techniques from previous years is essential for those people out there who are new to his products, and are a fabulous aide-memoire to those of us who have seen so many we are in danger of forgetting them! Tim's January 2016 Tag remixes two - Chalkboard and Industrious - and is perfect for any male themed project.

In need of a male birthday card I used his ideas as a jumping off point to create this...

(click each image for a closer look)

Let's start with that base layer; I have a quick tip for you when using repeat pattern embossing folder. Sometimes the folder won't quite reach the edge of your project if you are working on anything bigger than a large tag or A5 card. If it's possible to turn your card 180 degrees and pass it through your embossing machine then great.


If not, lay your card into the embossing folder (so the existing embossed pattern matches up and overlaps with the un-embossed area). Take your Remnant Rub Tool and, using the ball end, gentle push into the folder to manually emboss the missing parts. Hey presto, no-one will see the join!


I swapped Black Soot for Ground Espresso in my Industrious sections (I urge you to try this variation!) For the main Chalkboard area you'll spot my eternal favourite, Ledger Script, working in combo with the Books, Parcel, and Cakes Mini Blueprints from various sets. Those focal images were stamped with Range Glacier White Pigment Ink for clarity (I tried the Chalkboard version but they blended into the background too much in this instance) and the Industrious Sticker borders and frame helped to emphasise them further.


To finish I used a Small Talk sentiment strip covered with Glossy Accents, a touch of machine stitching, some Passport Design Tape in the corners, die cut mini stars and my favourite Pewter Liquid Pearls as faux rivets.


That's the first one of the year done - can't wait to see what Tim will be mixing up for us next! If you haven't joined in yet there's still time.

I've lots more to share with you so please keep your eyes peeled for upcoming posts.
In the meantime have a great end to your weekend and take care of yourselves. Jenny xxx

20 January 2016

Dearest Daphne...

Hi everyone and welcome to my second post of the day (if you missed the first it's HERE).

Over at the IndigoBlu blog today four of the International Design Team are sharing a second helping of gorgeous inspiration for January. Having shared the new floral 'Colour Me' stamps and 'Lost Family'/'Arts and Crafts After Morris' Mixed Media Paper collections on Facebook I've been putting them through their paces again, developing a story to got with it in my head along the way (!)...

(click on each image for a closer look)

Dearest Daphne... she's the granddaughter of a typical 'self made man', a Victorian industrialist who used his ruthless guile and entrepreneurial aptitude to make a fortune 'up North'. This upwardly mobile family now live in the home counties and mix with the higher echelons of society. Daphne attends lots of functions at some of the grandest houses and it was at one of these she met Charles.


Son of an Earl, Oxford educated, he's a bright young man whose potential family inheritance and a huge allowance allow him to gad about with gay abandon. Daphne loves his carefree spirit, his self confidence (though others may see it as arrogance) and piercing blue eyes. She's fallen head over heals and dreams wistfully of their wonderful life together...


Unfortunately for Daphne their 'love' is doomed; Charles rather likes this innocent young belle and her starry-eyed passion for him is rather flattering, but really, she's new money. Her family are 'new money' and his would never hear of him marrying anyone unworthy. Besides, he's too busy enjoying life, his new motor car and escapades with the chaps to contemplate settling down right now! It's to be hoped he lets Daphne down gently but I have a feeling Charles is the type to break her vulnerable heart without much thought...


Daphne's portrait comes from the 'Lost Family' A6 Mixed Media Paper collection. aged with a little gold paint on the edges, coloured with Distress Ink and heat embossed with clear powder, several times before being frozen and cracked. Layered on lace and with a couple of altered brass corners she could sit nicely alongside portraits of her relatives on a grand piano or large mantelpiece!


The background paper is from the 'Arts and Crafts After Morris' Mixed Media Paper collection (this is the 12x12 size) covered in a layer of white gesso and several more Lindy's Stamp Gang sprays. The initial layer of 'Colour Me Dahlia' stamping needed emphasis after I'd added some stencilling and faux 'verdigris' dry embossed paper so I used tissue transfer to make them stand out.


The lace flowers and Calico Crafts lettering were coloured with a mix of paints and Lindy's Stamp Gang sprays before extra seed beads were added. For once I didn't go mad with the embellishments as the paper and stamping needed to remain the focal points.


Thank you for joining me today for a double dose of inspiration. If you haven't done so yet please make sure you see what my fellow IndigoBlu team mates have been up to on their blogs HERE. I know you won't be disappointed!

That's it for today from me. Take care of yourselves, Jenny xxx

List of products used;
'Lost Family' A6 IndigoBlu Mixed Media Paper collection
'Arts and Crafts After Morris' 12x12 IndigoBlu Mixed Media Paper collection
'Colour Me Dahlia' IndigoBlu stamp
English Cottage Artist's Acrylic Paint; Goldfinger, Townhouse Teal, Pink Iced Gem
Fine Texture Paste

Lindy's Stamp Gang sprays - Industrial Chic/Crow's Nest Copper

Sing, Sing, Sing for Frilly and Funkie

Hi everyone and welcome to my first post of the day! Today it's the Funkie DT's turn to rise to Cec's challenge 'Sing, Sing, Sing' over at Frilly and Funkie. Here's what she says about the challenge; "Make a shabby chic or vintage project with music as the central theme. You can add musical instruments, music paper, sentiments about music or even vintage images with a music theme".

The Design Team will choose their top four picks with the winner being invited to join us in a Guest DT spot at Frilly and Funkie and the next three will receive badges to display on their blogs. Everyone who enters and follows the rules will be entered into the draw to have the chance to win a $25 spending spree at The Funkie Junkie Boutique.

Here's my card, combining bird song and the chance to sing Happy Birthday to someone...

(click on each photo for a closer look)

Most of the time I create my own backgrounds from scratch for my cards, yet people keep mentioning they "like the paper I've used" so I figured I'd show you how the background came together on this one!


Start by gently brushing Distress Glaze unevenly around the edge of your card with your finger. Patchy is better and keep the border quite narrow (unless you plan to add a lot of stitching or details around the edges).


Spritz with a layer of Antique Linen Distress Spray Stain - don't heat set it!


Dab away the excess with a dry, clean cloth then allow to air dry a little - still don't heat set!


Blend Tumbled Glass Distress Ink through the Scribbles stencil over the central section .


Laying the stencil back over the card blend Brushed Corduroy Distress Ink in patches. Wipe away any excess ink that may have strayed onto the Glazed edge to remove it and add a little to the edges of the card. Add some stitching to complete the background.

Here are some close ups of the finished card...


Over the background I layered a piece of card with Weathered Wood and Brushed Corduroy inks on, some Wallflower Paper Stash with Remnant Rubs, an Antique Linen Distress Stain blotted mini tag, die cut painted branches, tiny bronze leaves and Frameworks die cut pieces. I cut and keep the inner and outer parts of these from scraps and offcuts so they can be used in combination; this time it's French Industrial paper and some card covered in Rock Candy Crackle Paint and Antique Linen Distress Stain. To finish I added a bird from the 'Love You' Framelits set.


That's it for my 'Sing, Sing, Sing' project. Make sure you see what my Funkie team mates have created HERE and then it's over to you!

I'll be back later today with a second project (and a romantic tale!) so it would be lovely to see you again. For now thank you for joining me and take care of yourselves, Jenny xxx


18 January 2016

Bring in the New... Art Chemistry for IndigoBlu

Hi everyone and welcome! I have a few projects to share with you this week and kick off with this 'Art Chemistry' canvas which includes a brand new IndigoBlu stamp called 'Periodic Table of Elements' which is only just being released to trade this month!... 

(click on each image for a closer look)

As part of the 'Weird Science Series' it teams perfectly with an old favourite, the A5 'Beautiful Mind' stamp set (don't you just love it when new releases team up perfectly with ones you've already got in your collection!) And there's another background stamp that's been added to this series too, giving us even more possibilities! You'll spot the Periodic Table of Elements flittered with Chocolate Box Mega Flakes layered over/under stamping from the Beautiful Mind set and 'Rain Droplets' background. The focal lettering is from the A5 'Plume' stamp set.


So what else has been included; the paints (Wimberry Pie and Goldfinger English Cottage Artist's Acrylic Paints) have been spritzed and splattered over a base of texture paste and a further stencilled layer (using the Texture stencil). The paints have also been used on die cut acetate bottles (Pantry White, Banana Custard and Goldfinger) with more Chocolate Box Mega Flakes applied to the paint brush.


I had a ball creating this with it's acetate bottles and new 'Periodic Table of Elements' stamp, and will be entering the following challenges;


Emerald Creek Dares - NEW


Thank you so much for joining me to see this. I hope you'll be back this coming Wednesday for not one, but TWO posts!!!
And one includes a Distress background tutorial...
For now take care of yourselves, Jenny xxx

Related Posts Plugin for WordPress, Blogger...