9 June 2012

Share and Grow

Hope you are all having a lovely weekend and welcome to all my new followers - I am honoured to have you 'on board'. Reasons to be thankful: it has been a busy couple of days in Blogland with all sorts of fantastic tips and techniques being shared. Some to highlight (by no means an exhaustive list!) include Sue C at Frilly and Funkie, Anita Houston at The Artful Maven Haven, Amy Lynn at Sparkling Gnome Studios, and Hels Sheridan at Ink on my Fingers. Going to workshops and demos is fantastic if you are able to access them, but if not, there are so many wonderfully talented crafters/artists who freely share their ideas and inspirations with the crafty community - a HUGE THANK YOU from the bottom of my heart.

Another fellow crafter I have learned loads from is Julia S-W, who introduced me to the wonders of metal tape (I've banged on about her flowers before). Recently I posted a couple of examples using this medium and today's project is another of those. It is the next part of my OH's pressie (which is coming along nicely) and incorporates a TH CC2 technique called Faux Patina (page 58 - one of Linda Ledbetter's first challenges that I missed originally).


The recipe for the background is as follows; metal tape applied to card and embossed with an Indentz tree folder; patina created using White Mixative, Butterscotch and Stonewashed alcohol inks and a splash of Blending Solution; a bit of a scrub with steel wool; and 'fence' created using an old Anna Griffin wooden stamp with Pine Needles and Snowflake Embossing Tinsel.


The letters are grungeboard Alphas, coloured with a mix of Wild Honey, Pine Needles and Walnut Stain, and then covered with Crackle Glaze - I find this tends to blend the colours even more and gives them a slightly mottled look.


The leaves were punched from silver mirror card coloured on the reverse with teal ink. The pocket watch was stamped in Black Archival ink onto a spare bit of grungeboard using a Clarity stamp, coloured with Wild Honey and covered with Crackle Glaze. Finally the number was also stamped onto grungeboard using Pine Needles and had Crackle Glaze applied. The glaze is intended to make the grungeboard as 'husband at work proof' as I can manage!!

I decided to stop at this point as sometimes (OK, often!) I get carried away and add too much to a small project. One hint here though - after applying inks/solution to metal the surface can be a little sticky, even if it has been heated, so I gave it a quick wipe with an anti-static pad which solved the problem. OK, time to disappear for today - I have a date with some gesso, acrylic paint, Brilliance ink and bits of paper (thanks Hels! - see link above and you may become more enlightened!?) Hugs, Buttons x

8 June 2012

More repurposing!?

Hello out there. Have you got that Friday feeling? Sometimes it seems to be a day to breathe a sigh of relief that you have made it through another week. Other times (like half-term holidays) it is a rude reminder that next week is coming faster than you expected and you didn't get to complete all those plans you had! Whichever applies to you I hope you have a good one.("Enough philosophy woman and get on with it"!)

So here I am with the next instalment of the OH's birthday/inspiration ATC set. This one needed to be a Krafty recycling backup plan (see last post) with the addition of a spot of twine and will be entered into the Frilly and Funkie 'Kraft and Twine' Challenge. If you haven't seen this blog it is a MUST. Unbelievably talented design team members doin' their thang.


Where to start? The beginning methinks. So the paper at the back was scrunched up, reflattened and then had Memento Tuxedo Black ink applied DTP lightly over the raised bits. Next, a greaseproof paper stamped tape measure (Andy Skinner) with silver pen on the 'metal' end at the bottom, followed by a filmstrip (Dimension Fourth - stamped onto acetate packaging with Black Archival on one side along with a Kanban heart, Butterscotch Alcohol ink splodged onto the reverse and the whole lot given a quick blast with the heat gun to buckle it slightly.


The SB silver swirl die cut was overstamped with the same heart in Black Archival so that the image wasn't lost. Really proud of the charm - it was cut twice using a SB die from one of my quiche tin remnants (man, they are stretching a long way!) and had an embossed piece of acetate packaging (TH Texture Fades) coloured with the Butterscotch/White Mixative Alcohol inks, glued inside. To complete it I used a black Promarker and some steel wool (see TH's CC2).


The top section included more 'repurposing': twine, with a touch of DI Walnut Stain in water; a ticket made from that acetate packaging embossed again (same TH folder) with Copper Mixative Alcohol ink on the reverse and Black Archival ink on the front (rough it up a bit to make this adhere more); a small CS Bright Gold embossed heart on black card; a piece of K&Co paper from the Life's Journey collection, mounted on corrugated card, edged with Mementon Desert Sand and highlighted with Crackle and Glossy Accents to make the sentiment stand out; a small acetate star (same folder as above/Copper Mixative), two buttons from my stash and a screwhead stamped onto yellow gold card. And breath...!

Sorry if I've gone on a bit but I have been asked for the recipe/techniques fo many times before it seems sensible just to dish 'em out up front. I know that 's what interests me as much as the piccies on everyone else's blogs (learning for free! can't beat it!!) and you can always just look at the photos if you want. Right, time to shut up and feed the family, if I can stop the ideas from swirling around in my head for a mo'. Thanks for all the lovely comments. Soooo appreciated. Hugs, Buttons x

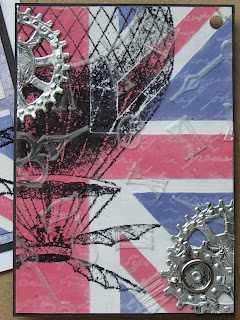
P.S. Ooops, almost forgot!! Those Sam Poole 'Arty Phrases' and 'Arty Sayings' stamp sets arrived yesterday (hoorah!) so I could finish the OH's Union Jack ATC...


Who knew you could stamp on black card with Picket Fence distress marker and it would look like those lovely 'pub menu' signs? Well not me until I tried, obviously!! That really is all folks! B x

7 June 2012

Repurpose your RW+B for a man!!

Good morning all on this damp, miserable day (no, this isn't going to be a depressing post! promise) and welcome to my new followers. OK, so maybe I'm being a bit overambitious here, but I have (almost) finished two projects to combine the following exciting challenges;


Yep, it saves time, but more importantly it fit with what I needed to do, which was...


making my Dad a super card for Fathers Day as he has been an absolute star on so many levels; making another piece for the OH's birthday project; and a new Stampendous stamp set (squeal!!) to play with courteousy of a challenge prize from the wonderful Jill and Ian at The Stamp Man. What better reasons did I need?! So let's show you what I did in more detail.


Menu for the background(s) first. I used lots of Memento Paris Dusk and Lady Bug sponged onto white card and covered in white gesso to make a faded/distressed backing paper. The Union Jacks were created using Ranger Specialty Paper - it wouldn't work with anything else (and believe me, I tried!!) The paper was embossed using my Stamposaurus mask, stamped with Perfect Medium using the Artemio music score background stamp (manuscript one used for the ATC), and then sponged with Paris Dusk and Lady Bug through the mask. Finally I used my wonderful Stampendous balloon stamp and a smaller balloon image from an old issue of The Craft Stamper (Black Archival ink) over the top.


The bunting was cut from white card and stamped with a Kanban Union flag image coloured with Promarkers. DAD was embossed onto three of the flags, and they were arranged using foam pads to help make them more prominent.


So there's lots of red, white and blue, but where's the repurposing I hear you cry (in my head of course!!) On the middle-sized balloon I placed a metal bottle top (bashed flat by my resident strongman - OH) into which I had glued a watch face (stamped onto white card using Black Archival ink, highlighted using CS pearlescent mica paint and covered in a mix of Ranger Crackle Accents and Glossy Accents).


The wings were made from acetate (formerly the front of a Skylanders box from Christmas - not mine of course!!) I used a Kanban steampunk stamp, a mix of Stonewashed and White Mixative alcohol inks, and a heat gun - see TH's Compendium of Curiosities 2 for details of how to do this. Attention then turned to the ATC part of this project (the bit I have almost completed).


More acetate was used to cover the background completely for a reason. When completed, ATC collection for my OH is destined to stay at work with him to provide inspiration and encouragement whenever needed, and it is going to get pawed by grubby hands (manufacturing can be a mucky business you know!!) I didn't want the white to go grey, so acetate seemed a sensible solution. It got another TH technique (see the Compendium again please) and then had cogs - diecut from quiche tin/aged with Black Archival ink/steel wool - and an open brad applied on top. To finish this I intend to add an inspirational saying from one of Sam Poole's recent Arty sets, but they are still in the postal system somewhere and I had a deadline to meet so you'll have to imagine that part. Soz!

So there you have it. Challenges met (almost) and more learned along the way, which is what it is all about.
Thank you for stopping by - hope you like what you see enough to leave a comment - I really appreciate all the lovely messages received over the past few days. They lift the ole soul and make it all worthwhile. Before I get any more maudlin' it's time to sign off!! Hugs, as always, Buttons x

4 June 2012

An unexpected twist!

Good evening all. Thank you for your fantastic comments which are so lovely to read and make me feel like I'm getting somewhere (not sure where as sometimes it seems to be in circles!) For those of you who read yesterday's post you will know I got in a bit of a pickle and missed the last MMM challenge deadline. Well today you could have knocked me down with a feather when I saw this week's theme - Make My Monday 'Birthday Card with Pearls'. Guess what I'd made!! Well I'll show you...


Bit of a story to this one (apart from the fact I took too long on it). I follow the blog of a particularly talented lady called Julia who recently created a stunning tag (go see here). It included instructions about how to create gorgeous metal flowers and methinks "gotta have a go at that".


My recipe/version - metal insulating tape on card; cut using SB Rose Creations and a Sissix embossing folder; coloured using White Mixative and Shell Pink alcohol inks; curled and embossed further with CS pink UTEE on the tips and Ranger Snowflake Tinsel in the centre; and white pearl beads from a charity shop purchase completed the look.


So the next bit of luck is that the background for this card enables me to enter a second challenge - the Simon Says Stamp and Show 'Some Texture' challenge. It includes: pink pearlescent card embossed with a Creative Expressions flower folder; white card embossed and faux letterpressed with a Creative Expressions brick folder; corrugated card (formally a milk container) painted in white gesso, white acrylic paint and inked in sage; white lace stems (formally part of a net curtain); and finally a sprinkling of pearlescent sequins. The sentiment was stamped on two layers of Whitewash Coredinations cardstock.

So there we have it - turned out alright in the end (breathes a sigh of relief). I'm now sat here with the Jubilee Concert on the box and a large glass of Baileys, seeing a myriad of stars entertain us all in honour of Her Majesty The Queen. Doesn't it make you feel good to be British - we do it so well, even in the rain! Thanks to everyone for stopping by. Hopefully see you all again soon (with some very patriotic offerings).
Hugs, Buttons x

3 June 2012

Distressed and out of time

Welcome back one and all. What a change to the weather (yes, we Brits are obsessed!!) It has been tipping it down all morning here and I've had to dig a jumper out again. Tell me, do you ever lose track of time? First thing (still darkish) this morning I finished a card to enter into this week's Make My Monday challenge which took inspiration from the most stupendous project on Julia's blog. Unfortunately when I checked the link had closed... oh b***er. Now it'll have to wait for another appropriate challenge. Serves me right for trying to do too many things at one time (bound to drop the odd ball ).


Still, onto other things... there is a 'Distress It' challenge on the Crafty Cardmakers challenge site, sponsored by the Digi Doodle Shop, that I have a little something put aside for, so no time like the present. The music paper was a small piece left over in my stash which got distressed with Walnut Stain DI and CS silver mica mist. The CS dark bronze mica paint grass was added by hand, and then pieces of lace from an old net curtain were cut to size, coloured with pink and purple mica powder and layered over the top.


The flowers were made from card which had been smooched around in the same pink/purple mica powder (water added). Having been die cut with the smallest of the SB Rose Creations some chocolate buttons were applied to the centres.


I love this butterfly (a Sarah Jayne wooden stamp image) which was black embossed onto card, painted with purple, dark bronze and pearl CS mica paint, and shaped over the end of a pencil. To finish I used charcoal grey/cream patterned card from my stash, dark bronze shimmer cardstock and cream lace, distessed on the edges with DI Walnut Stain. The sentiment was stamped using a Personal Impressions set in black embossing powder onto some more of the charcoal grey/cream card, again distressed with Walnut Stain having been die cut.

So there you have it - a valuable lesson learned about doing things in order. I'm off to work out what to recycle/repurpose for the Studio L3 challenge and to try out a 'what if' in preparation for two 'Red, White and Blue' challenges this week. Sending you all crafty hugs and hoping you are more on top of things.
Hugs, Buttons x

2 June 2012

Using the right words

Helloooo, welcome back to my mad world. So Hels Sheridan set her Sunday Stampers challenge 'Words' in honour of the late Robin Gibb, and I have been working on this on and off all week whilst singing every Bee Gees song in my head. As those of you who have been following my recent posts will know I am working on a birthday/motivational double-sided ATC collection for my OH (instead of a basic birthday card) so the words are very important. I finally settled on...


In my head was a plan for how to create the main word but the rest came together as I went along. Somewhere I have seen someone using small windows in letters to a lower layer to add dimension and interest, but can I find it? The bottom layer was created by stamping manuscript in black archival ink onto silver paper, scrunching it up and then running lightly over the lumps and bumps with teal ink.


The top layer was fun to create and came from a browse through TH's CC2 book. It is the riveted patchwork technique (which I won't go through out of respect for TH - just get the book as it is beyond fantastic). I don't have black soot alcohol ink but I do have copper mixative and black archival ink which, if left to dry, create the same effect. One thing I would say is raid the tool box for bradles, screwdrivers with different heads and use smaller embossing tools, the more the merrier!!


Now that main word was more fiddly than expected. I had to stamp the letters (Sam Poole's again!!) onto the metal layer and cut out the inside of each one using a craft knife. The same letters were stamped onto antique gold card (inked up with the teal ink) and cut out individually - again including removal of the inside of each. These were then layered on top of the metal layer.


To finish gold sprockets were die cut and stamped with archival black, and these were then arranged with brass chain and bits from an old necklace. Very industrial methinks. Hopefully you can see from the piccies above and below how this project is starting to come together?


The reverse of two of these have already been started but need more lightbulb moments to get them finished. That may well come from tomorrow's Sunday Stampers challenge, in which case I may get my entry done earlier in the week for once.

Just a quick heads up - you may have noticed the link currently at the top of my blog to the Crafty Ribbons Best of British event. It has been highlighting some fabulous British craft companies for the past 15 days and if you visit each of the posts you can enter draws for some goodies kindly donated by them (you don't need to have a blog to do this either - I know Hels, everyone should have one !!) The design team have also been super busy creating samples for every day which are well worth seeing. OK, that's all for today. Pink metal flowers to finish (for another project!!) and mouths to feed. I'd love to hear from you and will always try to reciprocate (though some of these verification widgets don't seem to want to work). See you all soon,
hugs Buttons x

1 June 2012

Time for cupcakes

Good evening everyone. So who else is really looking forward to having a lovely long weekend? There has got to be some time to craft in amongst all of the celebrations. Remember those cupcakes I needed to make for my hungry hoards? Thought you'd like a peak - mind, as I write this two thirds of them have gone! (and I did make 32 of them).


On to the main purpose for tonights post - my entry for the Simon Says Stamp and Show challenge, which currently has the theme 'One for the boys'. It is another side to the project for my OH.


Down to the 'how to'; the background is vellum, embossed with a Creative Expressions 'time' embossing folder, smooshed around on the reverse with copper CS mica powder and highlighted on the front with silver ink. The edges were textured using several layers of Ranger embossing tinsel mixed with green mica powder (the idea was that it gave the piece a bit of a verdigris feel).


The chains came from a DIY store - I discovered the one which has initials in its name sells various types of chain by the metre. The 'time' clock tiles were stamped using a mini Clarity pocket watch stamp, using black Promarker on copper cardstock and black embossed letters.


The silver charm is my old favourite, quiche tin cut and embossed with an SB die, with an antique gold insert, Kanban lettering and Crackle Accents. The  large pocket watch was stamped using a Dimension Fourth image onto the same antique gold card, painted with silver mica paint and again covered with Crackle Accents. Not sure it shows up very well, but the word 'shine' was stamped.

Time to disappear for the evening - need to be up early to finish the next part of this project which includes words and another TH technique (more DIY shopping required!) Thank you all for your lovely comments and I hope you all have a wonderful weekend. Hugs, as ever, Buttons x
Related Posts Plugin for WordPress, Blogger...