23 April 2024

Paris in Spring Mini Book for Eileen Hull Designs

Hi everyone and welcome. Spring colours are on full display outside as well as on the desks of Eileen Hull's designers! We are creating inspiring projects for the season drawing from all of Eileen’s Sizzix dies and products. It should come as no surprise that I've made another Mini Book, this time using Paris in Spring as my theme.


Based on Eileen's Mini Book Scoreboards Die and using her Lace 3D Embossing Folder to create a vintage look for the covers, the pages inside are a mix of hand drawn, stamped, die cut and printed images (some of which come from The Graphics Fairy).


Eileen's Tiled Alphanumeric Die was used to cut the lettering on the inside cover and you'll see a series of stamp shapes from the Faux Postage Die Set which have had PaperArtsy stamped images water coloured on them.


More stamped PaperArtsy images have been coloured, cut out and included on several collage pages. The hearts have also been water coloured and they, along with the vellum envelope and folder come from Eileen's Envelope, Folder & Flowers Die Set.


I also used the flowers in that set to die cut the cherry blossoms which have been scattered on hand drawn branches. All the doodling on the flowers and hearts were inspired by some I'd seen done by Mitsyana Wright a couple of years ago. To complete the pages I drew and painted representations of the Louvre, the Arc de Triomphe, the Musee D'Orsay and of course the Eiffel Tower.


I've made a short video flip through to better show the scale of the book;


I hope you've enjoyed seeing inside this Paris Mini Book. Make sure to check out all the fantastic Spring projects from the rest of the team - links to their posts can be found on Eileen's blog.

For now thanks for visiting,
Jenny xxx

4 April 2024

Lace Embossed Mini Book Covers for Eileen Hull Designs

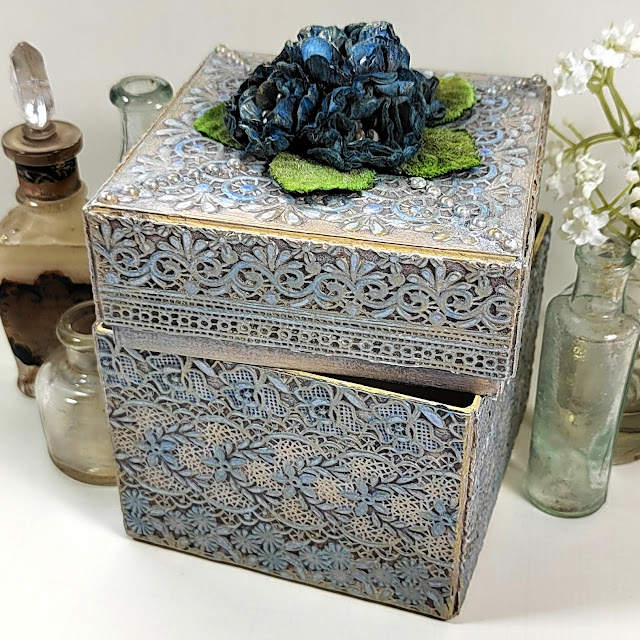
Hi everyone and welcome. In my last post (part of the Topflight 7th Birthday Blog Hop) I shared a small accordion book featuring PaperArtsy stamps designed by Scrapcosy. The only thing missing were some book covers, and having previously promised to show how I treated the 3D Embossed Lace used to cover Eileen's new Storage Box here, it made sense to combine the two projects.

As a reminder here's the Storage Box;


And here's the Accordion Book (with no covers);


Now here's the same Accordion Book with it's new Lace Mini Book Covers - given a vintage look with a hint of the colour used on the pages inside;


3D Lace Embossing Tutorial


Let's get started on the tutorial. Begin by painting a piece of card with white gesso and when dry, emboss with Eileen's Sizzix 3D Lace Embossing Folder.


Warning, the next bit will seem scary. Paint in some of the de-bossed details with strong colour; believe it or not the colours used below were also used on the accordion pages before they were dry brushed!! Don't worry about being too perfect with your painting - the details in the raised areas will be rejuvenated next.


More scary stuff - paint over the top of the dry surface with dark brown/black paint in small sections. Before the paint has dried wipe over with a damp cloth/baby wipe to remove most of the paint. You'll find the dark brown remains in many of the de-bossed areas. Don't try to paint the whole lot in one go if your paint is a fast drying one like the PaperArtsy Fresco Finish Chalk Paint. You'll find trying to wipe away dry paint is much more difficult and may lead to you damaging the embossed surface (I speak from experience here!!)


It's time to make this all look a lot less scary - using more white gesso start dry brushing the whole embossed surface. Make sure to use a flat brush and keep your brush as horizontal as possible to ensure the white gesso hits the raised areas without getting into the crevices. Start with a tiny bit of gesso on your brush, working it on your craft mat to make it as dry as possible before applying. You can always add more white through extra layers, but you can't remove them so take your time and allow everything to dry as you go.


Finally it's time to grab the Sizzix 'Ivory' Luster Wax to add a touch of subtle shimmer. Again go lightly with your application - a delicate touch with your finger will help you to catch the raised pattern and as previously mentioned, you can always add more to suit your taste.


You now have a 'shabby chic' look to your Lace Embossed panel with a subtle touch of colour. Use it to cover your box, book cover or whatever else you fancy! You might notice my finished book covers seem a little more vintage than shabby chic pale - that's because I applied a tiny amount of walnut stain to coordinate with the pages inside, something I didn't do to the original Storage Box.


I hope you've enjoyed this tutorial. Make sure to check out all the fantastic projects from the rest of the team - links to their posts can be found on Eileen's blog throughout the month.

For now thanks for visiting,
Jenny xxx
Related Posts Plugin for WordPress, Blogger...