28 October 2020

Home is Where the Heart is at The Funkie Junkie Boutique Blog

Hi everyone and welcome. It's time for another challenge over at the The Funkie Junkie Boutique Blog. I am your host for this one and I've called it 'Home is Where the Heart is'. "What does 'home' mean to you? Maybe it's a place of safety, somewhere you live with family or friends, or a place that holds treasured memories. It may be somewhere you can be yourself or a place from where you can grow and thrive. Whatever 'home' means to you create a project of your choice that represents it."

As ever, the Design Team will choose their top four picks, with the winner being invited to join us in a Guest DT spot at The Funkie Junkie Boutique Blog and three additional outstanding entries will receive Top 3 Badges to display on their blogs. Everyone who enters and follows the rules will be entered into the draw to have the chance to win a $25 spending spree at The Funkie Junkie Boutique.

With so many restrictions and uncertainty this year has been a strange one so being able to enjoy the tranquillity of our garden has been such a source of sanctuary. I wanted to represent this special space in my journal, including a nod to our home with the brick wall background.


Here's a brief 'how to' showing the process steps for creating it, starting with the base for the brick wall background. I used a mix of 'Sand' and 'Elephant' Dina Wakley Media Acrylic Paint on the card surfaces.


Digging a Wendy Vecchi Brick Wall stencil out from my stash I applied Opaque Matte Texture Paste unevenly through it before brushing 'White' Dina Wakley Media Acrylic Paint over the top.


The original intension was to go with whitewashed walls and brighter coloured flowers but with the seasons now changing I went with more of an autumnal look, adding a more realistic brick colour by mixing 'Sedona' and 'White' Dina Wakley Media Acrylic Paint. A spatula was then used to scrape a thin layer of 'Roast Chestnut' and 'After Dark' Seth Apter Izink Pigment Inks over the top, allowing them to catch on the raised spots. 


To make the largest of the flowers I started with a generous blob of 'White' Dina Wakley Media Acrylic Paint and added an increasing amount of 'Carnation' Dina Wakley Media Acrylic Paint to it, painting a few pieces of paper with them ready for die cutting with the large flower die pieces from the Sizzix 'Layered Winter Flower' set. A few leaf stems were cut from tea stained paper with dies from the same set. All the edges were aged with 'Acorn' Acrylic Archival Ink. I went on to use a black permanent ink pen to draw over the detail in the centre.


The smaller flowers started with paper painted with a mix of 'Lemon' and 'Sedona' Dina Wakley Media Acrylic Paint. I stamped the flower shapes using Wendy Vecchi's 'Country Flowers' MAKE ART Stamp/Die/Stencil set with 'Spiced Marmalade' Archival Ink, hand cutting and layering the petals for a little dimension and adding a centre stamped with black permanent ink. White dots were added to the centre with a white gel pen.


After sticking the main flowers and foliage to the brick background I die cut more leaf stems and some berries with dies from the Sizzix 'Layered Winter Flower' and Geometric Winter Frame Sets. A few of these were painted with a mix of 'Evergreen' and 'Black' Dina Wakley Media Acrylic Paint whilst the berries were formed with Wendy Vecchi's 'Carnation Red' Liquid Pearls. More of Wendy's Liquid Pearls, this time in the 'Sunflower' shade, were added directly to the journal page before I stamped the sentiment from Wendy Vecchi's 'Special Art' Stamp Set. The hand drawn rectangles are becoming a re-occurring element throughout the journal and in this case helped to link this page to a previous one.


So that's my take on the theme 'Home is Where the Heart is'. My talented team mates have also come up with their own projects representing 'home' for this challenge so make sure you hop on over and check them out HERE. And remember to link up your own shabby chic or vintage pieces to be in with a chance of winning one of the fabulous prizes that's up for grabs.

Thanks for visiting,
Jenny xxx

Products used to create this journal page are available from The Funkie Junkie Boutique and are listed/linked below.

20 October 2020

Jewel Post Box for Eileen Hull Designs

Hi everyone and welcome. With the release of Eileen Hull's new die designs this month the Inspiration Team are sharing ideas for using the Sizzix Scoreboards 'Box, Post' XL Die and Sizzix Scoreboards 'Teacup, 3D & Spoon' Die. Having previously shared tutorials for two vintage style post boxes HERE, three 'china' teacups HERE and a Halloween treat teacup HERE, today's project is another post box.


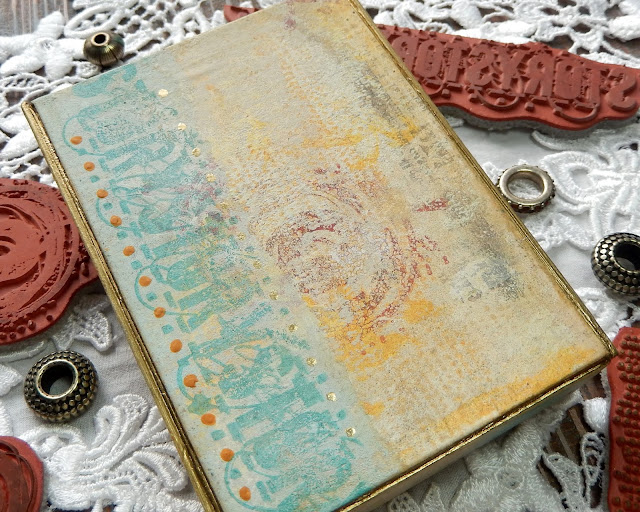
Here are a few close ups of the front and back of finished box; 


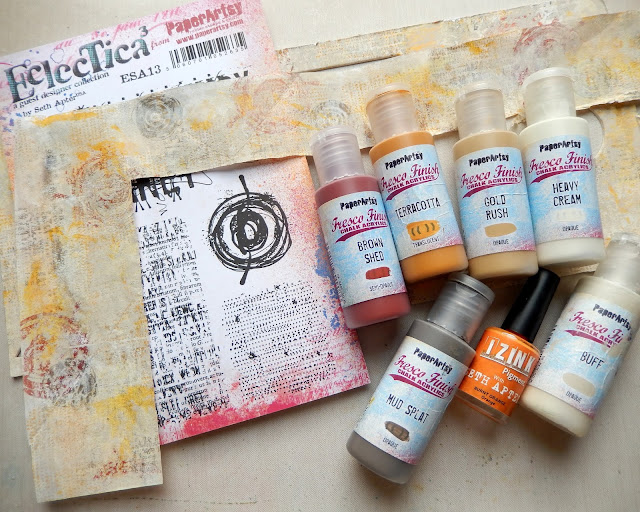
To create this box I started by pulling a Gel Plate print onto thick tissue paper. The patterns/colours were made using Seth Apter's ESA13 stamp set by PaperArtsy and a number of his Fresco Finish Paints. The splashes of deep yellow were made by spreading out small dots of the Burnt Orange Izink Pigment Ink.


Once pulled, the tissue was stuck onto some mount board using soft gel medium before being die cut using Eileen's 'Box, Post' die. Here's a closer view of the patterned tissue;


After assembling the box (just a case of sticking together the two sides) I tried out a technique demonstrated by Jackie Jimerson on a recent video tutorial HERE - a small Gel Plate was used like a stamp pad to apply strips of Seaglass paint over the top of the printed tissue.


To finish the edges of the box I ran a gold paint pen along them.


To add some extra detail to the Seaglass sections I then stamped one of the word images from Seth's stamp set along them with a coordinating permanent blue ink.


The circular embellishment on the front lid was created by pressing one of the stamps from Seth's set into melted Eileen Hull 'Golden Rod' Molten Dimensions Embossing Powder by Emerald Creek Craft Supplies. Once set I added a drop of the 'Brown Shed' paint into the centre.


I then went on to add more dots of the same paint onto the front of the box using the end of a ball tool.


Since this was so effective I replicated this effect with some of the 'Terracotta' paint and the gold paint pen across the rest of the box.


To finish a hole was punched into the box lid and a piece from a broken bracelet was attached with jump rings. Here are some more close ups of the finished box;


You can see all of the amazing projects that Eileen's Inspiration Team have made this month using her new dies by visiting Eileen's website.

For now, thanks for visiting,
Jenny xxx

Eileen Hull Designs Sizzix Scoreboards XL Die 'Box, Post' available in the UK at Country View Crafts and in the US at The Funkie Junkie Boutique

14 October 2020

Purple, Orange, Green! Eek! It's Halloween! at The Funkie Junkie Boutique Blog

Hi everyone and welcome. It's time for another challenge over at the The Funkie Junkie Boutique Blog. Sara Emily is your host for this one and she has called it 'Purple, Orange, Green! Eek! It's Halloween!' "I love Halloween, and I would love to see your vintage or shabby chic Halloween creations, whether it be a card, tag, canvas, or any other make! If Halloween is not your cup of tea, simply use the colors purple, orange and green on your project to play along."

As ever, the Design Team will choose their top four picks, with the winner being invited to join us in a Guest DT spot at The Funkie Junkie Boutique Blog and three additional outstanding entries will receive Top 3 Badges to display on their blogs. Everyone who enters and follows the rules will be entered into the draw to have the chance to win a $25 spending spree at The Funkie Junkie Boutique.

Though Halloween this year will be unlike others in the past there's no reason you can't enjoy yourselves by making and giving treats to family and friends. Eileen Hull's newly released teacup is the perfect container for this and you can have so much fun making yours as spooky as you like.


Sara Emily stipulated the colours purple, orange and green for this challenge and they do work so well for any Halloween related project. Here's how mine came together, starting with the die cut teacups using Eileen's 'Teacup, 3D & Spoon' Sizzix Scoreboards Die. After painting them both black a pattern was applied to one side of each using clear texture paste through a Finnabair Prima 'Vintage Wallpaper' stencil. I sprinkled Pam Bray's 'Licorice' Rock Candy Embossing Powder over the stencilled areas and let them air dry before heat setting. As you can see in the photo below Pam's embossing powder includes shiny bits that sparkle beautifully.


Wanting to make the cups even more detailed I spritzed them both with water and added small drips of Seth Apter's 'Avalanche' Izink Pigment Ink, allowing the colour to bleed around the raised areas. You can dab off any excess ink with tissue before letting it dry. Seth's Izink Pigment Ink flows beautifully straight from the bottle so it was easy to use the in-built brush to apply drips to the top of each cup.


One of the things you can cut using Eileen's die is a double-sided teabag. After adding die cut letters and painting one with 'Tangerine' Dina Wakley Media Acrylic Paint, I brushed 'Burnt Orange' Izink Pigment Ink across and down each side, blasting it with a heat gun to get those textural bubbles. 


One way to further emphasise the texture on the teabag is to repeat the technique used on the teacup, spritzing it with water before blending a little 'Purple Haze' Izink Pigment Ink over the top and allowing it to settle between the raised bits. To make the word stand out further I die cut the letters from black card and glued them over the top of the originals.


Having assembled the teacup using the joining piece that is cut using Eileen's die the drips at the top felt a little one dimensional. So I used a hot glue gun over the top and painted the now dimensional drips with more of the 'Olive Drab' Izink Pigment Ink. You can also see below that little touches of glitter were sprinkled on top.


Finally the spoon which can also be cut using Eileen's die was painted with Seth Apter's 'Purple Haze' Izink Pigment Ink (no paint or gesso beneath so you can see how rich it is). The hot glue gun got to work to create more of the drips and once again they were painted with the 'Olive Drab' Izink Pigment Ink with a little glitter added for good measure.


Here are some close ups of the finished Halloween teacup filled with treats and the spoon popped in amongst them;


That's my take on the theme 'Purple, Orange, Green! Eek! It's Halloween!'. My talented team mates have also come up with their own Halloween projects for this challenge so make sure you hop on over and check them out HERE. And remember to link up your own shabby chic or vintage pieces to be in with a chance of winning one of the fabulous prizes that's up for grabs.

Thanks for visiting,
Jenny xxx

Products used to create this teacup are available from The Funkie Junkie Boutique and are listed/linked below.

1 October 2020

Eileen Hull Designs Chapter 4 Release Party Blog Hop

Hi everyone and welcome. Thanks for joining us for the Eileen Hull Chapter 4 Release Party Blog Hop. Eileen has two new ScoreBoards Dies releases from Sizzix! Are you ready for a new Bigz L 'Teacup, 3-D & Spoon' die? Fill it with teabags and other assorted goodies or use the teacup cut out on the front of a card - so many possibilities. Also new is the Bigz XL 'Box, Post', a fun little box that goes together in 10 seconds and has a slit in the top to tuck a gift card. Throughout October, the team will be sharing tutorials with you and today we start with a launch blog hop. We hope that you will be inspired too and share how you use the dies in the Eileen Hull Fan Club.


Please hop with us through all of the projects and leave comments on the different designers' blogs. A lucky commenter will win the 'Box, Post' Die - there's a list of links for everyone's blogs at the end of this post.

And wait - there’s more - the Release Party continues! You won’t want to miss the Facebook Live at Eileen Hull Designs at 12:00 noon Eastern time (that's 5pm UK time) on Thursday, 1st October. Join the chat - and a random commenter will win the 'Teacup, 3-D & Spoon' Die!!!

Now for my first project with one of these new dies - I chose to use the 'Box, Post' Die to create these two vintage post boxes;


Eileen is right when she says this die goes together in 10 seconds so if you are planning on mass producing them then you are definitely in luck - in fact they took longer to decorate than to make! 

After folding the two die cut boxes along the pre-cut score-lines and gluing them together at the sides I die cut some of the floral arches using Eileen's 'Floral Arch & Words' Thinlits Die Set and some letters from different letter die sets. They were glued onto the boxes and allowed to dry before the whole lot was painted with a coat of black gesso. I then rubbed over the surfaces with a clear wax candle to create a resist. You may notice the inside of each box is also black - to make this even quicker I used mountboard that is black on one side and placed it face up on the die when cutting.


I chose to use some traditional post box colours to paint over the black bases. Of course these two just happen to be translucent colours so I did have to add a few layers of PaperArtsy Fresco Finish Acrylic Paint. My suggestion for making this more speedy would of course be to use opaque shades. Once air dry I rubbed over the boxes with a clean cloth so that the candle wax resist could work its magic and some of the colour could be removed in areas where there would naturally be wear and tear.


To give the finished boxes a more metallic feel I dry brushed them both with some gold acrylic paint (a gold wax could also be used) concentrating on the raised areas to make them stand out even more. As an alternative I also thought it might look good to paint the whole of the folded lid area in gold.

Thank you for joining me here as part of this Eileen Hull Designs Blog Hop. Here's the full list of blog hop participants - make sure to visit them all and leave a comment on each post to be in with a chance to win a 'Box, Post' Die;

Jenny Marples - you are here

Related Posts Plugin for WordPress, Blogger...