27 July 2020

Snowman Accordion Book for Eileen Hull Designs

Hi everyone and welcome. This month Eileen Hull's Inspiration Team are excited to be using the brand new 'Box, Mitten' and 'Box, Snowman' Dies that form part of Sizzix Chapter 3 release. Since the launch party at the beginning of July the team have shared a myriad of clever and creative ideas for using these new dies and this week there are even more to come.

For my second project of the month (see the first one HERE) I've had some fun with the 'Box, Snowman' Die, creating a little accordion book.


This little snowman opens up to reveal collaged pages featuring the designs of Kay Carley; one one side the first phrase...


... and on the reverse a second, each sandwiched between the snowman's sparkly crackled body.


I've put together a tutorial to show you how this accordion book came together, starting with a Gel Plate print from a session with PaperArtsy Fresco Finish Paints using a mix of tissue and brown wrapping papers to get a look of shattered glass/ice onto the sheets.


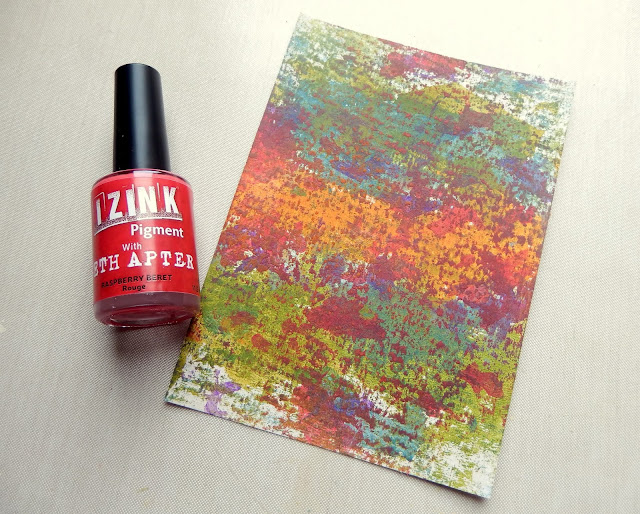
I cut off a strip 8 inches tall by 10 1/2 inches wide and added some Izink Pigment Inks with a spatula to add extra layers of colour and shimmer with the pearlescent ones. The strip was then cut lengthwise in half to form two, both 4 inches tall.


Having cut a strip of card 4 inches tall by 10 1/2 inches wide a strip of the paper was glued to each side. I then placed it on my scoreboard (as shown below) and scored on both sides at 2 1/2 inches, 41/2 inches, 6 1/2 inches and 8 1/2 inches to form three central 2 inch panels and one on each end measuring 2 1/4 inches.


Folding the strip into a concertina shape I placed it on the scoreboard as shown below, with the edges of the 2 inch strips just inside the edge of the snowman body on the 'Box, Snowman' Die.


After running it through the Big Shot this is what I was left with;


Now time to decorate the accordion book. I'd used more Fresco Finish Paints in pastel shades to pull prints from my 3x5 Gel plate onto tissue. Small strips were cut from a few and glued over the pages on both sides as shown below;


I then stamped holly sprigs onto the top and bottom of each snowman shape on both sides using the stamp from Kay Carley's EKC32 set, ensuring there was a gap left between each one and colouring them with Glaze and Metallic Gel Pens. Stamping the holly with Wendy Vecchi's 'Peat Moss' Archival Ink gave the images a softer look.


A tracing wheel was then used to add pinprick lines along the length of the snowmen on each side, over which I drew lines with a white Gel Pen to give the impression of stitching. A sentiment from Kay Carley's EKC32 was stamped onto one side and another from EKC31 on the other.


Finally I stamped and embossed the little snowflake from set EKC31 across both sides. You'll see below that I also cut a hat shape from card, covering it in more of the pastel tissue and embossing it with a snowflake.


To create sturdy front and back covers I cut two snowman shapes from matboard and covered them both with a mix of crackle paste and glitter.


Once dry I glued in place the hat, a scarf, nose and eyes (all cut from the same die and covered in the paste tissue) onto one of the snowman shapes before adding one to the front of the accordion shape and another to the back. All the edges were also blended with brown ink.


Here are some close up photos showing the accordion pages in more detail;


That's it for the second of this month's projects from me. Make sure to check out what the rest of Eileen's Inspiration Team have made using the new 'Box, Mitten' and 'Box, Snowman' Dies  by visiting Eileen's website.

For now, thanks for visiting,
Jenny xxx

22 July 2020

With This Ring for The Funkie Junkie Boutique Blog

Hi everyone and welcome. It's time for another challenge over at the The Funkie Junkie Boutique Blog. Suzz is your host for this one and she has called it 'With This Ring'. "Summer is a traditional time for weddings. This year we have seen many of the celebrations become virtual, rescheduled or limited to few people participating. We as craft makers can still share our art with the happy couples by creating something beautiful to celebrate their special occasion. I challenge you to create something celebrating a wedding, it can be anything including: layout, card, decor, or gift."

As ever, the Design Team will choose their top four picks, with the winner being invited to join us in a Guest DT spot at The Funkie Junkie Boutique Blog and three additional outstanding entries will receive Top 3 Badges to display on their blogs. Everyone who enters and follows the rules will be entered into the draw to have the chance to win a $25 spending spree at The Funkie Junkie Boutique.

Since I had some pretty backgrounds left over from the latest Funkie Junkie Boutique Saturday Showcase post I used a couple of them to create a romantic floral card, ideal for a summer wedding.


In case you haven't seen it my tutorial for creating these colourful backgrounds using Seth Apter's Izink ICE and Pigment Inks it can be found HERE. Initially I chose to use the third piece along from the left and ended up using some from the second piece along from the left as a background since they coordinate so well.


That first strip was cut into two pieces, one just large enough to cover the roses in the centre of the bouquet image from Wendy Vecchi's 'Rosy Art' stamp set. After embossing the roses with white embossing powder I cut around them and glued them on to a matching Mat Mini for extra height and strength.


A piece of card painted with a mix of 'Gilt' and 'Ancient' Dina Wakley Media Acrylic Paint was used to emboss the whole rose bouquet image which I then cut out with a craft knife. The colourful roses were then glued into the centre to form the focal point of the card.


I then began to play around with the remaining bits of card to create a background for the rose bouquet. As well as selecting some Rose Gold Metallic Kraft Stock and plain coloured card to mat and layer the Seth Apter pieces I stamped Wendy Vecchi's 'All Scratched Up' Background onto a piece of white card using Rose Gold Embossing Powder. To add extra detail to this layer I ended up using a tracing wheel and rose gold gel pen to create faux stitching around the edges. You'll also see in the photo below how I played around with the positioning of the sentiment from Wendy Vecchi's 'Funky Flower Art' stamp set.


Having stuck the various backgrounds, mats and layers together the embossed rose bouquet was glued onto it's complimentary panel with some embossed bronze leaf embellishments and die cut leaf stems underneath. To finish I added the stamped sentiment and a scattering of self adhesive pearls. You can see more of the details in the close up photos below;


So that's my take on the theme 'With This Ring'. My hugely talented team mates have also come up with their own wedding themed projects for this challenge so make sure you hop on over and check them out HERE. And remember to link up your own shabby chic or vintage pieces to be in with a chance of winning one of the fabulous prizes that's up for grabs.

Thanks for visiting,
Jenny xxx

Products used to create this card are available from The Funkie Junkie Boutique and are listed/linked below.

8 July 2020

Christmas Cards in July for The Funkie Junkie Boutique Blog

Hi everyone and welcome. It's time for another challenge over at the The Funkie Junkie Boutique Blog. Cec is your host for this one and she has called it 'Christmas Cards in July'. "If you are like me, you are anxious for 2020 to be over and done with. To speed things up let's pretend Christmas is around the corner even though it is only July and get a start on creating shabby chic or vintage inspired cards. This challenge is all about cards so please save other Christmas creations for later.'"

As ever, the Design Team will choose their top four picks, with the winner being invited to join us in a Guest DT spot at The Funkie Junkie Boutique Blog and three additional outstanding entries will receive Top 3 Badges to display on their blogs. Everyone who enters and follows the rules will be entered into the draw to have the chance to win a $25 spending spree at The Funkie Junkie Boutique.

With Eileen Hull's new Chapter 3 Sizzix Scoreboards dies released at the beginning of July it seemed like the perfect time to use one of them to make the first of my Christmas cards this year. Here's what I came up with;


As you may now be able to tell one of Eileen's new designs is a mitten shape. The die is officially called 'Box, Mitten' because you can actually make a box with it but I used just the main shape as it fits perfectly onto an A6 (roughly US size A2) card.

Now for the tutorial; I started with a piece of cheap textured watercolour paper and applied some Dina Wakley Media Acrylic Paint using a brayer - you can see how the textured surface stands out where the paint has caught it.


To enhance the vibrancy of those colours without adding lots more paint I used some coordinating Izink Pigment Inks by Seth Apter. You only need to dab the tiniest amount on using the built in brush and then scrape it in different directions using a palette knife or similar - because it dries relatively fast and is permanent it's worthwhile doing small sections at a time to get the colour exactly where you want it. The beauty of these inks is that they lay over each other revealing the under layers without creating mud.


Now it was time to add some 'va va voom' by going in with little touches of 'Purple Haze' - this really started to enhance the greens, yellows and blues beneath.


And for even more impact I added another colour, again in small patches layered over the other paints and inks - doesn't the addition of those two brighter colours make an impact on the overall look.


I ran the paper through the Big Shot with Eileen's die and cut out a mitten shape - you'll also spot that it cut some heart shapes too - more of that shortly. I also cut a mitten shape from matboard - you could stick the paper onto the board before cutting but I wanted to add some stitching so kept the two layers separate for now.


As part of the design the die will cut a wonderful zigzag shaped strip - I cut some from Buff painted paper, even hanging on to the ends with the straight edges.


After inking the zigzag edges with some Acorn Archival Ink I stuck them over the paper mitten, trimming the edges to fit and covering some of them with Glossy Accents and Dry Glitter.


To add further detail I stamped stitched lines onto some areas and hand stitched through others before gluing the paper mitten onto the matboard one for stability and strength.


Now, remember those hearts that were cut from the spare paper? Well I cut a bunch more from it in the four different sizes on the die and covered them with Glossy Accents. To create a second mitten I covered a piece of matboard with plain cotton calico fabric and embossed them with the Tim Holtz 3D Embossing Folder 'Elegance'. The edges were again aged with more of the Acorn Archival Ink and I glued the glossy hearts over the top.


I kept the colour scheme neutral so as not to detract from the colourful mittens, opting for layers of tea stained copier paper, book page, pattern tissue and plain cotton calico fabric. Die cut lace was blended with the Acorn Archival Ink to match.


 Here's the second mitten when added to it's card base;


To finish each mitten some cream cotton thread was wrapped around the cuff area and I attached a couple of snowflake charms from Linda's store (distressed with a little of the Buff paint). With some die cut holly leaves and little pearls added as an accent the mittens were ready for their backgrounds.

Here are some close ups of the two finished cards - I thought the second one could even be appropriate for a Christmas birthday, wedding or anniversary;


So that's my take on the theme 'Christmas Cards in July'. My hugely talented team mates have also come up with their own Christmas cards for this challenge so make sure you hop on over and check them out HERE. And remember to link up your own shabby chic or vintage cards to be in with a chance of winning one of the fabulous prizes that's up for grabs.

Thanks for visiting,
Jenny xxx

Products used to create these cards are available from The Funkie Junkie Boutique and are listed/linked below.

Chapter 3 Eileen Hull Bigz L Die - Box Mitten
Antiqued Bronze Snowflake Charm - Set of 5

1 July 2020

Eileen Hull Designs Chapter 3 Release Party Blog Hop

Hi everyone and welcome. Thanks for joining us for the Eileen Hull Chapter 3 Release Party Blog Hop. The Inspiration Team and Educators Team are excited to share their projects using the brand new 'Box, Mitten' and 'Box, Snowman' Scoreboards Dies. Throughout July, the team will be sharing tutorials and videos with you and today we start with a launch blog hop. We hope that you will be inspired too and share how you use the dies in the Eileen Hull Fan Club.


But wait - there’s more - the Release Party continues! You won’t want to miss the Facebook Live at Eileen Hull Designs at 12:00 noon Eastern time (that's 5pm UK time) on Wednesday, 1st July. Join the chat - and a random commenter will win the 'Box, Snowman' Die!!!

Please hop with us through all of the projects and leave comments on the different designers' blogs. A lucky commenter will win the 'Box, Mitten' Die (to be announced on 7th July) - there's a list of links for everyone's blogs at the end of this post.

Now for the first of my projects using the new dies this month - I used the 'Box, Mitten' Die to create two coptic-stitched hand-bound notebooks ready for all those lists and plans through the festive season;


Here's a rundown of how they came together and how you can create your own Mitten books. I started with a session pulling prints from a large gel plate using PaperArtsy Fresco Finish Paints and a mix of tissue and brown wrapping paper - the idea was to get layers that could be applied to heavier surfaces (like Matboard) as well as creating 'shattered' patterns on the plate from the crumpled papers.


Next up I die cut the basic Mitten shapes, some of the zigzag patterns and medium heart shapes using the 'Box, Mitten' Die. After gluing the pattern pieces onto one of the Mitten's were painted on both sides with 'Midnight' Fresco Finish Paint.


Below you'll see where the tissue was applied over the painted pieces with the unpainted shatter marks on the tissue being highlighted by the dark colour underneath. I also added some 'London Bus' Fresco Finish Paint to the zigzags and hearts as well as blending 'Chocolate Pudding' Paint around the edges with a sponge.


Taking folded plain white paper I cut signatures by lining the folded side just underneath the top cutting line of the Mitten and running each one through with the die.


Three holes were poked through each side of the book and through the middle of each signature, and then I stitched through them using coptic stitch and coordinating brown waxed thread. I repeated this process with some lime green gel plate printed tissue to make a second book. Once assembled I felt that the paint colour was still a little flat so added touches of pearl and matte finish Izink Pigment Inks to both; in this way it was possible to add more colour without losing the patterns underneath since these inks are translucent.


To finish each book I die cut and painted some festive greenery and included some of the metallic finish flower stamens from Sizzix. The idea was to embellish them but still allow them to be useful for adding 'to do' and Christmas lists when the festive season comes around. Below you can see more of the stitching and what one of the books looks when opened up.


Thank you for joining me here as part of this latest Eileen Hull Designs Blog Hop. Here's the full list of Eileen Hull's Inspiration Team and Educators Team blog hop participants - make sure to visit them all and leave a comment on each post to be in with a chance to win a 'Box, Mitten' Die;

Eileen Hull Designs
Madeline Arendt
Julia Aston
Jennie Atkinson
Debbie Bankston
Karen Bearse
Susie Bentz
Pam Bray
Sue Eldred
Anna-Karin Evaldsson
Annette Green
Maggi Harding
Lisa Hoel
Anita Houston
Sarah Lizzie
Jenny Marples - you are here
Elizabeth Robinson
Tonya Trantham
Cheryl Waters
Mitsyana Wright
Nicole Wright


Related Posts Plugin for WordPress, Blogger...