22 January 2020

Repeat Performance for The Funkie Junkie Boutique Blog

Hi everyone and welcome. It's time for another challenge over at the The Funkie Junkie Boutique Blog with a new challenge. Sara Emily is our host and she's getting us playing a game of 'Repeat Performance'.

"A popular New Year's resolution is to save money. I challenge you to save money (and the environment) by using at least one thing you would normally throw out on your vintage or shabby chic project. Please be sure to let us know what that one (or more) item is."

As ever, the Design Team will choose their top four picks, with the winner being invited to join us in a Guest DT spot at The Funkie Junkie Boutique Blog and the next three will receive Top 3 Badges to display on their blogs. Everyone who enters and follows the rules will be entered into the draw to have the chance to win a $25 spending spree at The Funkie Junkie Boutique.

Feeling in need of some positive affirmations I created a mini accordion book featuring some of the stamps, stencils and wise words of Wendy Vecchi. Measuring just 2 inches by 3 inches it may be small in stature but packs and punch and is perfectly portable too. I've put together a step by step below to show how it came together.


Start by cutting a 6 inch long piece of Distress Watercolor Cardstock and add torn strips of paper onto the smooth side (mine is some leftover tea stained copier paper). When secured in place use a brayer or spatula to apply a little White Gesso over the top in random patches. After this dries stamp Wendy Vecchi's background stamp 'Register' over the top using black permanent ink.


Dilute a little Peacock Acrylic Paint and brush in 'waves' over the dry ink/gesso. Allow this to dry.


Repeat the process with dilute Cheddar Acrylic Paint, this time working on different areas of the cardstock. Allow to dry.


Spritz the surface of the card with water before stamping Wendy Vecchi's background 'Wire with a Twist' on top using Eggplant Acrylic Paint, allowing the lines to bleed through the water. It doesn't matter if your stamping isn't perfect at this stage. When dry cut the card into two 3 inch strips horizontally.


I used the stencil from Wendy Vecchi's Stamp, Die, Stencil Set 'A Million Thanks' as it is the perfect size for cards, ATC's and other mini projects like this. Apply White Acrylic Paint through the stencil, repeating the pattern across the card.


I cut the strips into 2 inch wide pieces and stuck them onto a torn piece of calico, leaving a 1/4 inch gap between each piece to allow the accordion to fold over properly. For the first piece of recycling I used the edges of a used aluminium pie dish, die cutting them with one of the dies from the Tim Holtz 'Crochet' die set. These were added to the 'pages' as shown below.


For my second piece of recycling I used card from the myriad of packaging that is always left over after the Christmas festivities, adding some coordinating Design Tape and adding a little dilute Eggplant Acrylic Paint over the top to eliminate any obvious 'white lines' that might show. This was then die cut using dies from Tim Holtz 'Wildflowers' die sets.


After adding the flowers I machine stitched around the edges of each 'page' and then stamped, cut , inked and added sentiments from a number of Wendy Vecchi's stamp sets. Here are some close ups of the finished pages;


That's my take on the theme 'Repeat Performance' for the current The Funkie Junkie Boutique Blog challenge. There is a little more to come with this one but for now that has to remain under wraps... For now my amazing team mates have also been on the hunt for things to reuse for this challenge so make sure you hop on over and check out their gorgeous projects HERE. And remember to link up your own shabby chic or vintage projects to be in with a chance of winning one of the fabulous prizes that's up for grabs.

Thanks for visiting,
Jenny xxx

Products used to create this Mini Accordion Book are available from The Funkie Junkie Boutique and are listed/linked below.

Studio 490 Wendy Vecchi Background Stamp - Register Wendy Vecchi MAKE ART Stamp, Die, Stencil Set - A Million Thanks Tim Holtz Sizzix Thinlits Die Set - Crochet

8 January 2020

Tic Tac Toe for The Funkie Junkie Boutique Blog

Hi everyone and welcome. We are kicking things off over at the The Funkie Junkie Boutique Blog for 2020 with a new challenge. Cec is our host and she's getting us playing  a game of 'Tic Tack Toe'.


"Let's play a game of Tic Tac Toe for this first challenge of the year. Choose any vertical, horizontal or diagonal line from the graphic below and create a vintage or shabby chic project using all three items on your chosen line. In addition to using all three items you must include a copy of the graphic in your post and tell us which line you chose."

As ever, the Design Team will choose their top four picks, with the winner being invited to join us in a Guest DT spot at The Funkie Junkie Boutique Blog and the next three will receive Top 3 Badges to display on their blogs. Everyone who enters and follows the rules will be entered into the draw to have the chance to win a $25 spending spree at The Funkie Junkie Boutique.

For my DT project I have chosen the line 'Layers, Bling, Die Cuts' and played using Eileen Hull's brand new Gift Box.


Being as this is a new die, and wanting to show how I've used layers, bling and die cuts in my project I've put together a tutorial for you.

Start by using the die to cut two box sides with a lid flap and smaller scalloped piece. You also get a plaque piece that I didn't end up using on this project. Rather than paint both inside and outside of the box with Black Gesso I decided to cheat by placing the black side of the mount board face up when die cutting so that the inside was 'pre-coloured'. Alternatively you could use black chipboard to cut the pieces.


I assembled the box by gluing together the base and sides with wet glue.


After painting the outside of the box with Black Gesso stick lace trim around the bottom.


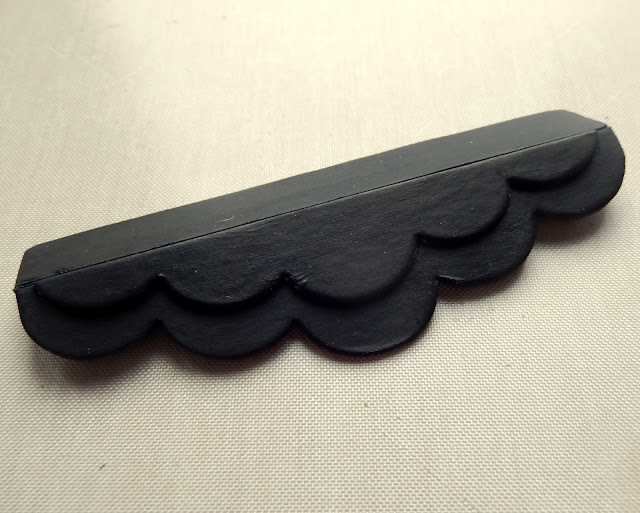
Glue together the lid flap and smaller scalloped piece, then paint with more Black Gesso.


Apply glue to one side of the lid piece (you can use strong tape if preferred).


Stick the lid piece onto the top of the box as shown below: you need to ensure that the scalloped piece fits on the outside of the box when the inner part tucks inside the box.


Cut flowers and leaves using the dies from the Tim Holtz 'Funky Floral, Large' set , layer them up and stick over the lace to add extra layers/pattern. Paint over the die cuts and lace with more Black Gesso.


Now to start with the paint layers - lightly brush first 'Marine', then 'Ocean' Dina Wakley Media Acrylic Paint over the raised areas. Ensure each layer is dry before applying a new colour and use less of the second than of the first.


Continue this process using the lighter shades of blue/green paint in Dina's range in increasingly smaller amounts, starting with 'Peacock', then 'Sky', then 'Turquoise' and finally 'White' to add the final highlights.


I applied Glossy Accents onto some of the lace before sprinkling Glass Glitter over it. As an alternative I would suggest using Distress Medium with Pam Bray's Rock Candy Embossing Powder as an alternative as when the medium is dry and the embossing powder has been heated it has a beautiful shine. I also added a few gems from my stash for some more 'bling' and coloured the centres of the flowers with a white pen.


Finally stamp moths from Tim Holtz 'Entomology' set from contrasting paper (I used some that had been printed using a Gel Press Plate and more of Dina Wakley's paints and backed it with black card). Cut out and bend into shape before gluing onto the sides and top of the box.


Here are a few more photos of the finished Gift Box from different angles so you can see how it looks all the way round;


That's my take on the theme 'Tic, Tac, Toe' for the current The Funkie Junkie Boutique Blog challenge. My fantastic team mates have opted for a number of the lines on the board for this challenge so make sure you hop on over and check out their beautiful creations HERE. And remember to link up your own shabby chic or vintage projects to be in with a chance of winning one of the fabulous prizes that's up for grabs.

Thanks for visiting,
Jenny xxx

Products used to create this Holiday themed Pocket Notebook are available from The Funkie Junkie Boutique and are listed/linked below.

Stampers Anonymous Tim Holtz Rubber Stamps - Entomology

1 January 2020

Display Stand Ideas for Eileen Hull Designs

Hi everyone and a very Happy New Year! I hope 2020 is a really good year for you all.  It's definitely going to be a good year for fans of all things 'Eileen Hull' as her clever designs continue to inspire and delight us.

Many of you have already seen the first of her new dies online and placed your pre-orders. Today I'm sharing a couple of ideas for the 'Sizzix ScoreBoards XL Die – Display Stand' and ways it can be used. There will be lots more of these to come from the rest of Eileen's Inspiration Team over the coming weeks and months; find more details over on Eileen's website.

Now for the first of my ideas for using the Display Stand - a phone stand.


I used a couple of embossed panels to add some grip for keeping things in place. The panels are not part of the die set but can easily be cut, embossed and glued onto the stand base as shown. Mine measured 3 1/2" by 4 5/8" and 1" by 4 5/8", were cut from mount board (like the stand itself) and were spritzed with water before being embossed with the Tim Holtz Flourish Embossing Folder. As can be seen in the photos I went with a white and gold colour scheme, rubbing it over with clear wax to act as a protective layer when in use.


You can see more clearly on the photo above the reverse side of the stand. The stand cuts in one piece and bends along the scorelines before snapping into place, and when not in use you can release the vertical piece from the tab to lie the stand flat for easy storage. Below you'll see how it holds my phone in place - how's that for 'hands free'!!!


Now for a different spin on the Display Stand - a jewellery stand, perfect for showing off bits of bling (handmade, vintage etc) maybe at a craft fair or when selling online. I found some really pretty pieces in a local charity shop and they pushed me towards the vintage look for this stand.


I started by painting the mount board base with gold acrylic paint before sanding it back and applying Walnut Stain Distress Oxide Ink over the top. The paper is old scrapbook stuff from my stash, machine stitched before being glued into place.


On the back of the stand you can see how the necklace displayed here is held in place; I cut a handle piece from Eileen's 'Treasure Box XL Scoreboards Die', chopped it in half, coloured it the same way as the stand and glued the pieces firmly in place on the back. And if you are taking your pieces to different venues the stand even stores flat with the jewellery still in place (measuring 5 1/4" by 5 1/2").


Those those are just two ideas for using Eileen's new 'Sizzix ScoreBoards XL Die – Display Stand'. Make sure to head on over to her website where you'll get links to more gorgeous ideas from the talented Julia Aston and Karen Bearse.

And for the complete lowdown on the new die releases check out Eileen's latest FB Live here;


Thanks for visiting,
Jenny xxx

Related Posts Plugin for WordPress, Blogger...