15 December 2020

A 2020 Round Up for Eileen Hull Designs

Heads up - if you are looking for the 'Comfort & Joy' Day 8 post it can be found HERE.

Hi everyone and welcome. This month Eileen's Inspiration Team are sharing their Top Picks in a review of 2020. I've taken a 'walk through' what has been and interesting and challenging year (to say the least) with a range of fabulous die releases from Eileen.


We started the year with the Chapter 1 releases, and one of my favourite projects is an expanding scrap holder that has proved really useful. Combining the Display Stand with the Pocket Notebook with old book covers, there's a tutorial for re-creating it HERE.


In April Eileen released the Tiny Book and Tiny Book Case which took making books to a totally different size. I combined Seth Apter stamps with a Gel Plate print and even bound tiny signatures inside the book. You can see more HERE.


The Tiny Book got a second airing in this accordion book featuring Eileen's House Ornament, Spring Leaves and Journaling Cards - Flowers & Leaves dies. They were used in conjunction with an embossing folder and words from an Alison Bomber set. The tutorial for this one can be found HERE.


Christmas came early with Eileen's third release as I made little books with the Box, Mitten die for another blog hop. Gel Plate printed tissue was layered over painted surfaces and you can find the tutorial HERE.


Another of Eileen's July releases, the Box, Snowman die provided the basis of another accordion book, this time featuring words from a Kay Carley set and yet more Gel Plate printed tissue. The tutorial for this one can be found HERE.


Eileen's new Box, Post die arrived in October and immediately became a favourite, again decorated with Gel Plate printed tissue and Seth Apter's stamps. More details and a tutorial for this one is HERE.


Finally another Box, Post project, this time one with a Christmas theme and created using Kunin felt with the Spring Leaves and House Ornament dies. See the post about it HERE.


It rounds off a fun year with Eileen's die releases and there's much more to come. The first release of 2021 is already available for pre-order and it is incredibly exciting, particularly if you enjoy making books and journals.

For now, I hope you are enjoying the fun with the 'Comfort and Joy' event taking place in the Eileen Hull Fan Club Facebook Group. And make sure to check out the round ups from the rest of the team - links to them can be found over on Eileen's website.
Thanks for visiting,
Jenny xxx

Chapter 1 2021 Eileen Hull Designs Dies are available to pre-order in the US at The Funkie Junkie Boutique.

14 December 2020

Eileen Hull Designs - Comfort & Joy Day 8

Hi everyone and welcome. We need some fun in our lives right now so all of us at Eileen Hull Designs put our heads together and came up with an event that you can participate in as much or as little as you'd like. It's a challenge of sorts and we'd like to see you to make a Holiday Journal for this season using any of Eileen's dies. Your journal could include activities, photos, recipes, shopping lists, daily thoughts, etc. Really, it can include anything you want; after all, it's your journal!


Every Monday, Wednesday, and Friday between November 27th and December 23rd there will be a post in the Eileen Hull Fan Club from member(s) of Eileen's team members with a prompt for your journal. These prompts are meant to get your creative thoughts flowing and give you ideas for your Holiday Journal. It might be in the form of a blog post, Facebook Live, recorded video, or a Facebook post in the group. Then it's over to you to have some fun - we can't wait to see what you come up with, so please share your covers and pages with us in the Eileen Hull Fan Club.

Fellow team mate Elizabeth Robinson and I decided to share a theme for Day 8 of the event and came up with the idea of using a colour prompt to kick start out journal projects. We found this one called Frosted Flora over on the design-seeds.com website which has a collection of beautiful images and the colours to match them.


Here's the final journal page that I came up with using the prompt;


Thank you to everyone who took the time to watch my lopsided fb live flip through and explanation of the journal and this page - Eileen makes it look so easy! For my part practice is clearly needed lol :)

I promised a tutorial so here it is, beginning with my choice of paints to match the prompt as closely as I could. Alternatively you could pick papers, gel plate prints or other images that follow the same colours to create your page - it's your journal after all! It also occurred to me that the floral arch shape from Eileen's 'Floral Arch & Words' die set looked a lot like the stems in the image prompt which then gave me the start of a plan for the page.


I started by covering most of the two pages with the darkest of the greens (PaperArtsy's 'Hyde Park') using an old large brush. You get lovely textures using old brushes and there's no fear of damaging them either. You may spot that I put some plastic packaging behind the pages to protect the ones either side.


Next up I added a the lighter green, PaperArtsy's 'Khaki', over the top using a smaller brush and less paint to ensure some of the darker colour beneath showed through.


Another layer, this time with PaperArtsy's 'Concrete' that adds a little light grey to the surface. Although it looks like the colour is being lost you are in fact adding depth and interest to the finished pages.


Referring back to the prompt the main colour in the image is white - that background of crisp snow, so I added some smudges of Seth Apter's 'Avalanche' Izink Pigment Ink because it is semi-translucent when spread thinly so you don't lose what is underneath.


To introduce the winter feel I stencilled in some stars with a white gel pen. Later on I decided to add some sparkle over the top with another gel pen.


A focal point was needed for this journal spread and so I used the chosen paints to pull a few prints onto copier paper using a little 3x5 Gel Plate. If you look closely at the green one on top you'll see there's what looks like the imprint of branches on it - to recreate this you'll need a mid green coloured print (or even coloured paper if you like). Die cut some of the floral arches, lay them onto your Gel Plate in the pattern you want, apply a thin layer of white paint or gesso over the top with a brayer and while it's still wet put the mid green paper on top. Smooth over and lift while the paint is still wet and you should get that 'shadowed branches' effect. This forms the background of the tree panel.


The die cut floral arches, once removed from the Gel Plate, were painted with some of the darkest green paint.


After sticking the painted 'branches' over the shadowed ones (offset so you can see the printed ones underneath) I decided to make them look less like die cuts and more like drawings. One way to do this is to draw around the edges as unevenly as possible, first with a black pen and then with a white pen.


You'll see below on the finished journal page how this panel was added to the page with a bit of purple paper underneath and some tea stained paper bits either side. To create the baubles I die cut some of the floral bits in the centre of the arch, painted them with PaperArtsy's pale purple/pink 'Taro Milk Tea' paint and stuck them onto/below the branches. After adding a bit of sparkle and Glossy Accents I drew lines to look like the ribbons tying them to branches above.


On the second side of the journal I used some of the left over bits of purple and green paper with a bit of old lace to carry the design through. The word 'moments' is included as one of the dies in the Floral Arch & Words set and after die cutting it I painted it with some PaperArtsy 'Squid Ink' paint.


So that's how my page for the Comfort & Joy event came together, all starting with the colour prompt from design-seeds.com.


Elizabeth will shortly be bringing you her clever ideas on using Eileen's Mitten die to create interactive elements, also following the colour prompt. We both hope you have a go at using it to create something in your own journals and in your own way. And make sure to keep checking in the Eileen Hull Fan Club group for the rest of the event days as there's still more in store to encourage and support you.

For now, thanks for visiting,
Jenny xxx

9 December 2020

Deck The Halls with The Funkie Junkie Boutique Challenge Blog

Hi everyone and welcome. It's time for another challenge over at the The Funkie Junkie Boutique Blog. Sara Emily is your host for this one and she's called it 'Deck The Halls'. "For this challenge, we would like to see those vintage or shabby chic Christmas decorations! This is not about Christmas cards this time, but think about tree ornaments, wreathes, vignettes, mantle or table decorations, etc. with a Christmas theme."

As ever, the Design Team will choose their top four picks, with the winner being invited to join us in a Guest DT spot at The Funkie Junkie Boutique Blog and three additional outstanding entries will receive Top 3 Badges to display on their blogs. Everyone who enters and follows the rules will be entered into the draw to have the chance to win a $25 spending spree at The Funkie Junkie Boutique.

Rather than go with crackers, which are pretty much a 'one and done' when used (so not the best environmentally) I decided to make gift boxes that can be refilled and will sit on the plates of each of the family members sat around our Christmas table this year. 


The base for this box is Eileen Hull's Gift Box which when cut from mount board forms a sturdy surface ready for decorating and will stand up to being stored for 11 months of the year. I painted the edges with 'Black' Acrylic Paint (Dina Wakley Media) before dry brushing them with the 'Gilt' version.


To decorate the sides, top and bottom of the box I cut squares of kraft card, stamped them with Wendy Vecchi's 'Register' Background Stamp in 'Barn Door' Archival Ink and embossed them with the Sizzix 'Tileable' 3D Embossing Folder - giving the card a light mist with water ensures the embossing is really crisp and deep. The embossed card was covered in a thin coat of soft gel medium to act as a resist when I added a coat of 'Umber' Acrylic Paint. After allowing the paint to settle into the embossed parts I wiped away the excess to reveal the colour underneath. To finish more 'Gilt' Paint was dry brushed over the surface and the 'Barn Door' Archival Ink pad was lightly rubbed over, at which point the embossed squares could be glued onto the faces of the box.


To decorate the top of the box I used the 'Winter Poinsettia' die to cut four of the larger flower shapes and eight of the smaller ones from more kraft card. The top three layers were painted with 'Sedona' Acrylic Paint whilst the bottom layer had a coat covered with a mix of 'Evergreen' and 'Olive' Acrylic Paint. For the centres I used a gold paint pen to colour the stamens and added cabochons altered with 'Coral' Alcohol Ink. Holly leaves were also cut from kraft card using the same die and were painted with more of the 'Evergreen' and 'Olive' Acrylic Paint. It really helps to shape the petals and leaves before adding colour to them.


To finish the decoration the flowers and leaves were nestled between 'Antique Gold' Mesh Ribbon and white needles cut using the Sizzix Thinlits 'Hidden Leaves' Die Set. Once glued into position the top of the box was misted with some Seth Apter 'Goldmine' Izink Die Spray. White cotton lace was soaked in dilute 'Sedona' Acrylic Paint and dry brushed with the 'Gilt' version before being glued around the centre of the box.


So that's my take on the theme 'Deck The Halls'. My talented team mates have also come up with their own festive projects for this challenge so make sure you hop on over and check them out HERE. And remember to link up your own shabby chic or vintage pieces to be in with a chance of winning one of the fabulous prizes that's up for grabs.

Thanks for visiting,
Jenny xxx

Products used to create this gift box are available from The Funkie Junkie Boutique and are listed/linked below.

Drusy Resin Dome Seals Cabochon Round Gold 12mm- Set of 5

25 November 2020

A Time to be Grateful at The Funkie Junkie Challenge Blog

Hi everyone and welcome. It's time for another challenge over at the The Funkie Junkie Boutique Blog. Suzz is your host for this one and with Thanksgiving fast approaching in the US she's called it 'A Time to be Grateful'. "Around this time of the year when we start to get into the holidays and the rush of everything it is a good time to reflect on what we are grateful for. My challenge to you is to capture that in your art. Show what you are grateful for in any type of project, it could be a journal page, a card, or anything else that expresses your gratitude. You choose how to show your thankfulness and share it with us."

As ever, the Design Team will choose their top four picks, with the winner being invited to join us in a Guest DT spot at The Funkie Junkie Boutique Blog and three additional outstanding entries will receive Top 3 Badges to display on their blogs. Everyone who enters and follows the rules will be entered into the draw to have the chance to win a $25 spending spree at The Funkie Junkie Boutique.

Reflecting on the many things to be grateful for I decided to thank and celebrate those people I count as my good friends in my journal.

(click on the image to see this in even more detail)

And here are the individual pages close up;


As ever I took some photos of the process taken to create this journal spread, starting with a session creating Gel Plate prints with Dina Wakley Media Acrylic Paints. I chose a range of coordinating pastels that included Sand, Heather, Buff, Mineral, Rosy, Elephant and Eggplant (to add to the depth of some of the prints) and pulled a mix of small pieces on white tissue paper.


To add decoration to some of the prints I used four of Wendy Vecchi's Background Stamps. The 'Tiled' stamp was used with paint to imprint on top of pulled prints.


Here I used the 'Register' stamp on some pulls to add text with a pale grey Archival Ink.


The 'Wire with a Twist' stamp was pushed into the wet paint on the Gel Plate before the print was pulled.


The 'Old Quilt' stamp was used with some of the Mineral Paint on top of a pulled print.


Having created a patchwork of tissue prints on the two sides of the journal spread I set about stamping the flowers, using Wendy Vecchi's 'Simple Reality' flower stamp with a dark brown Archival Ink. Some brown watercolour paint was used to add shading to the leaves and I drew over some of the edges with a white gel pen.


After initially considering using a deeper purple shade for the flowers I went with a subtle contrast of pale blue, stamping the flower onto the printed tissue a couple of times with the same Archival Ink as the ones on the page before cutting them out and adding a little white gel pen detail to the centres. These were then stuck over the ones on the page.


With the flowers in place I used coordinating Archival Inks to stamp some of Tim Holtz 'Ornate Trims' across the spread, joining the two parts together and leading the eye across the pages. They were enhanced with more white gel pen highlighting.


The words expressed the gratitude I have for my friends and came from Wendy Vecchi's 'Friends & Art' Stamp Set.


Finally I added a little Venise Lace trim and dots of Wendy Vecchi's 'Cornflower Blue' Liquid Pearls.


So that's my take on the theme 'A Time to be Grateful'. My talented team mates have also come up with their own gratitude projects for this challenge so make sure you hop on over and check them out HERE. And remember to link up your own shabby chic or vintage pieces to be in with a chance of winning one of the fabulous prizes that's up for grabs.

Thanks for visiting,
Jenny xxx

Products used to create this journal page are available from The Funkie Junkie Boutique and are listed/linked below.


19 November 2020

Felt Christmas Pocket for Eileen Hull Designs

Hi everyone and welcome. This month Eileen's Inspiration Team are sharing 'Seasons Greetings' with our festive themed makes. For this one I've experimented with using felt as the base for a Christmas Pocket using Eileen's Sizzix Scoreboards 'Box, Post' XL Die. Here's the finished soft pocket that has a button closure.


The basic shape was cut from Kunin Eco-Fi Plus Felt in that beautiful deep grey Granite colour; since it's a heavyweight felt it can hold the shape and structure of the pocket. To bring more interest to the background I added some grey lace along the main edges and a patchwork of painted tissue pieces in a  using soft gel medium securing it in place with decorative stitching.


Taking inspiration from an accordion Tiny Book created earlier this year I included felt 'trees' using Eileen's Sizzix Scoreboards 'Spring Leaves' L Die and little houses using her Sizzix Scoreboards 'House Ornament' L Die. These were stuck onto the patchwork background using dry adhesive - I'd recommend using something like Bondaweb on the back of the felt before die cutting it to make application easier.


Eileen has shared her passion for using embroidery stitching and it's infectious! French Knots became falling snow and Satin Stiches were used to cover the roofs with a wintery touch. It is much easier to sew through the felt base before it has been assembled.


With the decoration completed the pocket was ready to be assembled. I stuck strips of card onto the base and side sections to strengthen them further before adhering some dark grey interfacing to the inside to cover the stitches. Once thoroughly dry the sides were glued together and I did some 'invisible stitching' with grey cotton thread to ensure they didn't pull apart over time. A buttonhole was machine stitched onto the flap closure with a button added to the front of the pocket to complete the closure.


You can see all of the amazing projects that Eileen's Inspiration Team have made this month using her new dies by visiting Eileen's website.

For now, thanks for visiting,
Jenny xxx

Eileen Hull Designs Sizzix Scoreboards XL Die 'Box, Post' available in the UK at Country View Crafts and in the US at The Funkie Junkie Boutique

11 November 2020

Celebrate with The Funkie Junkie Boutique Blog

Hi everyone and welcome. It's time for another challenge over at the The Funkie Junkie Boutique Blog. Cec is your host for this one and she's called it 'Celebrate'. "Your challenge is to create a shabby chic or vintage project to celebrate someone or something special. Since celebrations are happy occasions, your project should be made with lots of happy, bright colours. Keep your dull or neutral colours to a minimum please because as winter approaches we will have lots of that naturally so your bright colours must be predominant."

As ever, the Design Team will choose their top four picks, with the winner being invited to join us in a Guest DT spot at The Funkie Junkie Boutique Blog and three additional outstanding entries will receive Top 3 Badges to display on their blogs. Everyone who enters and follows the rules will be entered into the draw to have the chance to win a $25 spending spree at The Funkie Junkie Boutique.

It seemed a good chance to make a start on getting some celebratory festive cards made - glory only knows how long it will take to send things abroad so as soon as it's safe to do so these will be in the post! They feature Eileen Hull's Snowman and the required bright colours.


Here's a brief tutorial showing how these cards were created. I started with some colourful textured card created in a previous Saturday Showcase and using a mix of Seth Apter Izink Pigment Inks and ICE by Aladine with a little acrylic paint. The card was cut into six strips ready for adding to the six A6 size card blanks.


To coordinate with the colourful strips I pulled out a piece of paper that had previously had some paint printed onto it (a Gel Plate fail!) and added layers of Izink Pigment Ink in blue and white. Having splattered it with the gold the paper was cut into six pieces (with a tiny offcut strip) ready for adding to the card blanks.


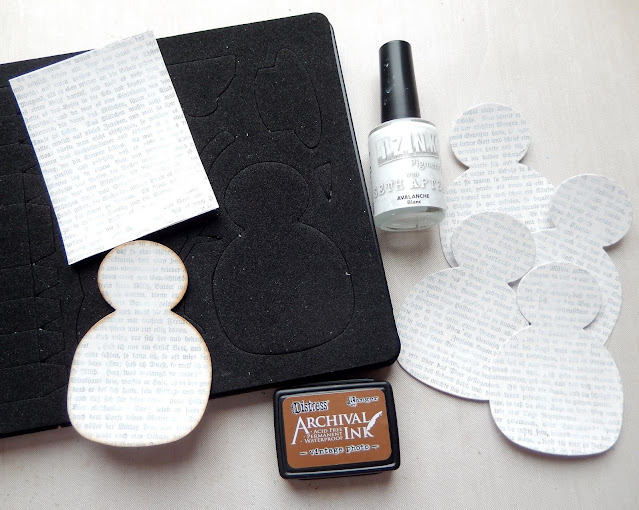
Moving on to the snowmen I stuck some text from an old German fairy tales book onto card and toned it down by spreading a thin layer of  'Avalanche' Izink Pigment Ink over the top. The snowman bodies were cut using Eileen's die and edged with 'Vintage Photo' Archival Ink.


The hats were created by using Eileen's die to cut card painted with 'Sky' Dina Wakley Media Acrylic Paint and 'Thundercloud' Izink Pigment Ink - there are hat two options available on the die.


Eileen's die also cuts the eyes, nose, arms and two different styles of scarf for the snowman. The ones cut for these were coloured with more Izink Pigment Ink.


Having stuck the backgrounds created earlier onto the card blanks I stamped a Tim Holtz 'Ornate Trims' border on either side of the coloured strip and added a greeting from his 'Yuletide' stamp set above it.


The snowmen were assembled and added onto each of the cards to complete them.


So that's my take on the theme 'Celebrate'. My talented team mates have also come up with their own celebration projects for this challenge so make sure you hop on over and check them out HERE. And remember to link up your own shabby chic or vintage pieces to be in with a chance of winning one of the fabulous prizes that's up for grabs.

Thanks for visiting,
Jenny xxx

Products used to create these cards are available from The Funkie Junkie Boutique and are listed/linked below.

Related Posts Plugin for WordPress, Blogger...