29 April 2016

Going Live!!!!...

Hi everyone and welcome! In my last post I promised some exciting news and it's time to share - I'll be doing my first live shows on Hochanda this coming Monday 2nd May at 11am, 2pm and 5pm!!! It's a huge honour to have been entrusted to represent IndigoBlu in this way and I've been working hard to come up with new demonstrations to share. A huge thank you to my lovely team mate Elizabeth Robinson who has also worked her socks off to create the most beautiful samples. Here are some sneak peeks of what's in store...


I hope you'll be able to join me on Monday, 2nd May online at www.hochanda.com on Sky channel 663 or on FreeSat channel 817.
There will be special offers for anyone wanting to shop and a giveaway on each show too!!!
Crossing fingers that I'll see you there! Jenny xxx

27 April 2016

It's Not Easy Being Green for Frilly and Funkie

Hi everyone and welcome! Have we really already reached the middle of the week?! Over at Frilly and Funkie we are celebrating Earth Day with a recycling theme 'It's Not Easy Being Green'; for this challenge you can create any type of project as long as you UPCYCLE or re-cycle something. Re-purpose an existing item, recycle an element that usually would be thrown away or use your paper scraps in a creative way. 

The winner will earn the chance of a Guest DT spot here at Frilly and Funkie, and everyone who enters and follows the rules will go into the draw for the chance to win a $25 spending spree at The Funkie Junkie Boutique. And there are Top 3 Badges for three further outstanding entries, chosen by the Design Team, because choosing just one winner is so hard!

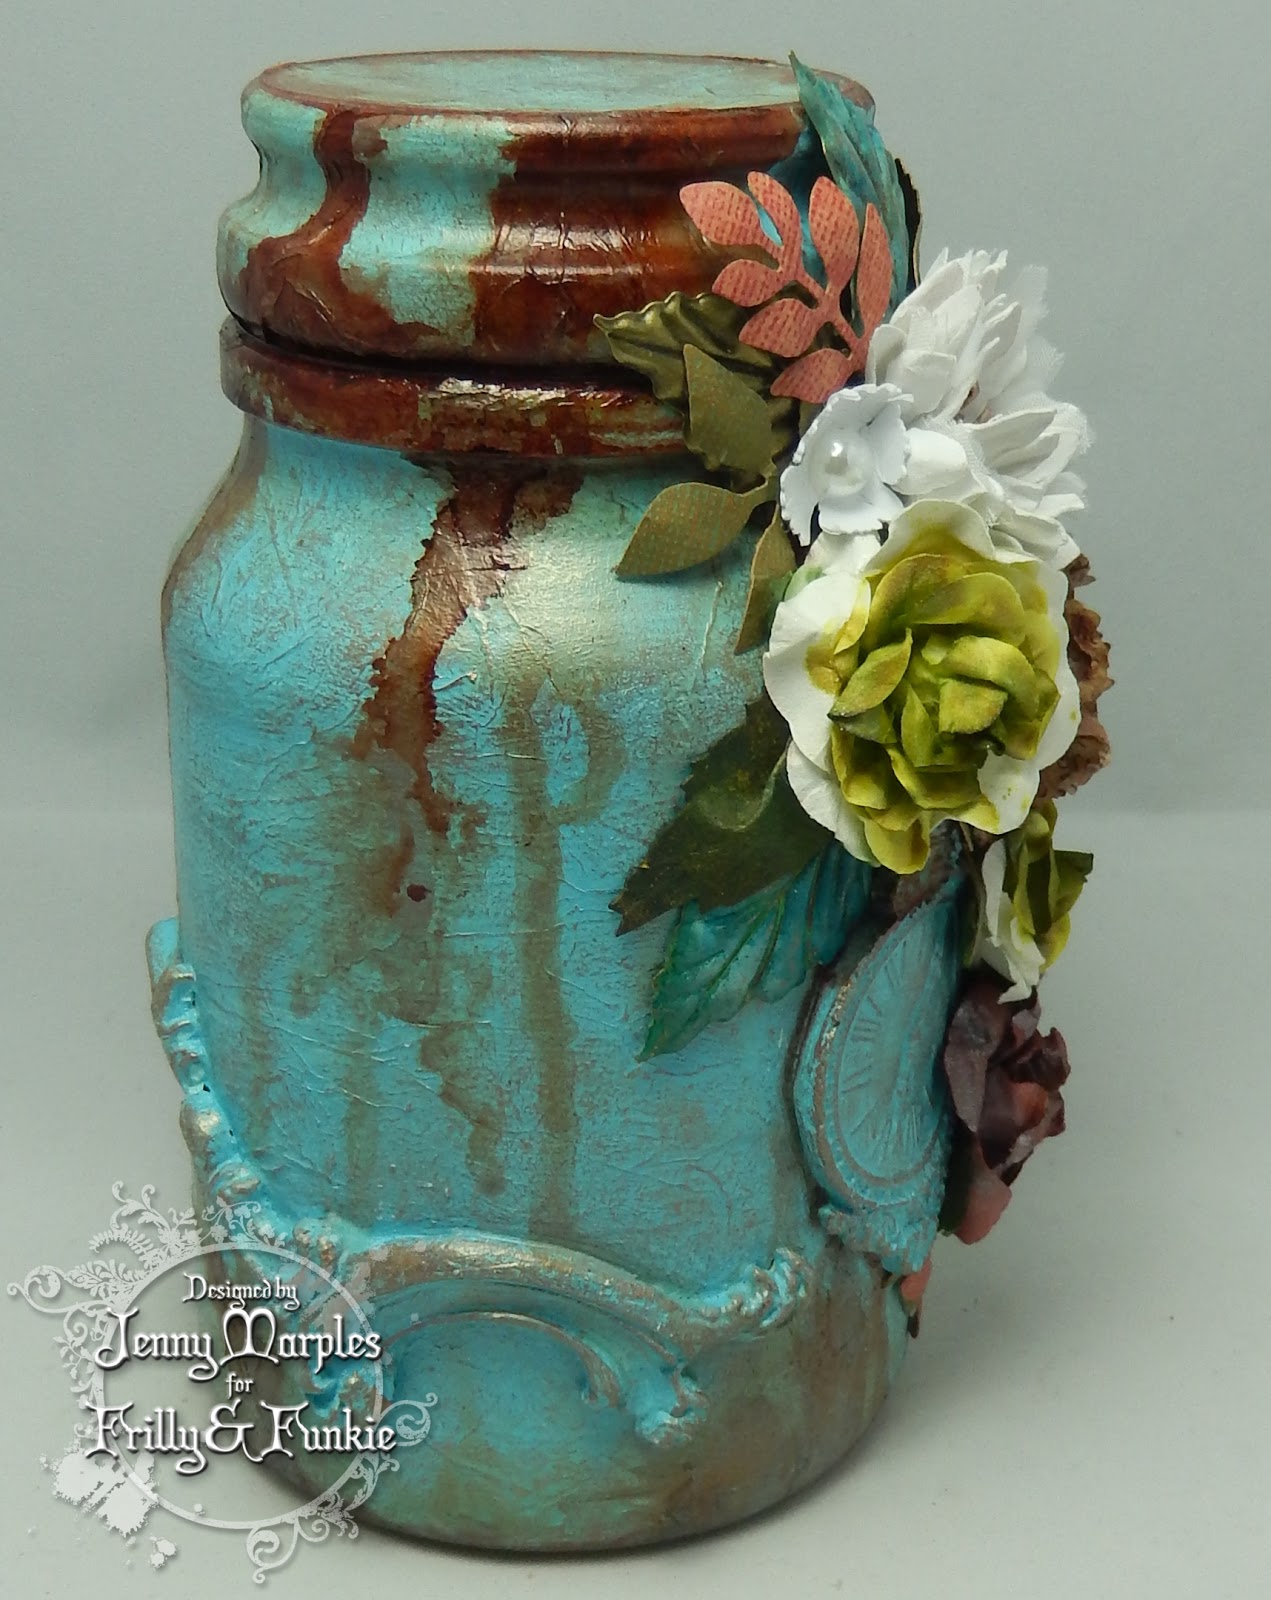
In our house we seem to get through copious amounts of coffee so the lovely large jars are soon emptied. With one of these to hand it was a great time to utilise my new Prima IOD moulds and Paper Clay to create this...


And this is where it started...


The jar had a base of tissue and gesso, the Prima moulded embellishments (love that little clock) Broken China Distress Paint, dry brushing with Pheasant Bronze paint and dribbles of Rust Alcohol Ink. With the base complete I had planned to add some Petaloo flowers but... plan B - handmade flowers, a couple of shop bought ones and some brass leaves came into play instead. As well as using Kraft Core card I added colour to the blooms with Lindy's sprays and the stamens have Liquid Pearls added to the ends. If you want a quick project I highly recommend pre-made stems of flowers but if you've got time and a hot glue gun the bespoke handmade ones are very satisfying.


Now what can you rescue from your recycling bin to transform into a thing of beauty? Is there something that's destined for the bin that really could be given a second lease of life? My talented team mates have more inspiration for you over at Frilly and Funkie and then it's over to you!

Right, I'm off to get lots of prep done ready for ... more news tomorrow!
Whatever you're up to take care of yourselves. Jenny xxx


25 April 2016

Creating is an adventure...

Hi everyone and welcome. The month is almost up and I just had to join in with Tim Holtz' April 2016 Tag challenge. The Distress Paper Mosaic Kit has been in my possession since the beginning of the year and (to my shame) I haven't made time to play with it, so this challenge was the perfect excuse. The original intention was to create a floral version but with so many wonderful examples already shared I decided to take a more masculine route - without further ado here's my finished tag canvas, Dapper style...


The background may be embossed with the Tiles Embossing Folder rather than woodgrain but it used the same colour scheme as on Tim's original tag. I carried the Tumbled Glass colour onto the edges of this deep sided canvas by using the Distress Paint version. The Paper Mosaic grout was easy to apply in a strip directly onto the canvas and picked up some ageing from the application of a little Distress Ink (Vintage Photo). Being a 'straight line' kinda gal I used the Mosaic Bigz Die to cut the Dapper paper pieces (so much easier than hand cutting for once!) and glazed them when dry. The glaze is definitely different from regular Glossy Accents and dried relatively quickly too.


I didn't want to hide much of the mosaic detail in the background so the new Tim Holtz Ornate Frame  #2 (embossed using 'the Shelly Hickox Tarnished Silver method) was left open to allow the strips of Dapper paper and my Found Relative to sit comfortably atop it. The stars looked much better with Paula Cheney's Mushroom Alcohol Ink suggestion added and the ribbon 'belt' was included as a salute to Tim's original design. I thought the Big Chat words would allow the viewer to come up with their own stories for this kindly gentleman. It occurs to me as I start to build a small collection of 8x8 canvases that they could be worth putting up for sale?


So clearly this is being entered into Tim Holtz' April 2016 Tag challenge.
And perfectly the latest Simon Says Stamp Mondy Challenge is Show Us Your Metal.
I was thrilled to have been chosen as last month's winner over at Rhedd's Creative Spirit with my Carte Blanche canvas
and will be entering this latest canvas into their April - Anything Goes Mixed Media Challenge.


That's it for today. I'll be back on Wednesday with my DT contribution to the current Frilly and Funkie recycling challenge.
For now, have a great week and take care of yourselves, Jenny xxx

20 April 2016

Just Testing...

Hi everyone and welcome! During this week the IndigoBlu International DT each get the chance to share a second project with you on their own blogs. For my contribution, and using a 6"MDF panel I took the chance to test one of the latest IndigoBlu stencils and some of the new paint colours...


This Roses Stencil is a 'ready to go' floral background with large blousy blooms covering the whole square beautifully. So whether you want to keep it simple and swipe paste or ink through it, or go to town as I have here, you'll not need much else to top it off. Having put Fine Modelling Paste through I covered the whole base with Black GeeSso Good Gesso as a primer. Then came layers of other matte IndigoBlu Acrylic Paints; Banana Custard, Postbox Red, and the new ones, Mulberry Bush and Lemon Meringue.


The great thing about having used a stencil - you can use it to add White GeeSso Good Gesso specifically to the raised roses (and black onto the spare leaves on the right). More black and white gesso around the edges and through the middle using a ruler with splatters of course gives the finished design a geometric look. And, keeping it simple, I die cut some black leaves using Coal Black Stamping Card and stamped one of the Word Blocks #1 in Claret StazOn ink on card painted and edged with gesso.


This is my contribution to the shared posts this week. Now I urge you to hop on over to the IndigoBlu blog and catch up on what the rest of the Design Team have created - they've risen to the task supremely once again!

And I'm pleased as punch to let you know that my latest set of cards, using IndigoBlu's 'Colour Me' floral stamp range, has been published in the May edition of Making Cards Magazine - in your shops on Friday!

Thank you so much for joining me today. Whatever the rest of the week holds for you I hope you get the chance to have some of your own creative fun and, of course, take care of yourselves. Jenny xxx

19 April 2016

Feature Artist at Anything But Cute


Hi everyone and welcome! Today it's a real thrill to have been invited to be a Feature Artist over at Anything But Cute. Hosted by the lovely Samra, the theme for this month's challenge is 'Earth Day' so I've created a little something to celebrate the event.


To see my tutorial for this (plus a few more of my tips on using Distress Crayons) make sure you head on over to today's post at Anything But Cute. Then I urge you to take a look at the amazing 'Earth Day' creations from the Anything But Cute Design Team HERE before joining in the fun too.


And as luck would have it the latest Simon Says Stamp Monday challenge is Butterfly Beauty so I'm entering with this!

Thank you for dropping by and whatever you're up to today, take care of yourselves. Jenny xxx

16 April 2016

Genuine Endeavour...

Hi everyone and welcome. The adventures of the Dapper gentlemen continue and I've another to share with you today. I went dark and bold here with Distress Paints and those fabulous Dapper papers to help tell a little of the story of Pádhraig...


Pádhraig arrived in New York in the early 1900's having left his home and family back in Ireland. He was in search of a challenge, success and a positive future, something which had alluded him in Sligo where opportunities were limited for someone of his position. So many of Pádhraig's compatriots had gone before and tantalising stories were often told about those who had carved out new lives for themselves. He, and the thousands from Eastern and Southern Europe arriving alongside him were starting a new chapter, much like the city itself; the new subway system and bridges linked people to and from the ever-climbing skyscrapers. Pádhraig found himself as an apprentice at a high class tailors, learning the basics of making bespoke suits and shirts before progressing to serving the store's clientèle. Of course that required him to ensure his own attire be immaculate and he quickly became a very 'dapper chap' with plans for the future...


I admit this background was a very happy accident and a lesson in perseverance; I layered up one of the navy coloured sheets of Dapper paper with some sewing related Ephemera (some of which got covered up eventually to stop the whole thing looking cluttered) and applied layers of Chipped Sapphire and Fossilized Amber Distress Paints. With some of the more Fossilized Amber Paint added through the Measured Stencil the paper took on a lovely sheen, the perfect foil to the matte layers on top. By the way, if you cut out your Found Relatives remember to save the remaining pieces as you can turn them over and use them for layering as I've done here. The Remnant Rubs, Industrious Stickers, Flash Card and other Idea-Ology elements really lifted it all and of course there had to be some stitching!


I'm entering Pádhraig into the following challenges;

Well that's another Dapper gentleman in the bag, and there's another waiting in the wings to be shared shortly. If you are in the mood to make something male orientated or have just finished creating one don't forget it's all about the boy over at Frilly and Funkie right now, with prizes and badges to be won; can't wait to see what you come up with!

I'll be back next week with an exciting Guest Design spot and a new IndigoBlu project.
In the meantime have a great weekend whatever you're up to and take care of yourselves. Jenny xxx


Related Posts Plugin for WordPress, Blogger...